I. Introduction.
This is my first model ship, and my first model of anything since adolescence. I'm in no particular rush to finish her, although I do have a personal goal of completing the model before summer. Want to say thank you in advance for all of your guys's posts and advice collected on this forum; part of the reason I feel confident enough to begin this project is because of the wealth of information I have discovered here and across other hobbyist forums. Again, thank you!
I have two major goals. First is to treat this project as a learning experience. I do not expect perfection, but I do expect to learn. Point of fact, I'm approaching this much the same way I approach a new recipe: give it a shot, learn about what works and what doesn't, jot down notes so next time things go more smoothly.
The second goal is to end up with something aesthetically pleasing vice something historically accurate. While I respect the history of sailing tremendously, and enjoy sailing myself when I find the time, my intention is to end up with something that, well, looks nice. So if certain choices are ahistorical, so be it (within reason -- I'm not going to put miniature jetpacks on deck).
A. Why this model?
I chose the Amati Rainbow because, one, I love the J-class's aesthetics (see aforementioned goal 2) and internet research indicated Amati's model was approachable for the novice (see aforementioned goal 1). In addition, I have seen a few other Amati J-Class models being built both here and on youtube, upon which I fully intend to rely. Put directly, the Amati J-class is well-trod ground, and I hope to learn from the successes (and mistakes) of the good people before me.
B. Tools, materials, and so on.
I have not purchased much in the way of tools, though I have some very simple woodworking tools from other hobbies, including a nice sanding block, some knives, files, and so on. I generally plan on ordering what I need as I go, rather than buying up everything all at once and likely finding that some tools are unnecessary.
In addition, the Amati model I purchased comes with a few random tools, and the store my wife purchased this from threw in some wood glues etc.
C. Experience.
Very minimal. I have enjoyed woodworking with handtools, mostly carving, and I feel fairly comfortable with finishing (shellacs, gels, and so on). Otherwise, I am a complete novice.
II. Unboxing.
The Amati box has nothing in the way of filler or protective foam, but everything is in one piece (a minor miracle, given this was shipped through the APO system quite literally across the world). Scale is 1:80, total length is 46 cm. Kit number, for future reference, is 1700/11.
A. Instructions.
The main instruction booklet is in Italian, with a booklet providing English translations to match the main instruction booklet. That is a bit confusing, so to explain it simply, the Italian booklet contains instructions and pictures; the English booklet has the instruction text only, meaning that I will be using the Italian booklet for pictures and English booklet for instructions.
There are two large diagrams for sails / rigging, and then the blocks and tackling on deck. Too early to tell how clear these diagrams are, but I can already tell I'll very much appreciate their generous size, which would seem to make these smaller parts easy to see.
B. Included tools.
Just FYSA, the included tools differed marginally from the tools pictured on the box, but I don't know how much I care. The quality appears mediocre, and I expect I'll mostly be tossing them eventually. But for the sake of the bank account I'll give them a fair shake before determining whether to replace them.
C. Punchboard
Is punchboard the appropriate term? Whatever it is, the plywood (I believe) boards with the wooden parts are lasercut, which will require sanding. No big deal there. I have labeled all the parts with pencil corresponding to their piece number in the manual.
D. Tackling and blocks, etc.
All come in sealed plastic baggies, further placed in molded plastic trays. A nice little touch I didn't expect, should help keep things a bit organized. I have a feeling I'll be using the plastic trays for mixing paints and glues more than for actually holding all the little bits in plastic baggies, but we'll see.
III. Keel Construction.
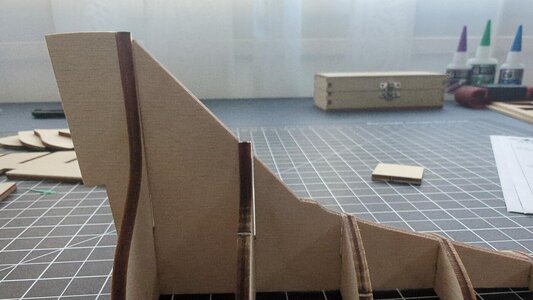
Using a scalpel I removed the main portions of the keel (pieces 1, 2, and 3) as well as reinforcements (pieces 5 and 7). I sanded any abrasions flat. Interestingly, there is a minor discrepancy between the cutouts and the instructions -- piece 5 in the instructions is one rectangular part, while the actual parts I have are split into pieces 4 and 5, each of which is square. I examined the manual and made sure part 4 is not used elsewhere, and I will likely use it to reinforce the keel alongside piece 5.
In multiple posts from various places, builders have routinely emphasized keeping the keel straight, without bends, which could affect the shape of the ship and ruin the model. Mine appears to sit quite flat, though I understand glue can warp as it cures, so I will be keeping a lookout for that before gluing any of the frames into place. Might be overkill, but I'll be clamping the reinforcements as well, just to be sure nothing goes awry. Would hate myself if I ruined the model on the first step!
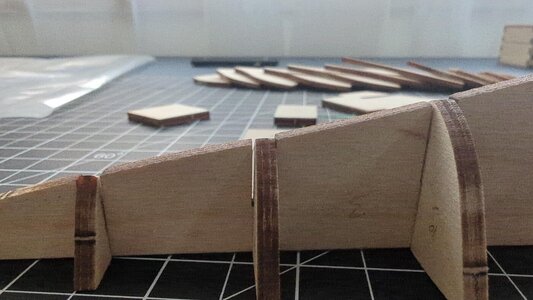
The only bend is a slight dip, which you can see below (note the white line running from bow to stern, showing a gap in the middle section of the keel). I think that's okay? In examining the plans, there does appear to be a slight dip, though unsure whether this is natural. I could sand it down flat, but I an concerned that the amount of wood I would have to take off (particularly at the stern) would significantly weaken the place where the final frame attaches to the keel.
In any case, welcome tips on this particular issue! I have to order wood glue from Amazon and it takes about two weeks for packages to arrive at my destination, so I'm not in any rush.
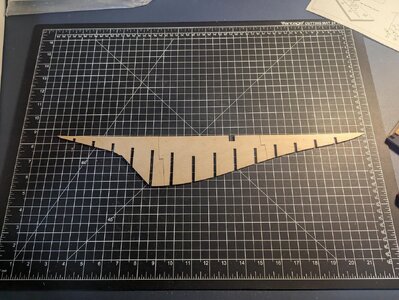

Note the slight dip along the upper keel. The bow and stern are both aligned on the same white line, but the middle of the keel dips slightly.


