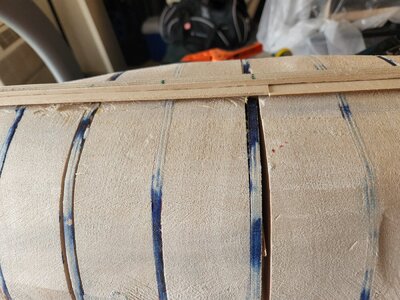
Fairing (beveling bulkheads) - help

Joined
Jan 9, 2022
Messages
574
Points
308

Location
Winter Haven, FL
I'm having trouble understanding how to correctly do this.

Example: model bulkheads 1 through 3 at the bow. I start beveling 1 and 2. Then 2 and 3.
What I don't understand is how does bulkhead 2 get beveled correctly (and not rounded)? I can't seem to understand how bulkhead 2 can have the correct bevel for both bulkhead 1 and bulkhead 3. It seems that there would be two different angles on bulkhead 2 - (1-2 and 2-3.) Can't seem to understand this. I've ended up taking too much off bulkhead 2 and then have to glue a strip on it to bring it back out.
 
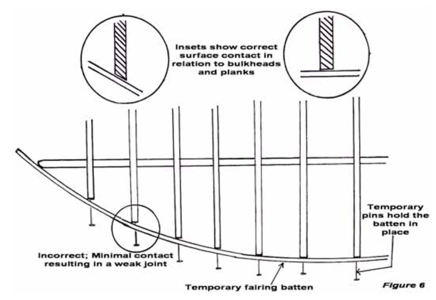
There is a slender arc at frame two, but it is almost imperceptible. The edges of each bulkhead are sanded to match the inside surface angle of a plank, or in the case below, a temporary batten simulating a plank. The batten can show you how shallow or sharp the new angle of the bulkhead's edge must be to offer support to the plank and surface area for the glue to bind to and hold the plank in position. Download and read the attached guide on hull planking below.

1673555431761.png
 

Attachments

  • plankingprojectbeginners.pdf
    1.9 MB · Views: 121
Thanks Kurt. Do I run the sanding block across bulkheads 1-3 until they look good, then 3-5 and so on? Or do I start at bulkhead 1 and keep the block going until I reach the 'dead flat' (think that's right) bulkhead.
 
Thanks Kurt. Do I run the sanding block across bulkheads 1-3 until they look good, then 3-5 and so on? Or do I start at bulkhead 1 and keep the block going until I reach the 'dead flat' (think that's right) bulkhead.
If the bulkheads near midships already have edges which will lay flat against the insides of the planks, there is no need to sand them. As you get closer to the bow and stern, that is where the angles of the bulkhead edges grow more extreme. Use a temporary batten to test the edges of all the bulkheads all along the edge surface to make sure your are done fairing the edges in before you start planking. The first hull you do is always the scariest and the model that generates all t he questions. Later models get easier very fast.
 
Rob, I have found a long wood file or what I now use is cheap fingernail file boards, as they come in all grits.

You can work one frame at a time, but easier to cover two or more at a time to help keep the angle from becoming too sharp or too shallow.

Us a thin plank or scrap trim of wood as shown in drawing to check and test often, easier to file more then add some back...ask how I know.
 
Kurt Konrath is spot on with regard to painting the edges before you sand or file them. As you remove the black paint, you can see where you've removed wood and where you haven't. This will prevent your from sanding off too much in one spot on the edge of the one of the bulkheads and creating a flat spot which you will have to repair by adding shim wood to the bulkhead edge or filling over the first planking layer to fill in the low spot.

As you add first planking, always stop every so often and check your hull symmetry by looking down the bow and the stern ends of the model. Make adjustments in planking to keep both sides symmetrical as you add pairs of planks, port and starboard, to form the hull.
 
I don't know if this will help or confuse the issue but here is my method
I assume, hopefully, that the frames drawn from the ships lines and that the frames rear faces are accurate.
There are usually a couple of identical frames at the centre which is where I start.
I mark the rear of the frames facing centre, for and aft, with a marker of your choice.
let's say there a 5 frames from centre to bow. Frame 1 is at the bow.

I file Frame 5 ,using the rear of 4 a target , keeping the mark at the rear of BOTH the frames . That gives me a bevel for frame 5
I repeat this along to frame 1 and the bow and use the same for the stern..Centre to rear
Works so far for me ....
or we could pressure the kit makers to engrave a bevel on the frames as some starting to do
 
There is a complete and comprehensive tutorial on how to fair a hull in my build log. It starts with Post #200.

 
EDIT: Heinrich's post is a great visual example of "before and after". He posted while I was writing my version of War and Peace!

Reading everyone's response and advice, I agree with most of it. Painting the edges of the bulkheads is something I do as well.

Two other things I've found are critical; 1) use a sanding block that does NOT bend, it must be ridged, 2) it should span 3 bulkheads, this prevents large angle variations and also prevents one bulkhead from being over sanded.

The objective is to create a smooth hull surface, with "gradual" changes from stem to stern AND lower wale to keel. This job can be made harder or easier, depending on the number of bulkheads on the model. Given two models of the same hull length, if one has 15 bulkheads and the other has 10, the model with 15 will be much easier to work with. That is because the gaps to bridge between the bulkheads are shorter/smaller. Many modelers, including myself use wood blocks that we insert into those gaps between bulkheads to create a pseudo solid hull. The blocks are cut to a rough shape and then sanded along with the bulkheads. For me personally it helps me "see" visualize the curve of the hull.

I never sweat making mistakes. I make them all the time. But we are working with wood. High spots are sanded, shims are placed to close low spots. If we really do learn from our mistakes I have to be smart! Just a couple of photos I hope help.

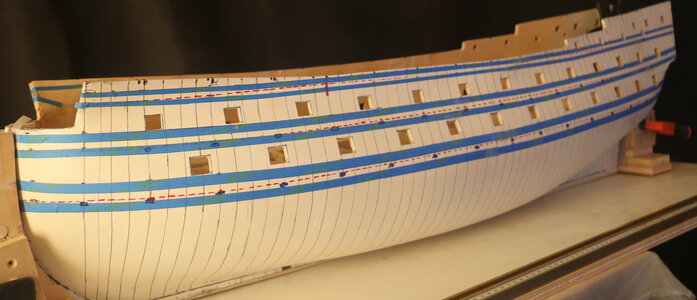
Rough shaped blocks between bulkheads, the bulkheads marked with "sharpie blue" and then rough sanding. 20220402_123629.jpg20220504_150403.jpg
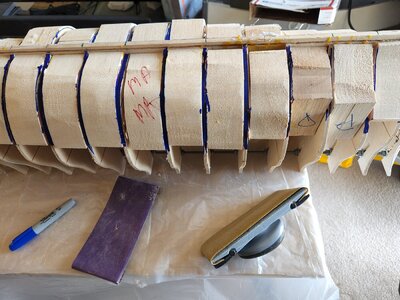
Running a batten to check bulkhead edges. Ideally, the batten should span the entire length of the ship's hull. I was waiting for wood of that length but could not wait to see if I had any real bad issues. I later checked with a full length batten.
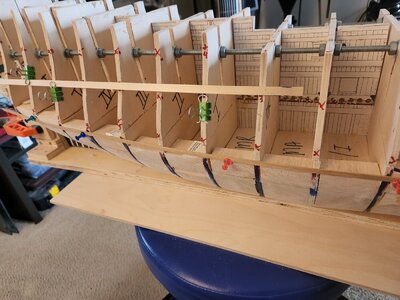
20220502_153530.jpg

For me, this phase of modeling work is not exciting at all. But it may be the most important. Done right, you'll see the beautiful lines the shipwright saw. Not done correctly, and the mistakes will be evident as high or low spots or a "wavy" appearance when you look down the length of the ship. But.....never fear!! If you are working on a kit, there is a good chance you will have two (2) layers of planking, a foundational layer and a thin veneer finish layer. Any mistakes will be evident after the first layer, and you're working with wood. High spots can be sanding and low spots can be filled with wood filler.

I see hull fairing more of an art than science. The more you do it the better you become at it. And maybe the final thing is, don't rush. Take your time. If you get frustrated, like I do sometimes, go take the dog out for a long walk and come back with fresh eyes and new energy.

Try and visualize what it will look like finish, or at least when the basic hull is finished. As ugly as the photos above are, I'm fairly happy with the lines of the finished hull once done. Not completely absent of mistakes but a result I can live with.
IMG_0271.JPG
 
The beveling of the bulkheads is our first lesson in relationships between structures in the ship model. The primary requirement is to create flat surfaces for attaching planks to each bulkhead. So the measure of accuracy is how well a plank sits on the bulkhead edge from bulkhead to bulkhead. I also make up a sanding block to help shape the edges in relationship to each other. I get a piece of wood a few inches longer than the width between the bulkheads…about an inch wide…and a few inches deep. I then glue a strip of sanding paper on the edge of the wood. Then I can sand the edges of at least two bulkheads in relation to each other. If you want to sand three edges just make your sanding block longer. Constantly check how well a plank sits against each bulkhead in relation to each other with a piece of planking strip. The secondary result of sanding the bulkhead edges is the smoothing, or “fairing” the curve of the hull from bulkhead to bulkhead. Anyway, a block of wood 7 or 8 inches long with a strip of sanding paper attached helps me sand each bulkhead in relation to each other…I use 120 grit sandpaper…
 
Thank you Heinrich, Hoss6262 and danielsje. All good advice. Nice looking hull Ken. And Heinrich from your post: "To most modelers, fairing means grabbing a sanding block and merrily (or not so merrily) sanding away at the bulkheads from bow to stern according to an imaginary visual line." ROTF That's me!! (but not anymore! Thumbsup)

My fairing will certainly improve from all the excellent advice provided by everyone.
 
There is a slender arc at frame two, but it is almost imperceptible. The edges of each bulkhead are sanded to match the inside surface angle of a plank, or in the case below, a temporary batten simulating a plank. The batten can show you how shallow or sharp the new angle of the bulkhead's edge must be to offer support to the plank and surface area for the glue to bind to and hold the plank in position. Download and read the attached guide on hull planking below.

View attachment 350894
Thanks for this, I've just printed it, & on reading through it, I found it to be the best explained method that I've read so far. I hope my next ship will benefit & not have 'pointy' planks!:)
Stuart
 
Oh…we all know things will be ugly before they are not! Hull sanding is one of those things. Sanding bulkhead edges and then the attached planking just takes patience to get from ugly to nice.
 
Back
Top