Disclaimer, i am not an expert on this, i have gathered some knowledge during my research, and i can try to ansswer any doubt, but let it be clear that i am not an expert on the subject
I've decided to try and do a diode laser cutter, that would actually cut to a certain extent, second disclaimer, this is not a CO2 laser, this is a diode laser, expectations need to be set accordingly, this will never be the fastest , most powerfull, or fail proof machine.
So i started by buying and assembling a CNC frame, this one came already with a controler, and it doesn't have the laser module, wich is what i wanted, since i'm building my own laser module.
link: https://www.banggood.com/EleksMaker...p-1027611.html?rmmds=myorder&cur_warehouse=CN


Now for the laser itself, starting with the diode, i bought the nubm08
link: https://www.ebay.com/itm/262893062600
The diode comes with a casing that nees to be removed, this is done with 2 pliers, and a "snapping" movement
Diode with casing

and the diode without the casing

Those filaments are quite fragile, do not touch them, don't let anything touch them
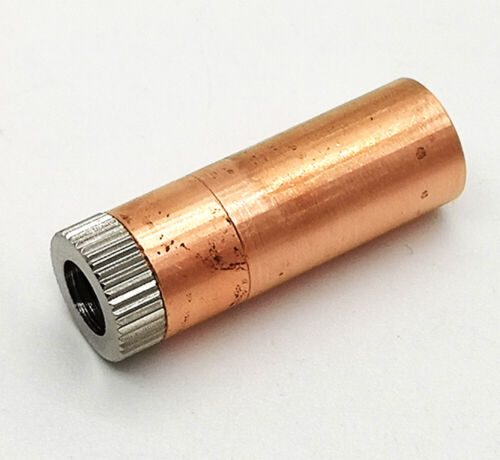
The following step is to press fit the diode on a jacket, i've chosen a copper jacket, i believe it is better than brass for termal conductivity, there are sizes to the jackets, you have to pay attention that it has to fit the dimentions of the diode in this case TO5 9mm, and the diameter of the jacket has to fit the heatsink
this is the jacket i have purchased
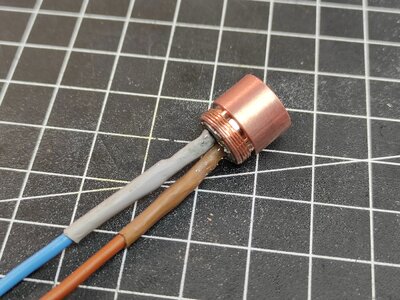
The diode is press fitted on one part of the jacket i used a small vise, here's a picture of the diode before beeing press fitted, and a picture after beeing press fitted and with 2 wires soddered already


The second piece of the jacket

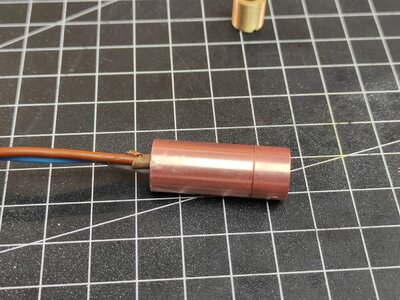
Then i apply thermal paste to the jacket and place it on the heat sink
this is the heatsink i purchased: https://www.banggood.com/72x32x32mm...p-1446026.html?rmmds=myorder&cur_warehouse=CN


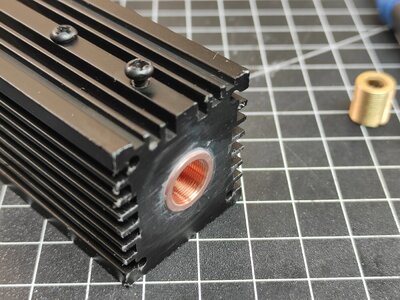
The jacked comes with an acrylic lens, that cannot be used, this diode will destroy any acrylic lens, the lens to be used is a G2 lens, it's the gold thing on the last picture above this
link https://www.ebay.com/itm/141870941996
Laser diodes are power hungry and absolutly need a driver controling the current, so this is the one i picked
link:https://www.ebay.com/itm/142857574974

The diode wires are soddered to the driver on the LED + and - spots, and the fan is soddered to FAN+ and - soddered, i've used a 4cm server fan, powerfull and noisy

And here it is a picture of everything soddered together

We now have a CNC frame with a controller, and a laser module with a driver, but they don't talk the same language, so we need a translator
link:https://www.banggood.com/EleksMaker...p-1245920.html?rmmds=myorder&cur_warehouse=CN

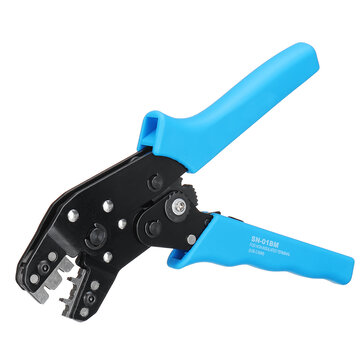
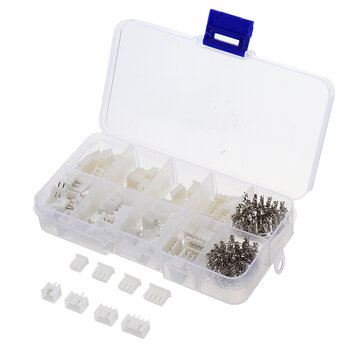
to make the cables to connect everything you might need the crimper plier and the xh2.54 terminals
 www.banggood.com
 www.banggood.com
Apparently i didn't take picture of the cables finished and connected, but for future reference, it's a 3 pin cable that connects on the cncn controller on the laser terminal on one end and on the input terminal of the "translator" board and then 2x 2pin cables that connect on the translator board and on the led driver
With everything connected i made a little table for the cnc

And a nail board for the piece that is beeing cut to rest on, this imporves the quality of the cut and reduces burn marks on the back

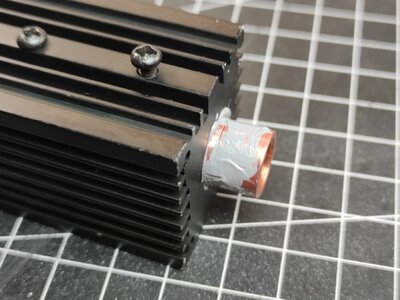
I painted the nails with matt black spray to have less reflections of the laser light, designed and 3d printed a support that would bring together the 3cm heatsink and the 4cm led driver and server fan


last but not least, this is also very important, i bent some brass tubbing, connected it to the compressor line to have air assist while cutting

And it was time to fire it up, never forget the protection glasses, the goal for me was alway to cut 5mm plywood, so i went for it

It needs a few passes, slow, but it does cut 5mm plywood as i set out to achieve, and i'm happy with the results
Final note, i'm using a DC 12v 8 amps power suply, the one that comes with the cnc is not good enough
Further considerations
As i said from the start, it's not the fastest most powerfull machine, but it does cut 5mm plywood, it is clearly on the limit of what it can do
To improve it, there's one resistor on the LED driver that can be changed, and it would make make the diode work with 4.5 amps, instead of 3 as it is now
There is no doubt that this will dramatically increase what the laser can do and how fast it does it
My issue is the heat, i don't know how much more heat will be created, and i don't know if my set up is good enough to handle it, considering that the heatsink is solid instead of having internal fins, and the fan is quite offset to the front due to restrictions of space
I think one day i'll get another driver to test it, without changing this one, so that i can always revert to it if needed, but for now, this is what i got
The machine also works as an engraver, but that was not the focus, if you only need an engraver, there's plenty selling that will do the job
Hope you enjoyed
I've decided to try and do a diode laser cutter, that would actually cut to a certain extent, second disclaimer, this is not a CO2 laser, this is a diode laser, expectations need to be set accordingly, this will never be the fastest , most powerfull, or fail proof machine.
So i started by buying and assembling a CNC frame, this one came already with a controler, and it doesn't have the laser module, wich is what i wanted, since i'm building my own laser module.
link: https://www.banggood.com/EleksMaker...p-1027611.html?rmmds=myorder&cur_warehouse=CN
Now for the laser itself, starting with the diode, i bought the nubm08
link: https://www.ebay.com/itm/262893062600
The diode comes with a casing that nees to be removed, this is done with 2 pliers, and a "snapping" movement
Diode with casing
and the diode without the casing
Those filaments are quite fragile, do not touch them, don't let anything touch them
The following step is to press fit the diode on a jacket, i've chosen a copper jacket, i believe it is better than brass for termal conductivity, there are sizes to the jackets, you have to pay attention that it has to fit the dimentions of the diode in this case TO5 9mm, and the diameter of the jacket has to fit the heatsink
this is the jacket i have purchased
Copper Housing for Laser Diode TO5/9mm/Laser Diode blank module With Acryliclens | eBay
Find many great new & used options and get the best deals for Copper Housing for Laser Diode TO5/9mm/Laser Diode blank module With Acryliclens at the best online prices at eBay! Free shipping for many products!
www.ebay.com
The diode is press fitted on one part of the jacket i used a small vise, here's a picture of the diode before beeing press fitted, and a picture after beeing press fitted and with 2 wires soddered already
The second piece of the jacket
Then i apply thermal paste to the jacket and place it on the heat sink
this is the heatsink i purchased: https://www.banggood.com/72x32x32mm...p-1446026.html?rmmds=myorder&cur_warehouse=CN
The jacked comes with an acrylic lens, that cannot be used, this diode will destroy any acrylic lens, the lens to be used is a G2 lens, it's the gold thing on the last picture above this
link https://www.ebay.com/itm/141870941996
Laser diodes are power hungry and absolutly need a driver controling the current, so this is the one i picked
link:https://www.ebay.com/itm/142857574974
The diode wires are soddered to the driver on the LED + and - spots, and the fan is soddered to FAN+ and - soddered, i've used a 4cm server fan, powerfull and noisy
DC 12V 0.73A 8.5W 4Pin 4028 Server Cooling Fan Brushless Motor Dual Ball Bearing | eBay
Find many great new & used options and get the best deals for DC 12V 0.73A 8.5W 4Pin 4028 Server Cooling Fan Brushless Motor Dual Ball Bearing at the best online prices at eBay! Free shipping for many products!
www.ebay.com
And here it is a picture of everything soddered together
We now have a CNC frame with a controller, and a laser module with a driver, but they don't talk the same language, so we need a translator
link:https://www.banggood.com/EleksMaker...p-1245920.html?rmmds=myorder&cur_warehouse=CN
to make the cables to connect everything you might need the crimper plier and the xh2.54 terminals
1PCS SN-01BM AWG28-20 Terminal Wire Cable Crimping Pliers Tool for Dupont PH2.0 XH2.54 KF2510 JST
Only US$19.99, buy best 1PCS SN-01BM AWG28-20 Terminal Wire Cable Crimping Pliers Tool for Dupont PH2.0 XH2.54 KF2510 JST sale online store at wholesale price.
230pcs XH2.54 2p 3p 4p 5 pin 2.54mm Pitch Terminal Kit / Housing / Pin Header JST Connector Wire Connectors Adaptor XH Kits
Only US$4.99, buy best 230pcs XH2.54 2p 3p 4p 5 pin 2.54mm Pitch Terminal Kit / Housing / Pin Header JST Connector Wire Connectors Adaptor XH Kits sale online store at wholesale price.
Apparently i didn't take picture of the cables finished and connected, but for future reference, it's a 3 pin cable that connects on the cncn controller on the laser terminal on one end and on the input terminal of the "translator" board and then 2x 2pin cables that connect on the translator board and on the led driver
With everything connected i made a little table for the cnc
And a nail board for the piece that is beeing cut to rest on, this imporves the quality of the cut and reduces burn marks on the back
I painted the nails with matt black spray to have less reflections of the laser light, designed and 3d printed a support that would bring together the 3cm heatsink and the 4cm led driver and server fan
last but not least, this is also very important, i bent some brass tubbing, connected it to the compressor line to have air assist while cutting
And it was time to fire it up, never forget the protection glasses, the goal for me was alway to cut 5mm plywood, so i went for it
It needs a few passes, slow, but it does cut 5mm plywood as i set out to achieve, and i'm happy with the results
Final note, i'm using a DC 12v 8 amps power suply, the one that comes with the cnc is not good enough
Further considerations
As i said from the start, it's not the fastest most powerfull machine, but it does cut 5mm plywood, it is clearly on the limit of what it can do
To improve it, there's one resistor on the LED driver that can be changed, and it would make make the diode work with 4.5 amps, instead of 3 as it is now
There is no doubt that this will dramatically increase what the laser can do and how fast it does it
My issue is the heat, i don't know how much more heat will be created, and i don't know if my set up is good enough to handle it, considering that the heatsink is solid instead of having internal fins, and the fan is quite offset to the front due to restrictions of space
I think one day i'll get another driver to test it, without changing this one, so that i can always revert to it if needed, but for now, this is what i got
The machine also works as an engraver, but that was not the focus, if you only need an engraver, there's plenty selling that will do the job
Hope you enjoyed