Bushnell’s Turtle. Revolutionary war submersible. 1:35 3D design and print

Joined
Sep 29, 2021
Messages
77
Points
103

Okay, first post here. and not technically a build log, as the model is actually finished. Still, I hope to show the process.

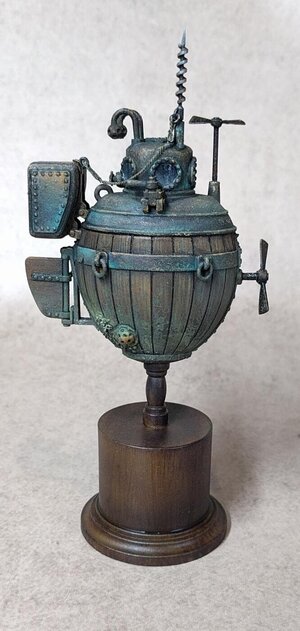
This is Model I've designed using Sketchup and subsequently printed on a Formlabs Form 3 printer. Let's start with a very potted design history.

Turns out there’s a lot of anecdotal evidence and vague notions attached to what this thing actually looked like, which is good, because that allows for a certain amount of creativity. Not too much though. despite the lack of hard documentation there is still an expectation of this wee contraptions’ appearance. There are some guessed measurements (approx. six feet high and three feet wide) and some descriptions of various fittings which talk more of purpose than appearance, like the number of windows and the existence of a charge made from wood and iron bands.

So a beginning was made.

Screenshot 2021-05-11 113344.jpg

...and several revisions later, printing occurred.

IMG_20210511_111714.jpg

...next up: Painting. and more revisions.
 
I Promised painting, didn't I?

Now, research suggests that the entire thing was probably covered in a generous layer of pitch. However, a thinly and messily applied skin of black sticky tar deeply offends my inner steampunk.

I’m going for a nice rich walnutty look.

First a layer of a pale yellowish ochre.

IMG_20210609_180455.jpg

…thin layer of vallejo Light rust wash…

IMG_20210609_180804.jpg

and keep adding brown/ dark rust and black washes (with an airbrush) in successively darker layers until:

IMG_20210609_182237.jpg

Nifty. A good base. Now to seal that and black in the rest…
 
Next bit.

Now with more black. wait. no. Dark grey. Tyre black. Whatevs.

IMG_20210610_204253.jpg

A bit messy, but these will serve largely as undercoats. loads of weathering and textures and stuff next. I’ve also temporarily placed the new and improved auger. 'cos it’s cool.


I’m thinking a beaten, textured, brassy bronze look for the main black metal parts. Which is most of it.
Started with some base texturing …

IMG_20210611_180343.jpg

…followed by a satin varnish to seal, and then a bunch of assorted brown/blue/ glazes to build up the colour.

IMG_20210611_184226.jpg

IMG_20210611_184245.jpg

The shine is bit distracting, but I’ll kill that later.

cheered up the hull planking a bit and started toning and blending the metals.

IMG_20210611_224109.jpg
 
Nearly there.

original_0929414a-e1e7-4819-9d95-0645d17df4c7_IMG_20210612_175049.jpg

original_6156c2b8-3f9d-4b39-b13f-bee02cf3d685_IMG_20210612_175031.jpg

I think the smallest, baby barneys will probably be okay replicated with paint. or some tiny spots of Mr surfacer 500 or whatnot.

Also, Tamiya Putty Quick type isn’t particularly. Which is good (as it allows time for pushing about with sharpened toothpicks), but is a bit of a misnomer.

....aaaaannd paint. with a bit of extra texture from some mud weathering product.

original_3cb2f1c8-635e-4f46-a43a-8c5a94bc2648_IMG_20210613_113353.jpg

IMG_20210613_113345.jpg

There is, of course probably no reasonable way the actual turtle was in the water long enough to grow a beard, but I’m having fun. Screw reasonable.
 
Now to build a 3D diorama with the Turtle burying its auger into the bottom of wood warship!

Which, despite the valiant efforts and expenses outlaid, it completely failed to do.


The original crew member gives a detailed account of his first combat mission (a three hour trip up the Hudson in a failed attempt to sink a British blockade ship) which involved him being unable to secure his clockwork charge to the bottom of the ship, being spotted, avoiding the row-boat sent out to investigate by dropping the charge as a decoy, decoy floating off and exploding spectacularly to no effect ,etc etc.

The British have no record of this.

More likely the the Crewman in question discovered just how impossibly, comically tiresome the whole idea was and gave up long before he reached his target.

Additional fun note: As burning a lamp inside the confined space was wisely considered a detriment, the interior was illuminated by photo phosphorescent phungus*.

*sorry. the alliteration got the better of me…

Very nicely done. brings up all kinds of ideas as to how it could be mounted in a diorama.

I did have an idea for a diorama.......

Screenshot 2021-06-15 111153.jpg

seemed appropriate for the Hudson river, and all. Or a skeleton with concrete boots.
 
Nearly there.

View attachment 259690

View attachment 259691

I think the smallest, baby barneys will probably be okay replicated with paint. or some tiny spots of Mr surfacer 500 or whatnot.

Also, Tamiya Putty Quick type isn’t particularly. Which is good (as it allows time for pushing about with sharpened toothpicks), but is a bit of a misnomer.

....aaaaannd paint. with a bit of extra texture from some mud weathering product.

View attachment 259692

View attachment 259693

There is, of course probably no reasonable way the actual turtle was in the water long enough to grow a beard, but I’m having fun. Screw reasonable.
This is a real insight as to how an expert like you moves through the steps/finishes to arrive at this impressive small submersible. It looks GREAT First Place Metal Rich (PT-2)
 
Okay. I think we are basically done here.

Found a resin plinth in my stash, printed a pedestal and gave the whole lot a quickie wood-grain finish.

IMG_20210615_143256.jpg

IMG_20210615_143309.jpg

IMG_20210615_143321.jpg


original_6572d866-86f4-49d3-a50c-759c7abe0047_IMG_20210615_143331.jpg

original_13101a50-a2f6-45cf-a75b-e9451178b099_IMG_20210615_143352.jpg

The trolley will have to wait. Maybe the 1/16 version.

To Sumarise: Full 3D print (formlabs form3 printer, 0.025mm resolution). Only parts that are not printed are some brass shafts (for strength) and the lead wire line. oh. and some Tamiya quick type putty and some mud effects terrain stuff for the barnacles.

All paint is Acrylic. Not that I don’t ever use other things, like enamels and lacquers, they just weren’t needed this time around.

Thanks all for the positive comments. I'm going to offer the Files for sale, but they need cleaning up first and some instructions doing. Not sure how much. Thinking $35us. Drop me a message if curious so I can guage interest.
 

Attachments

  • IMG_20210615_143321.jpg
    IMG_20210615_143321.jpg
    155.8 KB · Views: 4
Okay. I think we are basically done here.

Found a resin plinth in my stash, printed a pedestal and gave the whole lot a quickie wood-grain finish.

View attachment 260000

View attachment 260001

View attachment 260004


View attachment 260003

View attachment 260005

The trolley will have to wait. Maybe the 1/16 version.

To Sumarise: Full 3D print (formlabs form3 printer, 0.025mm resolution). Only parts that are not printed are some brass shafts (for strength) and the lead wire line. oh. and some Tamiya quick type putty and some mud effects terrain stuff for the barnacles.

All paint is Acrylic. Not that I don’t ever use other things, like enamels and lacquers, they just weren’t needed this time around.

Thanks all for the positive comments. I'm going to offer the Files for sale, but they need cleaning up first and some instructions doing. Not sure how much. Thinking $35us. Drop me a message if curious so I can guage interest.
You have produced a high quality model! First Place Metal
First Place MetalFirst Place Metal Rich (PT-2)
 
A convincing miniature, superbly painted!
Could I also order a printed model (unpainted) from you?
What would this cost, including delivery to Switzerland?

From Lake Lucerne
Wilfred
 
Okay. I think we are basically done here.

Found a resin plinth in my stash, printed a pedestal and gave the whole lot a quickie wood-grain finish.

View attachment 260000

View attachment 260001

View attachment 260004


View attachment 260003

View attachment 260005

The trolley will have to wait. Maybe the 1/16 version.

To Sumarise: Full 3D print (formlabs form3 printer, 0.025mm resolution). Only parts that are not printed are some brass shafts (for strength) and the lead wire line. oh. and some Tamiya quick type putty and some mud effects terrain stuff for the barnacles.

All paint is Acrylic. Not that I don’t ever use other things, like enamels and lacquers, they just weren’t needed this time around.

Thanks all for the positive comments. I'm going to offer the Files for sale, but they need cleaning up first and some instructions doing. Not sure how much. Thinking $35us. Drop me a message if curious wonderful work, well done
 
A convincing miniature, superbly painted!
Could I also order a printed model (unpainted) from you?
What would this cost, including delivery to Switzerland?

From Lake Lucerne
Wilfred

Hmmm.. One of my problems is I have a Very expensive to run Printer (the Resin is $300au per liter...) . I would have to investigate alternatives in order to produce a commercial product. I could do a limited run, I guess. I'll figure out a cost. I'm thinking about $80 au or less, but have a lot of calculations to do. Postage will be about $30au to Europe.

Before I go any further, What is the proper etiquette around here for selling things?
 
on ebay you can get commercially manufactured kit of the Turtle, its a eastern european company Mir something...
 
on ebay you can get commercially manufactured kit of the Turtle, its a eastern european company Mir something...
I have the Micro Mir kit. I wasn't impressed? Can't really comment on accuracy, but the details are very soft. The do a very presentable Hunley and a very cute little welman submarine, both of which could be a basis for very nice models....
 
Okay, current thought: "limited" edition kit. I.e.: limited to selling the number of kits I can be bothered to make. I wouldn't want to sell anything, or indeed take money for, anything I didn't actually have on hand.

Other thought: Should I scale it up a bit? Given there are at least two other kits in a similar scale already available should I up it to say... 1:24? Hmmm. Why not both? 1:16? Upping the scale would up the end cost. Gah. Help me out people.
 
Back
Top