Ok Guys, I like to contribute my two cents in our efforts creating a steam box that I hope it could be as useful for you guys as it did for me.
I am also dedicating this build do to RogerD. Fellow modeler having a hard time bending his planks.
So here it goes.

I use my jacuzzi to presoak the wood for about 1/2 hour.

But the next best thing is to use a 2"x 36" pvc pipe with a 5"x 5" also pvc base that you can take around the house. I think is it better because I fill it with hot water therefor speeding up the process. I don't know if I did right but I opened a tiny hole in the cap just to let go the pressure the hot water might create. Maybe without a hole would work better.

I used 5/8" ply and extra lumber I had in my garage. This will be the basic material that will cradle the main PVC heat box. You only see two in this picture but you will actually need three side pieces and three braces.
 For the main base I used 12" x 12" and gave it some fancy form, also I attached blocks what will be the supports for the side braces.


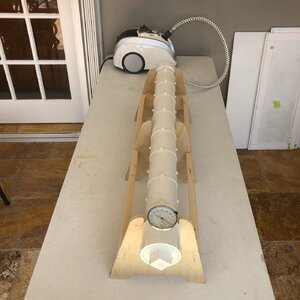
I marked in the middle of the tube the locations where the 1/4" wooden dowels will go through with a 4 3/4" separation between them. These dowels will be crate a bed for the planks to go on top. Cumming pictures will show how this work.

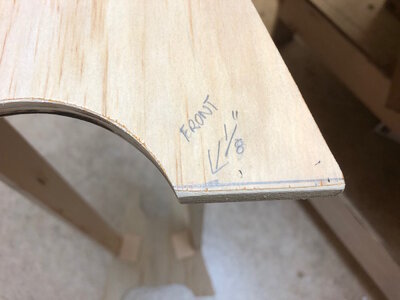
On the front leg, (the one that will have the front of the steam box), I trimmed 1/8" from the bottom so the contraction will have a down slope for the water to drain easier.

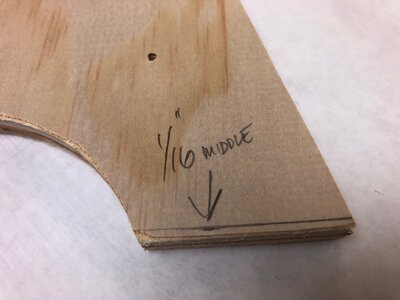
Middle leg I trimmed 1/16" off.

I added slots in the middle of the legs to insert another piece of wood. This will be the main seat for the tube.

This is all scrap wood I found on my garage and utilty room. Middle seat made from cedar and glued in place.

For my main steam source I purchased a used PurSteam system. You could find even a cheaper one if you look hard enough.

These are my fittings and white epoxy underwater proof glue.

I cut off from the steamer, the FRONT of the original hose, and epoxy glued the pvc coupling and 1/2" x 3/8" brass nipples. Make sure you don't cut the part of the hose that will attach to the steamer and also make sure that you used a waterproof epoxy.

This is the front of the steam box (Tube). Notice the small nipple that I inserted at the front bottom to let vapor water scape. This picture also shows you that the dowels are protruding 1/4" out and they are also sealed with the epoxy glue.

This aluminum mesh I found at work and is used as a bed for sliding in and out the planks. Later on I found out that you dont need it because the steam will make the aluminum stain the wood.


I made a small hole in top front to insert a thermometer that I purchase at my local Publix store.

I used large tie wraps to attach the tube to the cradle but later on I found out is not necessary. The heat of the steam will make the pvc expand and fit snugly in the base.

This is the final connection from the steamer to the steam box.
I hope this weird contraction could help my fellow modelers. It’s simple to make and not too pensive.
I am also dedicating this build do to RogerD. Fellow modeler having a hard time bending his planks.
So here it goes.
I use my jacuzzi to presoak the wood for about 1/2 hour.
But the next best thing is to use a 2"x 36" pvc pipe with a 5"x 5" also pvc base that you can take around the house. I think is it better because I fill it with hot water therefor speeding up the process. I don't know if I did right but I opened a tiny hole in the cap just to let go the pressure the hot water might create. Maybe without a hole would work better.
I used 5/8" ply and extra lumber I had in my garage. This will be the basic material that will cradle the main PVC heat box. You only see two in this picture but you will actually need three side pieces and three braces.
For the main base I used 12" x 12" and gave it some fancy form, also I attached blocks what will be the supports for the side braces.I marked in the middle of the tube the locations where the 1/4" wooden dowels will go through with a 4 3/4" separation between them. These dowels will be crate a bed for the planks to go on top. Cumming pictures will show how this work.
On the front leg, (the one that will have the front of the steam box), I trimmed 1/8" from the bottom so the contraction will have a down slope for the water to drain easier.
Middle leg I trimmed 1/16" off.
I added slots in the middle of the legs to insert another piece of wood. This will be the main seat for the tube.
This is all scrap wood I found on my garage and utilty room. Middle seat made from cedar and glued in place.
For my main steam source I purchased a used PurSteam system. You could find even a cheaper one if you look hard enough.
These are my fittings and white epoxy underwater proof glue.
I cut off from the steamer, the FRONT of the original hose, and epoxy glued the pvc coupling and 1/2" x 3/8" brass nipples. Make sure you don't cut the part of the hose that will attach to the steamer and also make sure that you used a waterproof epoxy.
This is the front of the steam box (Tube). Notice the small nipple that I inserted at the front bottom to let vapor water scape. This picture also shows you that the dowels are protruding 1/4" out and they are also sealed with the epoxy glue.
This aluminum mesh I found at work and is used as a bed for sliding in and out the planks. Later on I found out that you dont need it because the steam will make the aluminum stain the wood.
I made a small hole in top front to insert a thermometer that I purchase at my local Publix store.
I used large tie wraps to attach the tube to the cradle but later on I found out is not necessary. The heat of the steam will make the pvc expand and fit snugly in the base.
This is the final connection from the steamer to the steam box.
I hope this weird contraction could help my fellow modelers. It’s simple to make and not too pensive.