You are using an out of date browser. It may not display this or other websites correctly.
You should upgrade or use an alternative browser.
You should upgrade or use an alternative browser.
Amerigo Vespucci Panart 1:84 MA build log
- Thread starter mantares
- Start date
- Watchers 14
-
- Tags
- amerigo vespucci panart
- Joined
- Feb 19, 2023
- Messages
- 162
- Points
- 103

Hello, how are you! You know... I can’t even imagine now how many different models you have built, how many toys you have made yourself. How much experience do you have? I think that if I say that you are a Master... You won’t be offended, will you? Can I follow you here on S.O.S?
- Joined
- Feb 19, 2023
- Messages
- 162
- Points
- 103

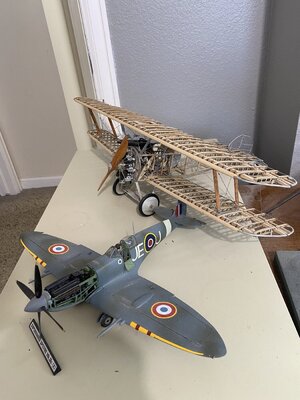
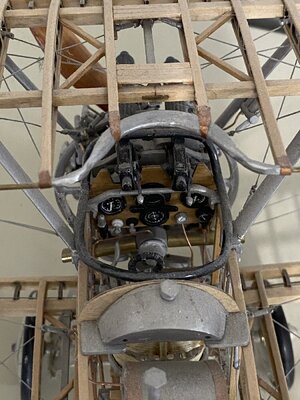
И And I welcome you again! Tell me about the two models in the photo, did you build both? Spitfire on the front? fighter? And behind him? They are beautiful!! Wow!!Here's my Sopwith that I did many years ago. A wonderful kit in that all the controls work. I highly recommend building it.View attachment 395432
Good evening. That is Beautifully made. I will certainly follow your progress. Cheers GrantI'm starting this log a bit late as I have completed chapter 5 but I can share some of my issues and successes getting this far.
Some background. I'm a 91 year old recently retired engineer. This is only the second plank on bulkhead model I have done--the first was an Amanti Vanguard 1:72, some rigging still required but mostly complete.
However I have been building models since I was 10 years old. In 1942, at the start of WWII I was able to buy a P. K. Guillows model for 10 cents. I would build a German or Japanese plane, light the tail, and throw it off of a second story balcony while making gun noises.
During the following decades I mostly built model airplanes. Free flight, U-control, gliders, and RC. In the 1980's a friend and I constructed a plans built 1:1 four-place airplane built from composite materials. My friend bought my share and it is still flying., I finally retired from flying the models to building high-end airplane kits, museum quality. That finally lead to building high-end ship models. I love the challenge of building a difficult model that looks really beautiful when completed.
OK, on to the Amerigo Vespucci. BTW, the real ship will be in LA next July 5th, my birthday. You can bet I'll be there!
This model is not for the faint hearted. Although the instructions are in 8 chapters, which leads you to believe that the instructions are complete and detailed, the truth is the instructions are in six languages and each language gets only a few sentences. In some instances, I have spent hours trying to figure out how to do some relatively minor task. In the end I always succeed. As a boy I lived for some years on a dairy farm with no running water or electricity. The uncle I lived with had a favorite saying: the difficult we do right away, the impossible takes a while longer. It's a guiding principle in my life and I really need it for this model.
I have dreamed of doing this model for years but could never afford it. Finally a store in London had it for an attractive price and I grabbed it. I'm not sure if the price reflects that my kit has many bags of parts but the bags are not labeled and I can spend a lot of time trying to make sure I have chosen the right part. I also am at a loss to know where I can purchase missing or replacement parts. Hopefully someone reading this will have the answer. Another issue is that most of the time there is an exact count of the needed part so if you lose or damage the part you are s... out of luck. In a couple of instances there were missing parts or the wrong number.
View attachment 394707
Yikes! I had forgotten how complex yet wonderful model this is. One that I would like to build in the future. Right now I have way too many kits on the shelf to think about getting another just to put it on the shelf. So I have to satisfy my wishful thinking by watching your build progress. Wicked good…
First, thank you so much for your very kind words! Yes I did build both, the Sopwith many years ago and the Spitfire recently. The spitfire plane has a very strong meaning for me as a very close friend of mine flew spitfires in the Battle of Britain--he died a number of years ago.И And I welcome you again! Tell me about the two models in the photo, did you build both? Spitfire on the front? fighter? And behind him? They are beautiful!! Wow!!
Сочувствую вашей трагедии, потере друга...
СпасибоСочувствую вашей трагедии, потере друга...
Hello
I am slso currently building the Panart Amerigo Vespucci an I am almost at the same stage as you are (I'll be posting an update to my build log during this week end)
I agree with you that having no reference on the multiple brass bags that are in the kit make things challenging, especially that the various parts are numbered in the booklets.
Now regarding missing pieces and lost pieces, I contact Mantua directly.
The email address I am using is ordinimantuamodel <ordinimantuamodel@virgilio.it>
I also order spare parts on the Mantua web site: https://www.mantuamodelshop.com/. They have a dedicate page for the Amerigo Vespucci. By the way if you order thru their website, they have a strange process. Once you are registered, you log in to their site, order the parts you want and then need to wait to receive an email with the price (including shipping) an payment instructions (they accept Paypal. Once they have received payment, they ship via UPS (at least for France).
Let's sync up on a regular basis with our build logs.
Cheers
Last edited:
I'm starting this log a bit late as I have completed chapter 5 but I can share some of my issues and successes getting this far.
Some background. I'm a 91 year old recently retired engineer. This is only the second plank on bulkhead model I have done--the first was an Amanti Vanguard 1:72, some rigging still required but mostly complete.
However I have been building models since I was 10 years old. In 1942, at the start of WWII I was able to buy a P. K. Guillows model for 10 cents. I would build a German or Japanese plane, light the tail, and throw it off of a second story balcony while making gun noises.
During the following decades I mostly built model airplanes. Free flight, U-control, gliders, and RC. In the 1980's a friend and I constructed a plans built 1:1 four-place airplane built from composite materials. My friend bought my share and it is still flying., I finally retired from flying the models to building high-end airplane kits, museum quality. That finally lead to building high-end ship models. I love the challenge of building a difficult model that looks really beautiful when completed.
OK, on to the Amerigo Vespucci. BTW, the real ship will be in LA next July 5th, my birthday. You can bet I'll be there!
This model is not for the faint hearted. Although the instructions are in 8 chapters, which leads you to believe that the instructions are complete and detailed, the truth is the instructions are in six languages and each language gets only a few sentences. In some instances, I have spent hours trying to figure out how to do some relatively minor task. In the end I always succeed. As a boy I lived for some years on a dairy farm with no running water or electricity. The uncle I lived with had a favorite saying: the difficult we do right away, the impossible takes a while longer. It's a guiding principle in my life and I really need it for this model.
I have dreamed of doing this model for years but could never afford it. Finally a store in London had it for an attractive price and I grabbed it. I'm not sure if the price reflects that my kit has many bags of parts but the bags are not labeled and I can spend a lot of time trying to make sure I have chosen the right part. I also am at a loss to know where I can purchase missing or replacement parts. Hopefully someone reading this will have the answer. Another issue is that most of the time there is an exact count of the needed part so if you lose or damage the part you are s... out of luck. In a couple of instances there were missing parts or the wrong number.
View attachment 394707
View attachment 396471
Finished first small boat, 10 to go! I'll be shifting to chap 7 for a while. The first one took some time but they should go faster as I gain more skill building them and know more what I'm doing.
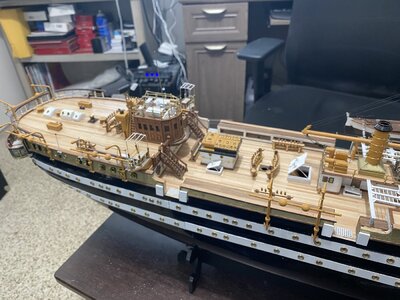
Completed the stern and starboard side davits and the high railing. For the railing I tried to do it their way--straightening out the 1 mm wire and pounding a flat area, then drilling a 1 mm hole. The result was a disaster! Never could get the wire as straight as I wanted and never could get the hole in the center of the flat area. I ended up purchasing 1 mm rod, then machining a small groove at one end. I attached the thread using a clove hitch at each post (practice for doing the ratlines later
The port side items are finished, just need to install.
Last edited:
Hi MantaresView attachment 398270
Completed the stern and starboard side davits and the high railing. For the railing I tried to do it their way--straightening out the 1 mm wire and pounding a flat area, then drilling a 1 mm hole. The result was a disaster! Never could get the wire as straight as I wanted and never could get the hole in the center of the flat area. I ended up purchasing 1 mm rod, then machining a small groove at one end. I attached the thread using a clove hitch at each post (practice for doing the ratlines later. I think it ended up looking pretty good. Nothing special about doing the davits. Just followed the plans. I did bend the 2 mm davit wire using a mandrel--I hunted in my garage until I found something that was the right diameter, ended up being a brass water hose coupler
The port side items are finished, just need to install.
The davits look nice (I did not know that name and I am glad to learn it
I have not done them yet; working on the bowsprit and the motor boats
have you started on the small boats?
Last edited:
I think you might be sorry for doing the davits now good though they look. I have left mine off for the time being as I just know I would knock them off doing the rigging!! And the rigging on this boat is a nightmare, why are we so masochistic making tall ships?
I also made the Sopwith a while ago and the rigging on that seemed difficult enough before now.
I also made the Sopwith a while ago and the rigging on that seemed difficult enough before now.
I finished the first small boat and mounted it on the deck and I started on one of the motor boats that will also mount on the deck. I'll finish the davits today and then have no excuse not to continue making small boatsHi Mantares
The davits look nice (I did not know that name and I am glad to learn it)
I have not done them yet; working on the bowsprit and the motor boats
have you started on the small boats?
Yeah, I did the rigging on a 1:72 Vanguard--it's almost complete but it has taken years and I purchased every book I could find on how to rig a period 74 gun ship of the line so I am NOT looking forward to rigging this ship. The instructions seem minimal.I think you might be sorry for doing the davits now good though they look. I have left mine off for the time being as I just know I would knock them off doing the rigging!! And the rigging on this boat is a nightmare, why are we so masochistic making tall ships?
I also made the Sopwith a while ago and the rigging on that seemed difficult enough before now.
- Joined
- Jul 23, 2019
- Messages
- 137
- Points
- 143

Here is the rigging that Amerigo Vespucci advises, OcCre. 1:100
There is at the end of the text
If you have any questions, please contact me, I'm just doing the rigging of this model
I can't send a pdf file!! send your mail. I will send
There is at the end of the text
If you have any questions, please contact me, I'm just doing the rigging of this model
I can't send a pdf file!! send your mail. I will send
Amerigo Vespucci, OcCre . 1:100 [COMPLETED BUILD]
Первая партия катеров на борту. Работаем над шлюпками. Закрыл металл деревом. The first batch of boats on board. We are working on boats. I covered the metal with wood. Good evening. A very good looking model. It certainly has a busy deck which is really impressive.
shipsofscale.com
Hi Mantares
The davits look nice (I did not know that name and I am glad to learn it)
I have not done them yet; working on the bowsprit and the motor boats
have you started on the small boats?
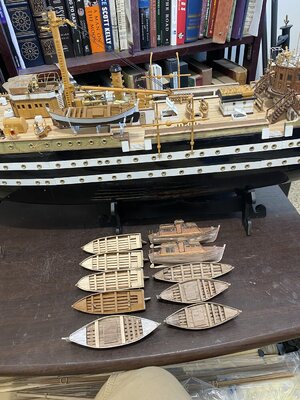
I just finished building the 11 boats except for painting and adding some little doodads like the lifting pulleys. I'm going to shift back to chapter 7 for a while before working on the boats again. I'll install the four boats on the deck (one already done as you can see) but wait on installing the remaining ones until the very end.
BTW on my 92 birthday next July 5th my wife and I are intending to see the Amerigo Vespucci in person in Los Angeles, the one day it will be there.
- Joined
- Jun 17, 2021
- Messages
- 1,668
- Points
- 488

Love the boats AND seeing what's on the bookshelf!
At 92 (or thereabouts) thanks for the reminder to never stop looking forward!
Pete
At 92 (or thereabouts) thanks for the reminder to never stop looking forward!
Pete
IgorHere is the rigging that Amerigo Vespucci advises, OcCre. 1:100
There is at the end of the text
If you have any questions, please contact me, I'm just doing the rigging of this model
I can't send a pdf file!! send your mail. I will send
Amerigo Vespucci, OcCre . 1:100 [COMPLETED BUILD]
Первая партия катеров на борту. Работаем над шлюпками. Закрыл металл деревом. The first batch of boats on board. We are working on boats. I covered the metal with wood. Good evening. A very good looking model. It certainly has a busy deck which is really impressive.shipsofscale.com
I'll soon be starting the rigging on my Vespucci model and I am interested by this document
Can you please send it to me
My email address: gilbert.meldener@hotmail.com
THanks in advance
Hi MantaresView attachment 406780
I just finished building the 11 boats except for painting and adding some little doodads like the lifting pulleys. I'm going to shift back to chapter 7 for a while before working on the boats again. I'll install the four boats on the deck (one already done as you can see) but wait on installing the remaining ones until the very end.
BTW on my 92 birthday next July 5th my wife and I are intending to see the Amerigo Vespucci in person in Los Angeles, the one day it will be there.
Good job on the small boats
I am also about to finish all of them on my side.


