AMATI 1/60 HMS BOUNTY

I've had the same problems with Billings Boats Bounty & wouldn't mind betting I'm not the only one. What's more, is I cannot make sense of the rigging as it's all on one full scale drawing, almost impossible to race each rope, also no sizes of block. At present she's just a hull (completed) model. This kit has been harder to build than OcCre's Montañes. AOS does not give enough rigging info., & Anderson's is for warships. I'm thinking of using OcCre's Beagle rigging plan or buying Amati's plans. In the meantime I'm back to Columbo's fleet of 1492.
Any advice would be much appreciated, thanks in advance, guys.
Stuart, warship of merchant, rigging is pretty standard for sailing vessels. The only possible variation may be sizing of the rigging. Remember too that BOUNTY was taken into Royal Navy service and underwent a refit before venturing into the Pacific so her rigging would have been done to Royal Navy standards anyway
 
Stuart, warship of merchant, rigging is pretty standard for sailing vessels. The only possible variation may be sizing of the rigging. Remember too that BOUNTY was taken into Royal Navy service and underwent a refit before venturing into the Pacific so her rigging would have been done to Royal Navy standards anyway
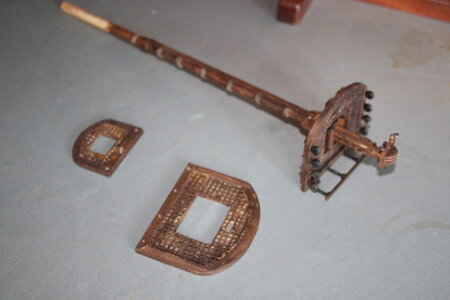
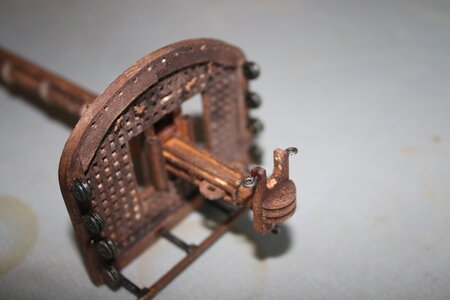
Thanks Peter for your confirmation, in which case I will use my OcCre Beagle plans for the rigging when I return to Bounty, which had got me really 'peed off', after I've dealt with N, P, & St.M., hoping they'll put me in a better mood! I have scratch built Bounty's mast tops with gratings & lower foremast using AOS drawings.

Stuart
 
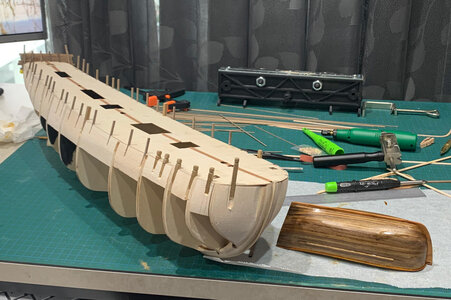
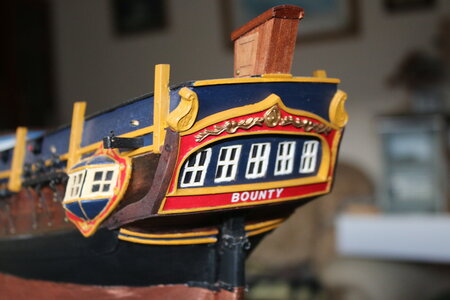
Progress is still being made on BOUNTY. I have just about finished all the stanchions and bollards on the STBD side and all the stanchions on the PORT side. I have also started planking the transom. Won't be long before the first hull plank is laid starting with the sheer plank.
NORFOLK has just been matt Varnished: still wet which is why she's a little shiny.

IMG_0442.jpg
 
Progress is still being made on BOUNTY. I have just about finished all the stanchions and bollards on the STBD side and all the stanchions on the PORT side. I have also started planking the transom. Won't be long before the first hull plank is laid starting with the sheer plank.
NORFOLK has just been matt Varnished: still wet which is why she's a little shiny.

View attachment 337484
Hi Peter, on the subject of varnish, I'm finding it very difficult to find a really matte matt varnish over here. I used a Paint Factory matt aerosol on Bounty & now on Nina, but it was no more like satin/semi gloss, so had to give both a coat of Testors Dulcote (now unavailable outside, but now re-manufactured by Rustoleum but only available in US - so far) Luckily I still have 2 or 3 in stock but always looking out for a substitute. I'd appreciate any suggestions from UK 'Ship Mates'.
I'll look at your photo again tomorrow to see how matt it's dried to! ROTF
Stuart.
I used to use Testors dullcote on my model railway and military models. Sometimes through the tin but mostly through an airbrush. Itss a great product and dried quickly but that's because it was airbrushed so the thinning agent evaporated quickly.
The quality of a matt finish really depends upon the matting agent suspended in the varnish. If you let Dullcote sit for a while in a glass jar you will notice how much of the agent comes out of suspension and sits on the bottom; why its important to thoroughly mix before applying.
On my ships, I use Feast Watson stains and matt varnish (though I also have their shellac made up too). It is quite a thick mix and I brush it on with a good quality flat brush. When thoroughly mixed, it looks like charcoal suspended in the fluid as it has a grey tint to it. The varnish takes a coupe of days to full cure since it is turpentine based and soaks into the wood. After nearly 18 hours since application its still tacky but a very low sheen. It will be matt by tomorrow so I'll put an update image up when I have the bowsprit mounted. but that will be in the NORFOLK build Log.
 
Last edited:
Stuart.
I used to use Testors dullcote on my model railway and military models. Sometimes through the tin but mostly through an airbrush. Itss a great product and dried quickly but that's because it was airbrushed so the thinning agent evaporated quickly.
The quality of a matt finish really depends upon the matting agent suspended in the varnish. If you let Dullcote sit for a while in a glass jar you will notice how much of the agent comes out of suspension and sits on the bottom; why its important to thoroughly mix before applying.
On my ships, I use Feast Watson stains and matt varnish (though I also have their shellac made up too). It is quite a thick mix and I brush it on with a good quality flat brush. When thoroughly mixed, it looks like charcoal suspended in the fluid as it has a grey tint to it. The varnish takes a coupe of days to full cure since it is turpentine based and soaks into the wood. After nearly 18 hours since application its still tacky but a very low sheen. It will be matt by tomorrow so I'll put an update image up when I have the bowsprit mounted. but that will be in the NORFOLK build Log.
Peter,
Come to think of it I've got a couple of bottles of Dulcote, they got pushed to the back & almost forgotten. What did you use for thinning? My Dulcote goes back to my model railroading days too.
 
Peter,
Come to think of it I've got a couple of bottles of :), they got pushed to the back & almost forgotten. What did you use for thinning? My Dulcote goes back to my model railroading days too.
Testors thinner. Prefer using the product that the paint manufacturer recommends as there is little chance of incompatibility or poor output through the airbrush. Interesting re: model railway. Seems you either go O scale or larger or move to ship Modelling as you get older....:)
 
Testors thinner. Prefer using the product that the paint manufacturer recommends as there is little chance of incompatibility or poor output through the airbrush. Interesting re: model railway. Seems you either go O scale or larger or move to ship Modelling as you get older....:)
My HO layout was in the loft, which despite insulating the ceiling it suffered seasonal extremes of temp., although the track didn't suffer 'sun kinks', I did & the opposite in winter, and as age brought on more & more aches & pains, I became less mobile so climbing the ladder was a 'right pain in the - knee! I said ---- it, finished of selling my collection, some to 'Down under', and finishing off 'Blue Shadow' (Mamoli) after 35 yrs. which got me bitten by the 'ship bug', again.
I very much doubt I'll find Testors thinners over here, but worth a search, my airbrush could do with an 'airing' ;) to knock off the cobwebs since the demise of Montana Rail Link!
 
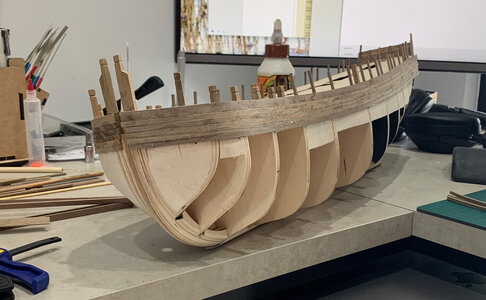
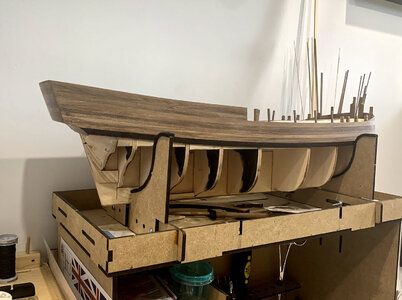
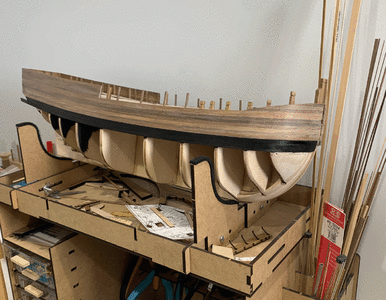
Planking of BOUNTY is well underway with the transom completed, the sheer strakes installed and the first 5 rows of planks. 2 more rows plus the 5 rows of bulwark planks to be done still. As I am getting close to the whales, they have been bent and will get a soak in Japan Black stain.

I will sand the sheer, 7 rows of planks plus the Bulwark planks before installing the whales

IMG_0447.jpg
 
Hi Peter, on the subject of varnish, I'm finding it very difficult to find a really matte matt varnish over here. I used a Paint Factory matt aerosol on Bounty & now on Nina, but it was no more like satin/semi gloss, so had to give both a coat of Testors Dulcote (now unavailable outside, but now re-manufactured by Rustoleum but only available in US - so far) Luckily I still have 2 or 3 in stock but always looking out for a substitute. I'd appreciate any suggestions from UK 'Ship Mates'.
I'll look at your photo again tomorrow to see how matt it's dried to! ROTF
Peter, at last I've located some really matte matt varnish: it's Liquitex Professional Matte Varnish recommended by one of the guys on 'Woodworkers Forum'.
 
Stuart, warship of merchant, rigging is pretty standard for sailing vessels. The only possible variation may be sizing of the rigging. Remember too that BOUNTY was taken into Royal Navy service and underwent a refit before venturing into the Pacific so her rigging would have been done to Royal Navy standards anyway
I've now purchased a set of Amati Bounty plans to use for my Bounty.
 
I've now purchased a set of Amati Bounty plans to use for my Bounty.
Stuart, I am using the Anatomy of Ships -BOUNTY book for my build rather than the Amati plans as the Amati plans have some physical errors on the Transom and the deck fitting arrangements. As I said previously I was not keen to use the ply for bulwarks so I fitted stanchions then planked per prototype. Sounds like your past this stage anyway and onto rigging.
Amati mast, yard an rigging arrangements are generally correct though there are some minor detail errors. e.g treetops are grated not decked, and they don't show the detail of square, octagonal and tenon arrangements but that's all in the detail and depends on how prototypical you really want to go. One that does stand out and appears common across many model manufacturers is the use of fixed blocks on the Jib boom instead of a traveler.
 
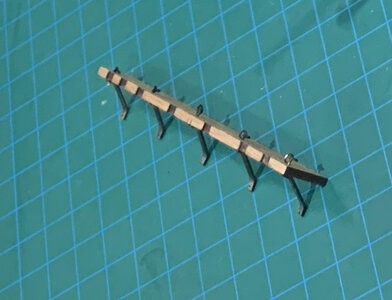
Working on the BOUNTY's channels while contemplating GREYHOUND's next steps. The kit supplies two top mounted wood knees for each channel, however AOS shows undercount angle brackets lined up with each of the ring bolts so that's what I am attempting.

I used 0.5mm hard brass wire for the eyes and the rings and 1/32 x 1/16 brass strap for the brackets. Its a little tedious but if its authentic to prototype then needs must.

IMG_04521.jpg
 
Stuart, I am using the Anatomy of Ships -BOUNTY book for my build rather than the Amati plans as the Amati plans have some physical errors on the Transom and the deck fitting arrangements. As I said previously I was not keen to use the ply for bulwarks so I fitted stanchions then planked per prototype. Sounds like your past this stage anyway and onto rigging.
Amati mast, yard an rigging arrangements are generally correct though there are some minor detail errors. e.g treetops are grated not decked, and they don't show the detail of square, octagonal and tenon arrangements but that's all in the detail and depends on how prototypical you really want to go. One that does stand out and appears common across many model manufacturers is the use of fixed blocks on the Jib boom instead of a traveler.

Working on the BOUNTY's channels while contemplating GREYHOUND's next steps. The kit supplies two top mounted wood knees for each channel, however AOS shows undercount angle brackets lined up with each of the ring bolts so that's what I am attempting.

I used 0.5mm hard brass wire for the eyes and the rings and 1/32 x 1/16 brass strap for the brackets. Its a little tedious but if its authentic to prototype then needs must.

View attachment 341876
I did mine likewise.
 
Stuart, I am using the Anatomy of Ships -BOUNTY book for my build rather than the Amati plans as the Amati plans have some physical errors on the Transom and the deck fitting arrangements. As I said previously I was not keen to use the ply for bulwarks so I fitted stanchions then planked per prototype. Sounds like your past this stage anyway and onto rigging.
Amati mast, yard an rigging arrangements are generally correct though there are some minor detail errors. e.g treetops are grated not decked, and they don't show the detail of square, octagonal and tenon arrangements but that's all in the detail and depends on how prototypical you really want to go. One that does stand out and appears common across many model manufacturers is the use of fixed blocks on the Jib boom instead of a traveler.
Peter, I have completed the hull, so already for masts etc.. I've made the tops as per AoS, also the transom is partly AoS & my 'design', so really it's the rigging I have Amati plans for as the book is not all that clear. Some photos, but not that good, I won't re-take them after the hassle I've had today in downloading from my camera. For some unknown reason my EOS70D would not connect to the PC, EOS Utility all of a sudden won't work despite several shots at reloading. I reckon Microsoft has been 'Foxtrotting' about!! In the end I could only get the photos to download to 'saved pics' then move to One Drive. All this is irrelevant I know, but makes me feel better having a rant!!
Stuart

054.JPG

056.JPG

057.JPG
 
Peter, I have completed the hull, so already for masts etc.. I've made the tops as per AoS, also the transom is partly AoS & my 'design', so really it's the rigging I have Amati plans for as the book is not all that clear. Some photos, but not that good, I won't re-take them after the hassle I've had today in downloading from my camera. For some unknown reason my EOS70D would not connect to the PC, EOS Utility all of a sudden won't work despite several shots at reloading. I reckon Microsoft has been 'Foxtrotting' about!! In the end I could only get the photos to download to 'saved pics' then move to One Drive. All this is irrelevant I know, but makes me feel better having a rant!!
Stuart
Nice work on the masts. Yes this AoS is not as good as the ENDEAVOUR one but I do find that Peterssons book Rigging Period Ships is an accurate guide and matched very closely the AoS for ENDEAVOUR. The grated tops makes fitting those underslung blocks a lot easier.
As to your photos: have you had any software updates recently? Might be worth checking that there are no compatibility issues if you have; you may need to update camera firmware if its available
Thanks Peter, yep Petersson is my go to book also. I ended up downloading the Canon set up & installation software, which must now be updated, as I get a different location for my pics, they all go to 'One Drive' then I have to compress them to JPG files. It's still weird to me - but as I said I'm sure Mircosoft 'interferes'. It 'messed' up my printer connection & somehow deleted Acrobat in favour of Edge (which is a PITA), I've since re loaded Acrobat. I'm not the best IC op, 90% self taught.
Just about to 'bend' the sails on Pinta, then to build St. Maria before returning to Bounty.
Stuart
 
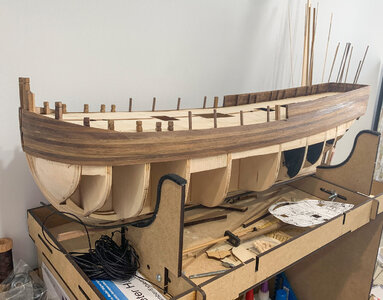
First whale installed both sides. Whales have been stained with Japan Black. Unfortunately the wood is so dense it didn't stack in so I will have to touch up after sanding. The topside planks are still awaiting their post sanding sealer sand.

IMG_0453.jpg
 
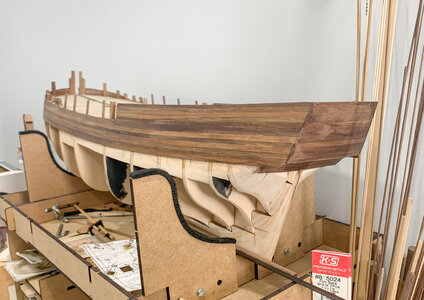
Work on BOUNTY is stilll progressing (slowly). The second whale is in on the Starboard side but it needed an awful amount of sanding. Th ePort side second whale is being steamed and bent a little differently to put in a compound curve to simulate a spiled plank - a bit difficult to photograph while clamped up but I will see how it comes up after clamping

IMG_0460.gif
 
Back
Top