alternative copper bottom ideas

Joined
Jun 17, 2021
Messages
1,670
Points
488

To me, copper bottoms for sailing vessel models, like sails, are a moving target. What's most satisfying aesthetically or realistically? How much detail to include at what scale? When does the effort to recreate a copper bottom (along with other aspects of a model, like sails) enhance the overall look of the model? When does the pursuit of documentary realism advance the art or get in the way? Aesthetics, for me is paramount. For others it is documentary accuracy and realism. I do not presume to judge. I mentioned before an admonition included in the 1955 Model Shipways kit instructions for the "Young America, that (because of its' tiny scale,1:192): "Models should be judged by what is included, not left out".
In painting do you come down more on the side of Thomas Eakins, or Claude Monet?
I have struggled with the idea of using actual copper and reproducing the rivets being a bridge too far, depending on the scale of the model and its' purpose. What should the patina look like? (Copper only turns green when exposed to air.) I have no idea of what copper patinized by long exposure to seawater should look like. At what scale distance do you cease to see the presence of rivets. How many to include? (Clipper Ships had dozens per plate, in a complex geometric pattern.) Or even the distinction between individual plates for that matter? A similar problem: at what scale does what would have been gloss varnish or paint cease to be realistically gloss and become satiny or even flat?
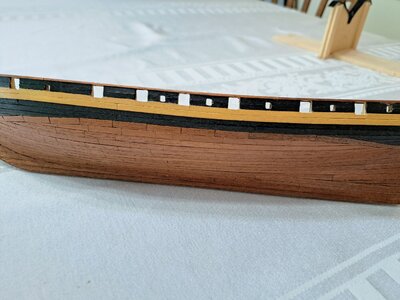
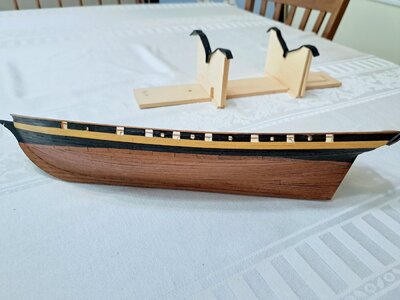
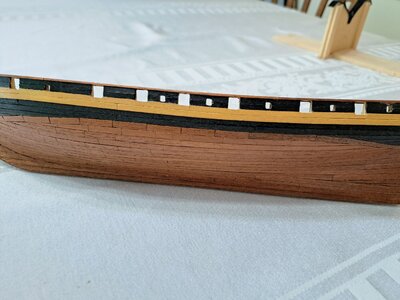
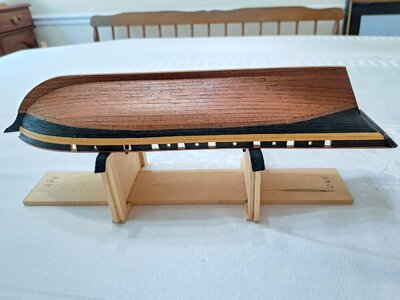
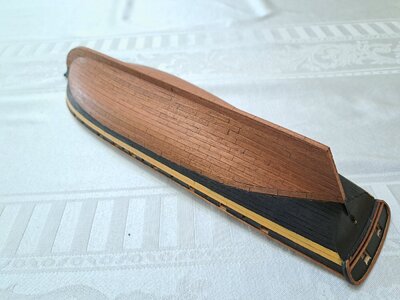
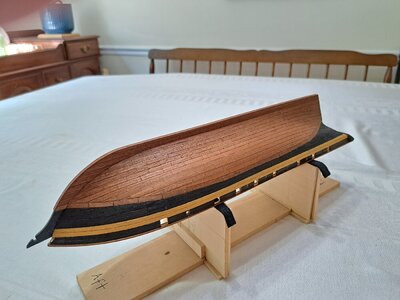
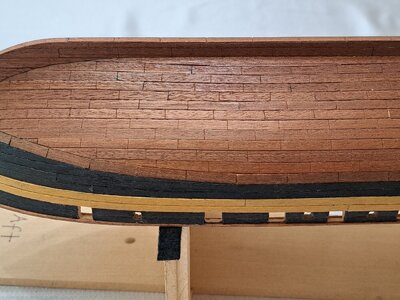
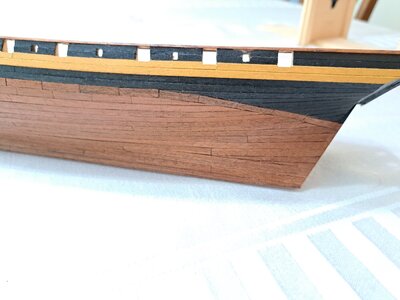
Following is one of my attempts at a more impressionistic approach: Mahogany (or Sapele) veneer (for its' Sienna brown base color, pickled with copper acrylic paint (Solvent paint dries too quickly.) that is, paint wiped on then wiped off while still wet to leave a trace of the applied color imbedded in the grain of the wood.
I am enclosing pictures of a bottom done this way on a fairly modest sized hull, about eleven inches long, in hopes of producing a subtle, unobtrusive, suggestion of a copper bottom, with a pleasing patina and texture, where the model is wearing the "copper" bottom and not the other way around.
It is one attempt at an acceptable solution. The subject, as always, is open to criticism and discussion. 20230831_111934.jpg20230831_111528.jpg20230831_111511.jpg20230831_111426.jpg20230831_111511 (1).jpg20230831_111353.jpg20230831_111240.jpg20230831_111125.jpg
 
Last edited:
Your method looks good to me and at a normal viewing distance would more than pass as acceptable.

The rivit counter in me say the black gaps in top band stand out when plates should overlap, but not a bad look overall.
 
I think I like it although it does seem to lean a bit to the Mahogany side. If I think copper, I can see copper but if I think Mahogany, I can see Mahogany. I think if you hadn't mentioned Mahogany I may have thought it was copper. Can you tell I'm torn :)
It is like the question of what color is "Sky Blue" a light blue, medium blue or darker blue, and from early morning or late evening with a touch of sunlight red in the mix, the possibilities are endless.
 
Jeez, Don. That was quick! I don' believe I'd even gotten done editing before you responded!
Very good question! I guess I'll never know, because I had to mention the wood in order to explain the process. But in so doing I have irrevocably biased the outcome! Catch22 :rolleyes:

Thanks, Pete
 
Kurt, you are right. the gaps are a problem, but less visible in reality than in the photos with the boosted light. Still another issue to address when searching for techniques and solutions.
 
Your method looks good to me and at a normal viewing distance would more than pass as acceptable.

The rivit counter in me say the black gaps in top band stand out when plates should overlap, but not a bad look overall.
I agree with you since you pointed it out (and even before, if I'm honest with myself) about the black gaps. I've ordered some Craft Smart Rub and Buff from the Great Vending Machine in the Sky (as my son calls Amazon) to see if that will help resolve that problem.
I had an extra "Dapper Tom" rough hull from MS laying around and started jonesing to carve something. So, it sort of become a platform for experimentation.
Thank you and anyone else for the creative critical assessments. Thumbsup

Pete
 
Last edited:
I like your technique, it does suggest copper plating without being the bright copper finish that is seen. My take on copper patina is I seldom see the green patina but mostly see the aged copper look. I will follow your experiments.
 
Many, if not most, contemporary models didn't copper. The planking needed to be visible to build the real ship the model was a guide for. I spend a lot of time and effort on my planking, if I'm using a kit I put the supplied timbers into storage and buy specialised timber. I am not going to cover it up!! In terms of aesthetics I prefer it, in terms of realism/history I don't care. My recent builds are presented on a diorama type sea with the lower hull still visible. The build is removable if I want a change in presentation.
20211206_002347.jpg20220713_164359.jpg
 
Thanks. In that case I will forge ahead. I was beginning to have my doubts. I just like a more subtle approach in order to keep all aspects of a model in proportionate focus aesthetically.
I like your technique, it does suggest copper plating without being the bright copper finish that is seen. My take on copper patina is I seldom see the green patina but mostly see the aged copper look. I will follow your experiments.
Thanks.
Many, if not most, contemporary models didn't copper. The planking needed to be visible to build the real ship the model was a guide for. I spend a lot of time and effort on my planking, if I'm using a kit I put the supplied timbers into storage and buy specialised timber. I am not going to cover it up!! In terms of aesthetics I prefer it, in terms of realism/history I don't care. My recent builds are presented on a diorama type sea with the lower hull still visible. The build is removable if I want a change in presentation.
View attachment 392536View attachment 392538
Bob, I am encouraged by your attitude and creativity! What ship is that represented? Gorgeous! Got more I can see?
I made a similar presentation with my HRM regatta yacht "Britannia" I think it's' on finished models from kits. I don't think you can see the hull underwater in the pictures, but it's there. I'm constantly trying to come up with something that satisfies my vision of what sails, and in this case a copper bottom should look like in a believable representation. "Britannia" was my first diorama. The idea struck me mid-build. It was expensive as hell to finish the way it is in a custom-built case the size of a refrigerator.
Thanks for the very thoughtful post.
Pete
 
My thoughts...if the model calls for a copper bottom I will plank the hull with that end goal in mind...in other words use basic bass wood planks without necessarily perfect planking. Then, as I would with painting...cover the planking with the copper. One odd out idea that I have used on smaller models...copper metal acrylic paint. Really nice stuff. The paint dries with a true copper metallic sheen. Of course one does not get the details of plates and rivets...but the copper paint does make for an interesting hull finish in the same way that painting a hull with antique white to simulate the "white stuff" coatings on many period ship hulls.
 
I did as you advise with the copper paint on my 1:192 "Young America" clipper. I mixed just a drop of green into the copper acrylic to subdue the intensity of the red.
I am very happy with the results. (That, of course, was over a well-sealed sugar pine carved hull., the Model Shipways wood of choice for rough carved hulls ca.1955.)
I'm afraid the "Flying Cloud" is too large to go that route. I'm still casting about for a solution that is believable as copper sheathing, but more subtle in execution.
All suggestions are most welcome.
Thank you for yours.
Pete
 
Back in the early 80's I paper coppered one of the ships I built and it turned out awful and was very distracting. Could not find thin enough copper, no goggle back then. I decided I would never copper bottom another ship. I believe it takes away from the true beauty of the ships lines and the hard work involved with planking the hull., the heck with being authentic .I like your technique and might try it in the future.
 
Thanks. In that case I will forge ahead. I was beginning to have my doubts. I just like a more subtle approach in order to keep all aspects of a model in proportionate focus aesthetically.

Thanks.

Bob, I am encouraged by your attitude and creativity! What ship is that represented? Gorgeous! Got more I can see?
I made a similar presentation with my HRM regatta yacht "Britannia" I think it's' on finished models from kits. I don't think you can see the hull underwater in the pictures, but it's there. I'm constantly trying to come up with something that satisfies my vision of what sails, and in this case a copper bottom should look like in a believable representation. "Britannia" was my first diorama. The idea struck me mid-build. It was expensive as hell to finish the way it is in a custom-built case the size of a refrigerator.
Thanks for the very thoughtful post.
Pete
Hi Pete,
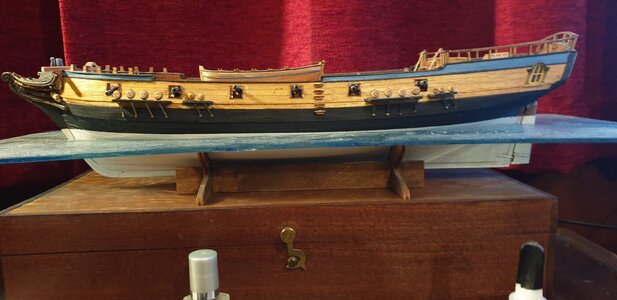
The brig pictured is the Phoenix by Master Korabel, it's on hold (along with 2 other builds!) At 1:72 it's too small for my tastes, I'm going to use the lines to design an HMS Sophie. It will be more in the keeping of Aubrey's first command from the book than Cochran's Speedy! Maybe 1:48 or 50.

20230903_155758.jpg20230903_155732.jpg20230903_155901.jpg
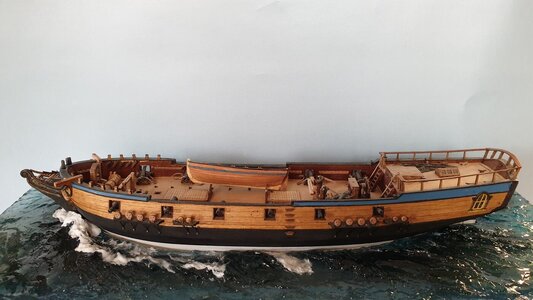
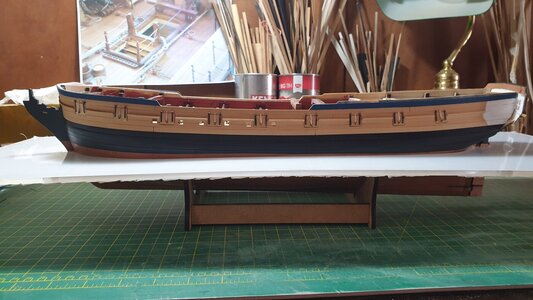
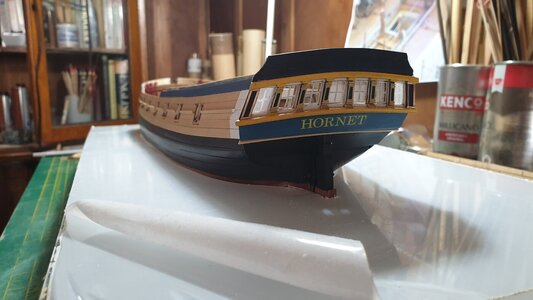
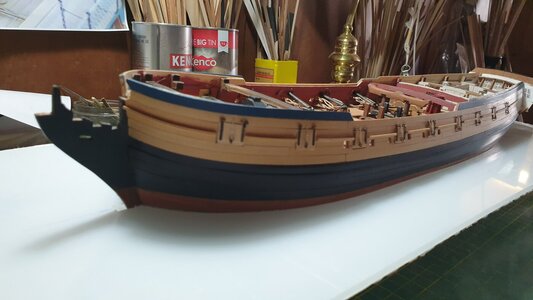
This is a Cormorant class ship sloop, HMS Hornet. 1:64, I used the lines of Amati's Fly from a kit, they have the same pattern. The base is 5mm acetate, it needs shaving to allow the ship to sit at the waterline. The final presentation will be under sail with the wind on the starboard quarter, it will list towards the viewer. It will of course need a lot of crew, I'll probably have to make them all, Napoleonic era crews are not common, they don't fit the gamer's requirements which is where the money is! Suitable 1:64 figures are like hen's teeth! Possibly dodo's teeth....long extinct! Also manufacturers only make gun crews. Nobody in a far more useful rigging, up aloft pose actually working the ship. Anybody with a printer has a market here!
The sea will be made from waved layers of acetate sealant (Clear-fix) coloured with alcohol based ink. After these, back to UK/European coastal vessels and fishing boats. I fancy a 'tableau' of Alert capturing Le Coureur, but I'm running out of space! Might just squeeze a 1:64 into the living room?
 
Hi Pete,
The brig pictured is the Phoenix by Master Korabel, it's on hold (along with 2 other builds!) At 1:72 it's too small for my tastes, I'm going to use the lines to design an HMS Sophie. It will be more in the keeping of Aubrey's first command from the book than Cochran's Speedy! Maybe 1:48 or 50.

View attachment 392690View attachment 392691View attachment 392692
This is a Cormorant class ship sloop, HMS Hornet. 1:64, I used the lines of Amati's Fly from a kit, they have the same pattern. The base is 5mm acetate, it needs shaving to allow the ship to sit at the waterline. The final presentation will be under sail with the wind on the starboard quarter, it will list towards the viewer. It will of course need a lot of crew, I'll probably have to make them all, Napoleonic era crews are not common, they don't fit the gamer's requirements which is where the money is! Suitable 1:64 figures are like hen's teeth! Possibly dodo's teeth....long extinct! Also manufacturers only make gun crews. Nobody in a far more useful rigging, up aloft pose actually working the ship. Anybody with a printer has a market here!
The sea will be made from waved layers of acetate sealant (Clear-fix) coloured with alcohol based ink. After these, back to UK/European coastal vessels and fishing boats. I fancy a 'tableau' of Alert capturing Le Coureur, but I'm running out of space! Might just squeeze a 1:64 into the living room?
I know what you mean about running out of space. My wife is very tolerant. Even a booster! But my house is starting to look like the Gutterman Memorial Museum.
The above is fabulous! I have a feeling that you know what it feels like when inspiration in overdrive keeps all the proliferating ideas for projects just beyond reach!:rolleyes:
I look forward to your progress. keep me posted!:D Pete
 
Last edited:
I know what you mean about running out of space. My wife is very tolerant. Even a booster! But my house is starting to look like the Peterman Memorial Museum.
The above is fabulous! I have a feeling that you know what it feels like when inspiration in overdrive keeps all the proliferating ideas for projects just beyond reach!:rolleyes:
I look forward to your progress. keep me posted!:D Pete
Single, so living room is also my studio. Heavy tools are in the shed, lathe etc in the conservatory!! I sometimes think about a partner but I haven't got the room, and think of all the nagging that will come with the sawdustROTF
I must do a full build log of the Hornet, I'll do that soon!
 
I did as you advise with the copper paint on my 1:192 "Young America" clipper. I mixed just a drop of green into the copper acrylic to subdue the intensity of the red.
I am very happy with the results. (That, of course, was over a well-sealed sugar pine carved hull., the Model Shipways wood of choice for rough carved hulls ca.1955.)
I'm afraid the "Flying Cloud" is too large to go that route. I'm still casting about for a solution that is believable as copper sheathing, but more subtle in execution.
All suggestions are most welcome.
Thank you for yours.
Pete
I would go ahead and use copper strip plates in your model. Yes, left as is the new copper they are bright and shiny and would probable stay that way for a very long time. My copper bottom Constitution model is still bright after three years. A solution to dull down the new copper plates is to “antique” them. Antiquing is a technique used in many hobby genres to make things new look old. Anyway…once your copper plates are in place wash the copper with a very light and diluted antiquing wash of diluted acrylic paint…wipe lightly with rag...or if the solution lays well do not wipe. Let dry and decide if you need to repeat for darker effect. You can use, in my opinion, either black or shades of green. At this point you will need to set up a test board…put some copper plates on a piece of flat board and test various strengths of acrylic paint wash and various colors. Using a copper green patina wash might be just the trick for you.
 
Last edited:
Thank you for all your advice and technique recommendations. I essentially did a version of what you suggest on the bottom of my "Chasseur" model and really liked the result. But when I tried to repeat it on another model (my "Grecian" model, also in the finished models forum) I couldn't repeat it! The bottom came out shiny. My antiquing efforts didn't work as well as before. Go figure! I used blackening solution diluted with water, buffed on (and off) with 000000 steel wool.
Before I get to that stage, I will take all of your suggestions under advisement and make a bunch of test samples.
I greatly appreciate all of the care and interest you have taken in assuring a good outcome for my next model. However that comes out, I will have the benefit of your advice. Thanks for caring!Thumbsup

Pete
 
Back
Top