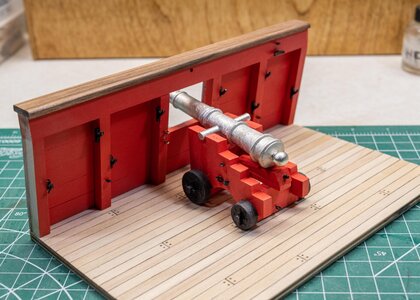
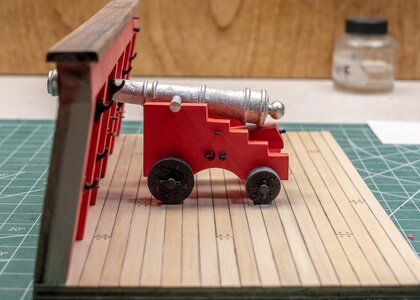
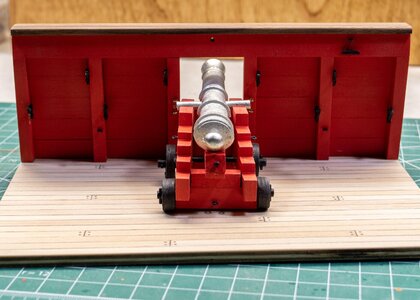
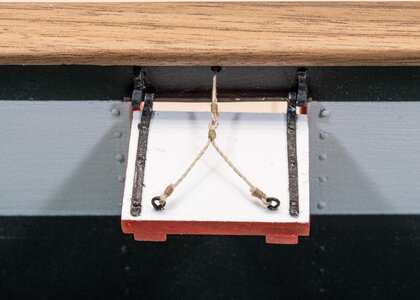
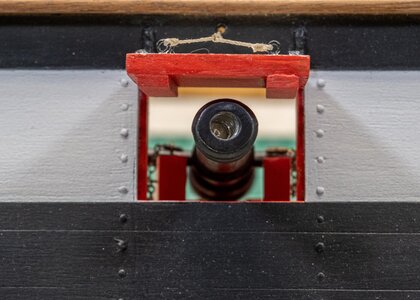
Nicely done work-up from the kit presentation. I'll be looking toward your completion. A similar French naval cannon kit returned me to modeling in the same way as well as completion of a lathe turned steel barrel firing .27 caliber 15 grain balls with black powder when the carriage was done. Rich (PT-2)I like the colour scheme what shade red did you use it looks really good. I agree with you about castings I used mine mainly because I wanted to use the parts provided.
You are using an out of date browser. It may not display this or other websites correctly.
You should upgrade or use an alternative browser.
You should upgrade or use an alternative browser.
Thanks Tony - The red is ModelExpo MS 4802 Bulwarks gun red. I had it left over from my HMS Pegasus build. I added the white stripe because I like the USS Constitution color scheme.I like the colour scheme what shade red did you use it looks really good. I agree with you about castings I used mine mainly because I wanted to use the parts provided.
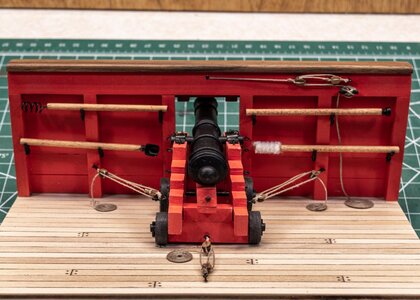
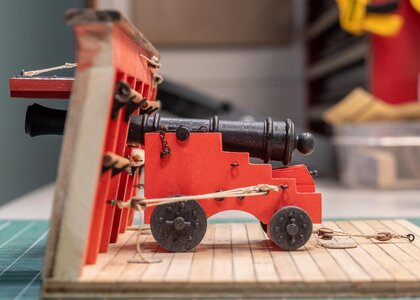
The sides of the carriage took three tries to get it acceptable but I think this time it looks pretty good. Had to do a little adjusting to get the gun barrel to center vertically in the port. Test fitting the basic parts, now to try and make some wheels. The supplied parts had all the wheels the same size but I wanted large forward and smaller aft. A bit of a challenge.
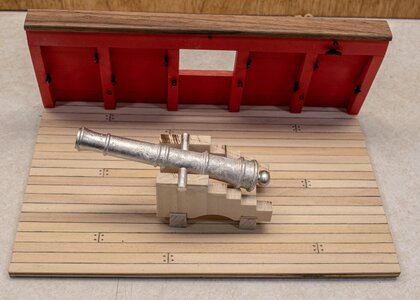
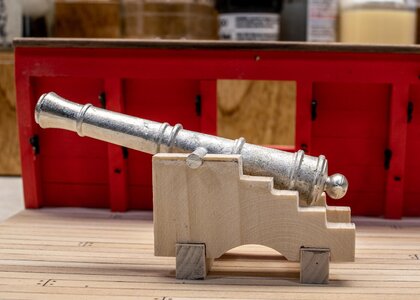


The evolution of the wheel.
What the kit supplies are not acceptably so I made my own. I saw this trick on YouTube somewhere and it worked out great. I started with a piece of ply and and glued on planks across the blank.
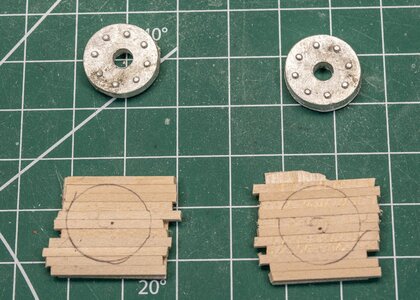 Next I drilled the center hole and stacked it on a machine screw and bolted it on. Note: The hole must match the diameter of the bolt exactly or your wheel might become oval instead of round. I speak from experience.
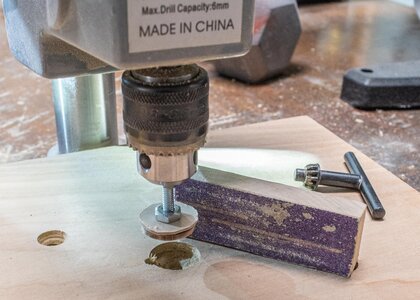
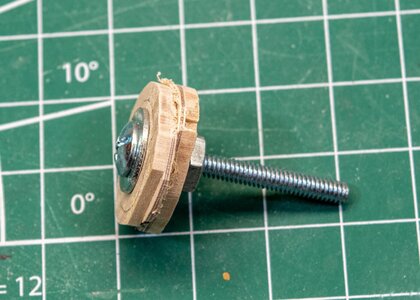 Then I chucked it up on my drill press and held sandpaper at right angles until the diameter was down to what I wanted.
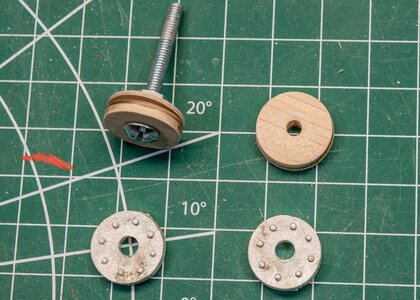 I drilled holes for the wheel retainer pins, toothpicks sanded down, and inserted them.
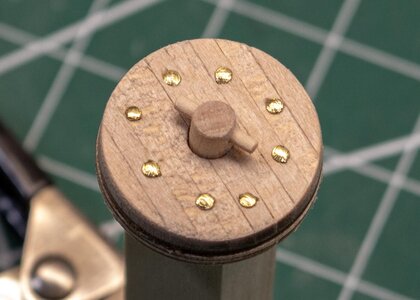 Then I dry fitted the axel and wheel assembly to the carriage.
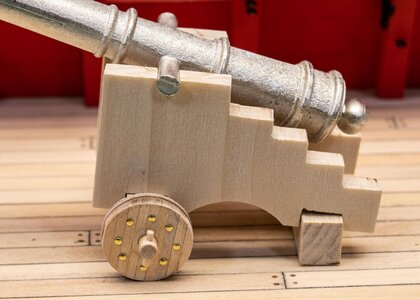 Tomorrow I'll tackle the smaller rear wheels.
What the kit supplies are not acceptably so I made my own. I saw this trick on YouTube somewhere and it worked out great. I started with a piece of ply and and glued on planks across the blank.
 Next I drilled the center hole and stacked it on a machine screw and bolted it on. Note: The hole must match the diameter of the bolt exactly or your wheel might become oval instead of round. I speak from experience.
 Then I chucked it up on my drill press and held sandpaper at right angles until the diameter was down to what I wanted.
 I drilled holes for the wheel retainer pins, toothpicks sanded down, and inserted them.
 Then I dry fitted the axel and wheel assembly to the carriage.
 Tomorrow I'll tackle the smaller rear wheels.
Looking nice. RichThe evolution of the wheel.
What the kit supplies are not acceptably so I made my own. I saw this trick on YouTube somewhere and it worked out great. I started with a piece of ply and and glued on planks across the blank.
View attachment 217532Next I drilled the center hole and stacked it on a machine screw and bolted it on. Note: The hole must match the diameter of the bolt exactly or your wheel might become oval instead of round. I speak from experience.
View attachment 217533Then I chucked it up on my drill press and held sandpaper at right angles until the diameter was down to what I wanted.
View attachment 217534View attachment 217542I drilled holes for the wheel retainer pins, toothpicks sanded down, and inserted them.
View attachment 217543Then I dry fitted the axel and wheel assembly to the carriage.
View attachment 217544Tomorrow I'll tackle the smaller rear wheels.
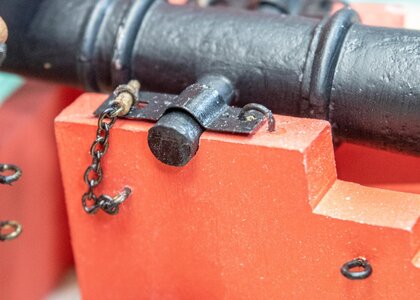
This is finishing out very nicely. Rich (PT-2)Gun carriage has been painted. This time I tried Kilz as a primer instead of an oil based sealer. The finish is not as smooth, a small amount of fuzz remained, but the paint adheres better and the tendency to sluff off is reduced. Obtaining a good finishing technique still eludes me.View attachment 218272View attachment 218273View attachment 218274View attachment 218360
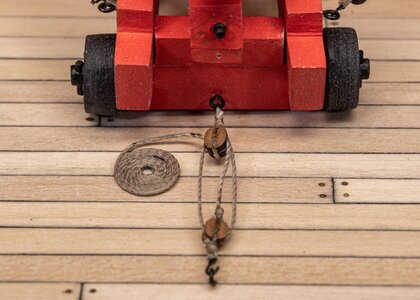
Here is my jury-rig for making rope coils. First, I cut out two sort of circular blanks from an old CD case. Then I drilled a hole in the center of both blanks the size of the bolt that will hold them together. Cut a small notch in the corner of one hole for the line to pass through so it won’t interfere with the bolt, then bolting the blanks together.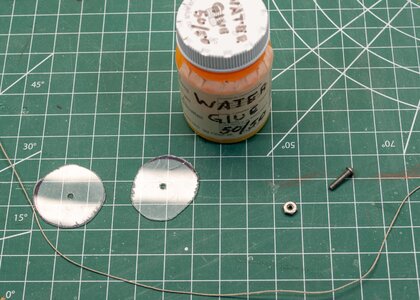 Soak the line in a mixture of 50/50 water and glue. Pass the line through the hole and holding it against the notch, bolt the other blank onto the first and lightly tighten the halves together.
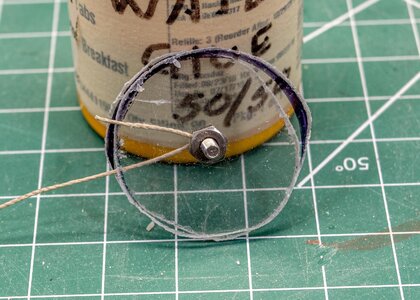 Rotate the blanks keeping tension on the line so the wraps stay snug to each other. When the coil is the size you want, hold it with a clamp until it dries.
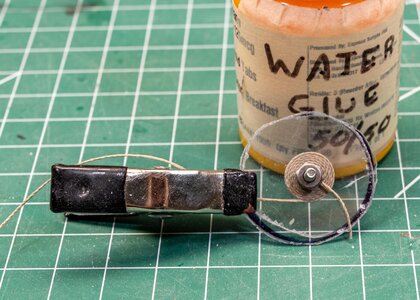 When dry, remove the bolt, nut and blank halves. I found if it dries to long, overnight in my case, the bolt will be hard to get loose and it pulled the coil apart. About 2-3 hours seems to be about right but be careful as it might still be a little damp. A little more drying time and you have a nice, neat coil.
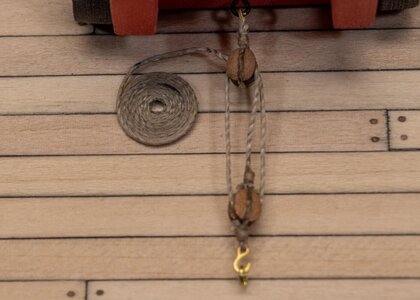
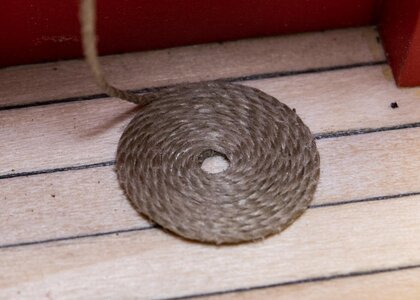
 Soak the line in a mixture of 50/50 water and glue. Pass the line through the hole and holding it against the notch, bolt the other blank onto the first and lightly tighten the halves together.
 Rotate the blanks keeping tension on the line so the wraps stay snug to each other. When the coil is the size you want, hold it with a clamp until it dries.
 When dry, remove the bolt, nut and blank halves. I found if it dries to long, overnight in my case, the bolt will be hard to get loose and it pulled the coil apart. About 2-3 hours seems to be about right but be careful as it might still be a little damp. A little more drying time and you have a nice, neat coil.

JUst a thought for consideration if you want a more working presentation. . . tight flat coils would only have been seen in port for inspections, When at sea and under firing conditions the lines would be laid out in longer loops that feed out quickly and are "thrown" down again after recoils where they would not be stepped on by the gun crew members on each side of the carriage. Gun battles were fought and won (with some luck) at the highest rate of fire and not accuracy of aim which was mostly up to chance with the pitch and roll of the ship as well as smooth bore inconsistencies. Your own plan for presentation will be correct for you and the details that you want to show. You are proceeding very well. Rich (PT-2)Here is my jury-rig for making rope coils. First, I cut out two sort of circular blanks from an old CD case. Then I drilled a hole in the center of both blanks the size of the bolt that will hold them together. Cut a small notch in the corner of one hole for the line to pass through so it won’t interfere with the bolt, then bolting the blanks together.View attachment 219283Soak the line in a mixture of 50/50 water and glue. Pass the line through the hole and holding it against the notch, bolt the other blank onto the first and lightly tighten the halves together.
View attachment 219284Rotate the blanks keeping tension on the line so the wraps stay snug to each other. When the coil is the size you want, hold it with a clamp until it dries.
View attachment 219285When dry, remove the bolt, nut and blank halves. I found if it dries to long, overnight in my case, the bolt will be hard to get loose and it pulled the coil apart. About 2-3 hours seems to be about right but be careful as it might still be a little damp. A little more drying time and you have a nice, neat coil.
View attachment 219286View attachment 219287
Interesting that I also entered SoS just after completing this 1750 French Naval cannon/station and tricked up the kit for more of the accessories and working conditions.JUst a thought for consideration if you want a more working presentation. . . tight flat coils would only have been seen in port for inspections, When at sea and under firing conditions the lines would be laid out in longer loops that feed out quickly and are "thrown" down again after recoils where they would not be stepped on by the gun crew members on each side of the carriage. Gun battles were fought and won (with some luck) at the highest rate of fire and not accuracy of aim which was mostly up to chance with the pitch and roll of the ship as well as smooth bore inconsistencies. Your own plan for presentation will be correct for you and the details that you want to show. You are proceeding very well. Rich (PT-2)
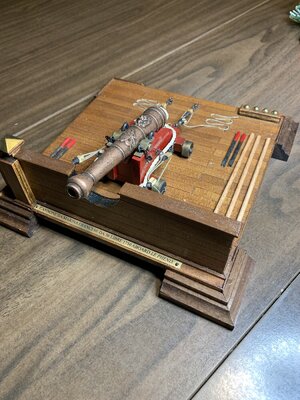
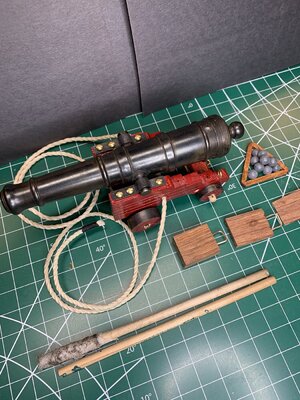
Not a full bulwark station kit but it was a fun faux 1/17th scale
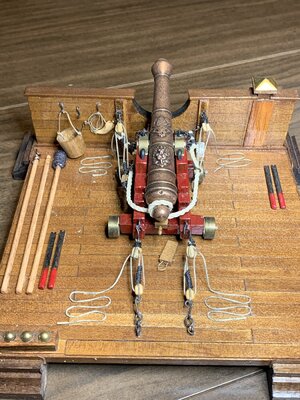
For an actual firing cannon with a 6 inch steel barrel turned about 50 years ago and put onto a carriage for shooting last spring: .027 caliber, 15 grain ball, muzzle loaded with 15 grains of black powder for shooting on the local rifle range in a controlled setting with elevation exploratory distances of 15 out to 25 yards with fairly accurate impacts which at 15 yards penetrate 1/2 inch strand board.
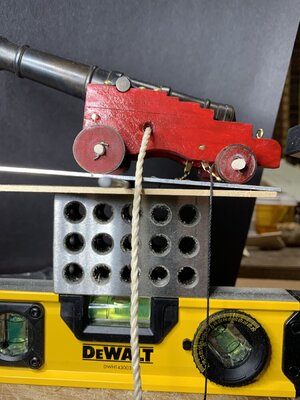
Experimenting with the balance point you can see a rod under and just behind the front wheels for a drop to the breach which changed to muzzle down with less than a 32nd inch shift of the balance rod. Lots
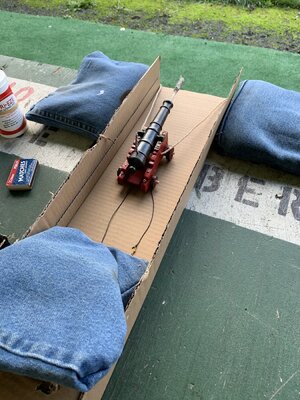
 of smoke and noise when firing using a cardboard "track" with the recoil hawsers around the front edges limiting recoil range. Ramrod in bore was to assist in first firing sighting and then removed before lighting the fuse.
Months ago I posted an MP-4 video of the firing but do not recall how to do that. Maybe a reverse search would find it. Rich (PT-2)
October 16, 2020 starting on page 100 and then 101Interesting that I also entered SoS just after completing this 1750 French Naval cannon/station and tricked up the kit for more of the accessories and working conditions.View attachment 219329
Not a full bulwark station kit but it was a fun faux 1/17th scale
View attachment 219330
For an actual firing cannon with a 6 inch steel barrel turned about 50 years ago and put onto a carriage for shooting last spring: .027 caliber, 15 grain ball, muzzle loaded with 15 grains of black powder for shooting on the local rifle range in a controlled setting with elevation exploratory distances of 15 out to 25 yards with fairly accurate impacts which at 15 yards penetrate 1/2 inch strand board.View attachment 219331
Experimenting with the balance point you can see a rod under and just behind the front wheels for a drop to the breach which changed to muzzle down with less than a 32nd inch shift of the balance rod. LotsView attachment 219334View attachment 219334 of smoke and noise when firing using a cardboard "track" with the recoil hawsers around the front edges limiting recoil range. Ramrod in bore was to assist in first firing sighting and then removed before lighting the fuse.View attachment 219335
Months ago I posted an MP-4 video of the firing but do not recall how to do that. Maybe a reverse search would find it. Rich (PT-2)
Let's see if this is the MP-4 firing videoInteresting that I also entered SoS just after completing this 1750 French Naval cannon/station and tricked up the kit for more of the accessories and working conditions.View attachment 219329
Not a full bulwark station kit but it was a fun faux 1/17th scale
View attachment 219330
For an actual firing cannon with a 6 inch steel barrel turned about 50 years ago and put onto a carriage for shooting last spring: .027 caliber, 15 grain ball, muzzle loaded with 15 grains of black powder for shooting on the local rifle range in a controlled setting with elevation exploratory distances of 15 out to 25 yards with fairly accurate impacts which at 15 yards penetrate 1/2 inch strand board.View attachment 219331
Experimenting with the balance point you can see a rod under and just behind the front wheels for a drop to the breach which changed to muzzle down with less than a 32nd inch shift of the balance rod. LotsView attachment 219334View attachment 219334 of smoke and noise when firing using a cardboard "track" with the recoil hawsers around the front edges limiting recoil range. Ramrod in bore was to assist in first firing sighting and then removed before lighting the fuse.View attachment 219335
Months ago I posted an MP-4 video of the firing but do not recall how to do that. Maybe a reverse search would find it. Rich (PT-2)
Hey Rich - Love the French battle station. This is my second one. I did one for my son last year and this one is for my EMT nephew. They make good gifts for friends and family. Really interesting on the firing or your smooth bore. Looks like a lot of fun. I used to build flint lock black powder pistols and Kentucky long rifles and had a blast shooting them (pun intended). Saw a video of a broadside firing on HMS Victory on YouTube. Absolutely awesome. I was lucky enough to be able to visit that ship back in 1966. Sure wish I'd taken a lot of photos but was more interested in the English pubs at that age.Interesting that I also entered SoS just after completing this 1750 French Naval cannon/station and tricked up the kit for more of the accessories and working conditions.View attachment 219329
Not a full bulwark station kit but it was a fun faux 1/17th scale
View attachment 219330
For an actual firing cannon with a 6 inch steel barrel turned about 50 years ago and put onto a carriage for shooting last spring: .027 caliber, 15 grain ball, muzzle loaded with 15 grains of black powder for shooting on the local rifle range in a controlled setting with elevation exploratory distances of 15 out to 25 yards with fairly accurate impacts which at 15 yards penetrate 1/2 inch strand board.View attachment 219331
Experimenting with the balance point you can see a rod under and just behind the front wheels for a drop to the breach which changed to muzzle down with less than a 32nd inch shift of the balance rod. LotsView attachment 219334View attachment 219334 of smoke and noise when firing using a cardboard "track" with the recoil hawsers around the front edges limiting recoil range. Ramrod in bore was to assist in first firing sighting and then removed before lighting the fuse.View attachment 219335
Months ago I posted an MP-4 video of the firing but do not recall how to do that. Maybe a reverse search would find it. Rich (PT-2)
Thanks for the info Rich. I’m going for the in-port look. I agree the Flemish coil looks much neater and also leaves room on deck for other pieces of gear. I think the small details are what make the model. Still have to add lots of stuff – buckets, cannon balls, etc. I could have faked down the lines, but they take up so much deck space. I have handled a lot of lines in my early Navy days. I was a Tin can sailor for 22 years and a fantail line handler during sea detail. All mooring lines were kept on big reels at sea then faked down when the ship was ready to tie up to the pier or alongside another ship. Much easier to handle and ran out with ease. CharlieJUst a thought for consideration if you want a more working presentation. . . tight flat coils would only have been seen in port for inspections, When at sea and under firing conditions the lines would be laid out in longer loops that feed out quickly and are "thrown" down again after recoils where they would not be stepped on by the gun crew members on each side of the carriage. Gun battles were fought and won (with some luck) at the highest rate of fire and not accuracy of aim which was mostly up to chance with the pitch and roll of the ship as well as smooth bore inconsistencies. Your own plan for presentation will be correct for you and the details that you want to show. You are proceeding very well. Rich (PT-2)
You have the hands on experience for line work that was not a part of Naval Aviation in the heavy attack squadrons that I served as a photo interpreter in air intelligence 1963 - 67 including the Tonkin Gulf Yacht Club on Yankee Station 65/66.Thanks for the info Rich. I’m going for the in-port look. I agree the Flemish coil looks much neater and also leaves room on deck for other pieces of gear. I think the small details are what make the model. Still have to add lots of stuff – buckets, cannon balls, etc. I could have faked down the lines, but they take up so much deck space. I have handled a lot of lines in my early Navy days. I was a Tin can sailor for 22 years and a fantail line handler during sea detail. All mooring lines were kept on big reels at sea then faked down when the ship was ready to tie up to the pier or alongside another ship. Much easier to handle and ran out with ease. Charlie
Still can't see how the sailors in the age of sail managed to handle all those lines and ropes. I understand they were divided into groups and assigned to a mast. Then further divided into top men and deck men. Interesting. Never got to Nam. Spent all that time in the med chasing soviet subs. Been into photography from my high school days. Think I have some shots I took of Russian boats we surfaces packed away somewhere in my slide collection. Reliving my glory days.You have the hands on experience for line work that was not a part of Naval Aviation in the heavy attack squadrons that I served as a photo interpreter in air intelligence 1963 - 67 including the Tonkin Gulf Yacht Club on Yankee Station 65/66.
Our squadron was deployed on the Saratoga for a Med NATO war games and ports of call for about 11 months in 64/65. Upon completion we were supposed to get a year conus but within 3 months were sent west on the Ranger to Tonkin Gulf games. No mulligans allowed there and total focus was required of the air crews. I worried most about the married ones who were distracted and knew that the single steel eyed gunfighter types were as safe at they could be without any distractions. I was fortunate in all of the strike mission prep and briefings I never lost a pilot or plane during our cruse before coming home under the Golden Gate Bridge with Carol Doda, topless in her motor boat doing circles around the carrier to the delight of all of us standing along the flight deck at rigid attention ;-)Still can't see how the sailors in the age of sail managed to handle all those lines and ropes. I understand they were divided into groups and assigned to a mast. Then further divided into top men and deck men. Interesting. Never got to Nam. Spent all that time in the med chasing soviet subs. Been into photography from my high school days. Think I have some shots I took of Russian boats we surfaces packed away somewhere in my slide collection. Reliving my glory days.
Glad everyone came home safe and sound. My brother-in-law still battling with PTSD. He was in country as a medic on Hueys. Met my wife in Majorca Spain in 68. A vacationing Finn from Helsinki. After several trips up north we were married and 1969 and reported to my next duty station, Key West Fla. talk about culture shock! Never heard of Carol Doda but she might be the sister of Humpy Dumpty in Naples.Our squadron was deployed on the Saratoga for a Med NATO war games and ports of call for about 11 months in 64/65. Upon completion we were supposed to get a year conus but within 3 months were sent west on the Ranger to Tonkin Gulf games. No mulligans allowed there and total focus was required of the air crews. I worried most about the married ones who were distracted and knew that the single steel eyed gunfighter types were as safe at they could be without any distractions. I was fortunate in all of the strike mission prep and briefings I never lost a pilot or plane during our cruse before coming home under the Golden Gate Bridge with Carol Doda, topless in her motor boat doing circles around the carrier to the delight of all of us standing along the flight deck at rigid attention ;-)
Carol Doda was a San Francisco item in the middle 60's and my living on the West Coast I was more familiar with the S.F. scene having been there several times before the service. As I recall the squadrons from NAS Sanford were split between Key West and Georgia about the time that you were sent there but I had departed to return to school before that separation of the squadrons.Glad everyone came home safe and sound. My brother-in-law still battling with PTSD. He was in country as a medic on Hueys. Met my wife in Majorca Spain in 68. A vacationing Finn from Helsinki. After several trips up north we were married and 1969 and reported to my next duty station, Key West Fla. talk about culture shock! Never heard of Carol Doda but she might be the sister of Humpy Dumpty in Naples.
Did a lot of fishing around the Boca Chica NAS 69 to 72Carol Doda was a San Francisco item in the middle 60's and my living on the West Coast I was more familiar with the S.F. scene having been there several times before the service. As I recall the squadrons from NAS Sanford were split between Key West and Georgia about the time that you were sent there but I had departed to return to school before that separation of the squadrons.


