Windlass - CNC machined

Joined
May 1, 2023
Messages
115
Points
113

I'm fairly new to CNC machining, and I've been doing it for a little less than a year.
Currently, I'm focusing on improving the precision of fixing the material, which will allow me to work on smaller details.

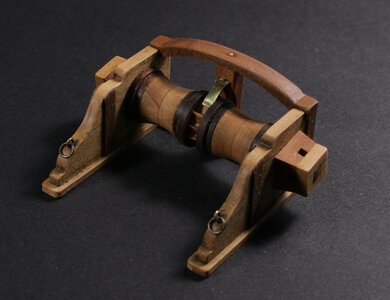
So far, I have been working on relatively larger projects, like this windlass version (scaled at 1:65).
This is my first attempt at this windlass, and I consider to make some improvements in the future (it's not yet glued into the model).
However, it functions well and was quite easy to assemble.

For modeling, I use Fusion 360.

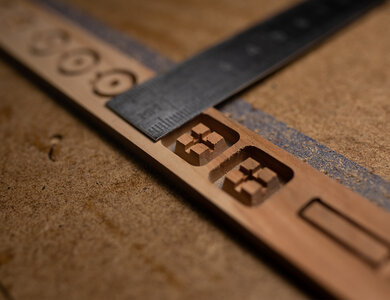
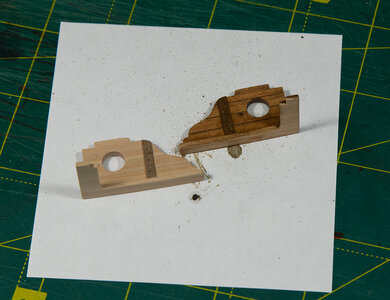
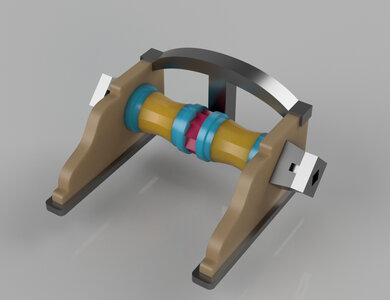
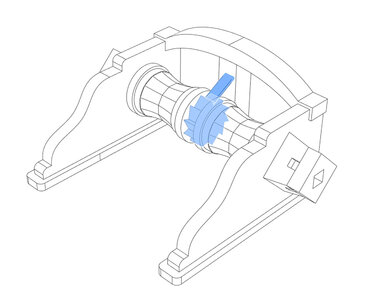
The main idea behind this project was to create a set of pieces that would eliminate the need for "double-sided" or "flip" CNC processing.
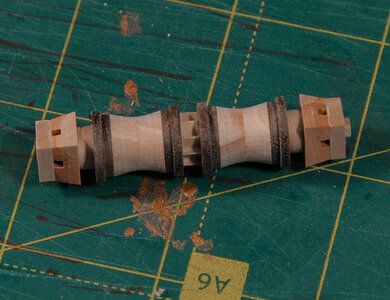
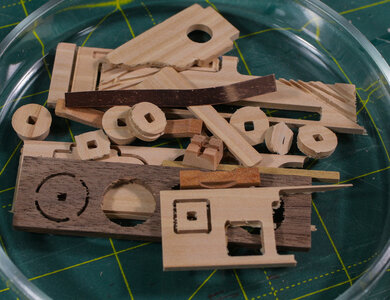
Here are some stages with stages of the process and the final result.
And also the link to a video where I'm assembling it...
2023-05-04_035913.jpg

2023-06-05_165255.jpg

2023-06-05_190153.jpg


MVV_5204.jpg

MVV_5258.jpg

2023-06-05_190251.jpg

2023-06-05_190456.jpg
 
I am new to 3D printing I have a 8k resin unit, not sure what a UV printer is.
An 8K resolution is more than sufficient for this purpose. UV, which stands for ultraviolet, is an alternate term used for resin printers.

However, if I were to 3D print this model, I would modify the design slightly. Since now it is designed for one-sided milling, it has an excessive number of parts. By using a 3D printer, you may print more of these objects as a single piece, reducing the overall number of parts that need to be printed.
 
Last edited:
Well with lots of parts I get more practice on assembly and maybe color printing if I get more colors of resin.

Can you send me a PM with the files or location of them.
 
I'm fairly new to CNC machining, and I've been doing it for a little less than a year.
Currently, I'm focusing on improving the precision of fixing the material, which will allow me to work on smaller details.

So far, I have been working on relatively larger projects, like this windlass version (scaled at 1:65).
This is my first attempt at this windlass, and I consider to make some improvements in the future (it's not yet glued into the model).
However, it functions well and was quite easy to assemble.

For modeling, I use Fusion 360.

The main idea behind this project was to create a set of pieces that would eliminate the need for "double-sided" or "flip" CNC processing.
Here are some stages with stages of the process and the final result.
And also the link to a video where I'm assembling it...
View attachment 377955

View attachment 377956

View attachment 377957


View attachment 377960

View attachment 377961

View attachment 377962

View attachment 377963
Great Result - Looking very good Thumbsup
 
This is very good work indeed, especially for a first attempt, well done. What CNC machine are you using? I haven't explored CNC so far, only 3D printing (both filament & resin), including making 1:96 versions of the Cutty Sark windlass, winches and pump (here) . I likewise use F360 and find it to be an excellent tool. I have a laser cutter on the way but am interested in CNC as well. Some things on some models look better when made from wood. For sure I can fake it in resin, but only up to a point.

In passing, although you can indeed often print things like this as a single item, I usually end up breaking them down into multiple parts, for a couple of reasons; a) supports on very small parts can spoil the appearance, but I can often work around this via a multi-part assembly; b) if painting items you get much cleaner lines via multi-part assemblies.

Thank you for your kind words!

I've followed the link to your post with the printed details and must admit you do an excellent job. These printers now offer remarkable precision. Personally, I have a small Photon Mono 4K. However, a printer is just one aspect. The other half is the model itself, and it's quite a task to develop a model that is both printable and visually appealing. I truly admire your efforts in this regard!

The CNC machine I use is assembled by a friend of mine who has been doing this for quite some time, and his machines are exceptionally accurate. The only challenge lies in the components from China :) Sometimes they turn out well, but occasionally they come with unpleasant surprises hidden within.

For me, whether to print or mill is always a balance between technical feasibility, complexity, and the final aesthetic.

When working with wooden models, my preference is to use wood for the majority of the parts. However, due to the grain and structure of wood, it is not always feasible to achieve the desired appearance and scale through machining alone. In such cases, I opt to print certain details. In my current project, I am striving to minimize printing and utilize authentic wood and metal components as much as possible.
Nevertheless, I have yet to find a solution for creating visually pleasing blocks, which might eventually lead me to resort to printing them. Additionally, I'll print a lantern and possibly some small items for the deck. And, after visiting your post I'm thinking about a printed windlass, at least partly :)

Regds,
Max
 
Max, I think we're probably on the same trajectory. It's whatever tool or process yields the best result. I think the best models will come from using a variety of processes and materials. Just like the real things, I suppose. 3D Printing is fabulous in many situations but as you know, also has limitations and shortcomings. The same is true of every other material. I think the laser machine will open further avenues for me to use wood when it would add to the model. I'm especially looking at deck veneers, cabin tops and so on; I believe I have a good method now for 3D printing these but being able to combine this with real wood tops, designed in from the outset, would take it up another notch. Regarding micro CNC, I'm probably more interested in what this would allow vis a vis metal or post-finishing filament prints, as these can have all the strength properties but not the finish.

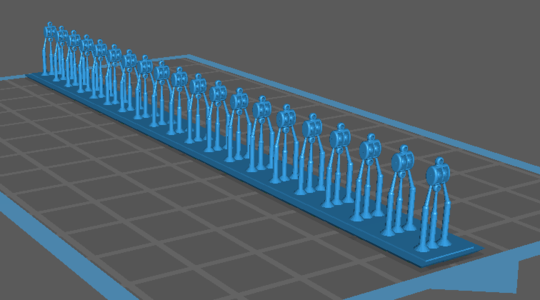
Resin printing is great for blocks! The thing I like most is that it allows me to mass produce in such a way that the painting is also really easy. Here's a method I've settled on: I create a strip of ready-to-print blocks i.e. with the supports already in place, and then print multiples of these. As I can easily reach all sides and angles of a strip with an airbrush I can paint them all really quickly and consistently, then just snip them off when done.

1686481148263.png
 
Max, I think we're probably on the same trajectory.
I think yes :)
Regarding micro CNC, I'm probably more interested in what this would allow vis a vis metal or post-finishing filament prints
Well, that is an intriguing approach. While my CNC machine excels in precise metal works, it can be time-consuming and requires specialized tools. I made several attempts and was pleased with the results, but it consumed a significant amount of time. As a result, I reconfigured my worktable for woodwork and have been focused on that for now. Additionally, after witnessing the capabilities of laser engravers with brass, I made a clear decision to avoid working with metal on my CNC, at least for the time being. It's currently easier for me to ask a friend who has a laser engraver to handle metal-related tasks. However, in the future, when my budget allows, I may revisit the idea and upgrade my CNC accordingly.

Regarding the precise processing of pre-printed plastic details, especially those with complex curved surfaces, I haven't personally attempted it. The main challenge I foresee is achieving accurate positioning of the CNC machine over such intricate stock. However, I believe it should be theoretically possible to find a solution for this.
 
Even though the manufacturers say this laser can only etch metal, I’ll be looking to see if it can cut very thin sheet and do the equivalent of photo-etching. It‘ll be completely new territory for me and I’m looking forward to taking delivery - I bought the machine via Kickstarter I.e. you help fund the development and get the product at a huge discount as a reward.
 
Even though the manufacturers say this laser can only etch metal, I’ll be looking to see if it can cut very thin sheet and do the equivalent of photo-etching. It‘ll be completely new territory for me and I’m looking forward to taking delivery - I bought the machine via Kickstarter I.e. you help fund the development and get the product at a huge discount as a reward.
May I hope you’ll share the results? ;)
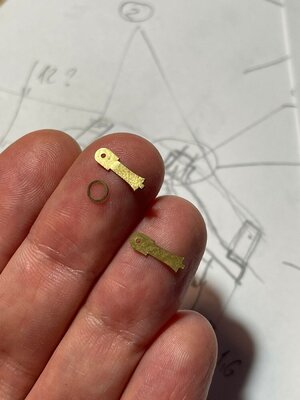
What my experience shows - laser cuts are much sharper and more precise, than photo etching. In addition - powerful metal laser engravers can make amazing 3D things, deep enough to serve many shipmodelist needs (I'll share the picture later - need to find it).
But those parts in the photo below have been cut for me by a colleague of mine. He just has a rather lower power engraver, but with many threads (passes), it is able to cut brass up to 0.5mm thick.

I would get such a machine, but it's a bit over my budget now :)

LaserCut.jpg
 
Last edited:
Back
Top