Sopwith Camel. Artesania Latina [COMPLETED BUILD]

Hello modellers. Another short update on my progress. First I received my missing cylinder head from AL. in fact they sent me a packet of four, again excellent service.

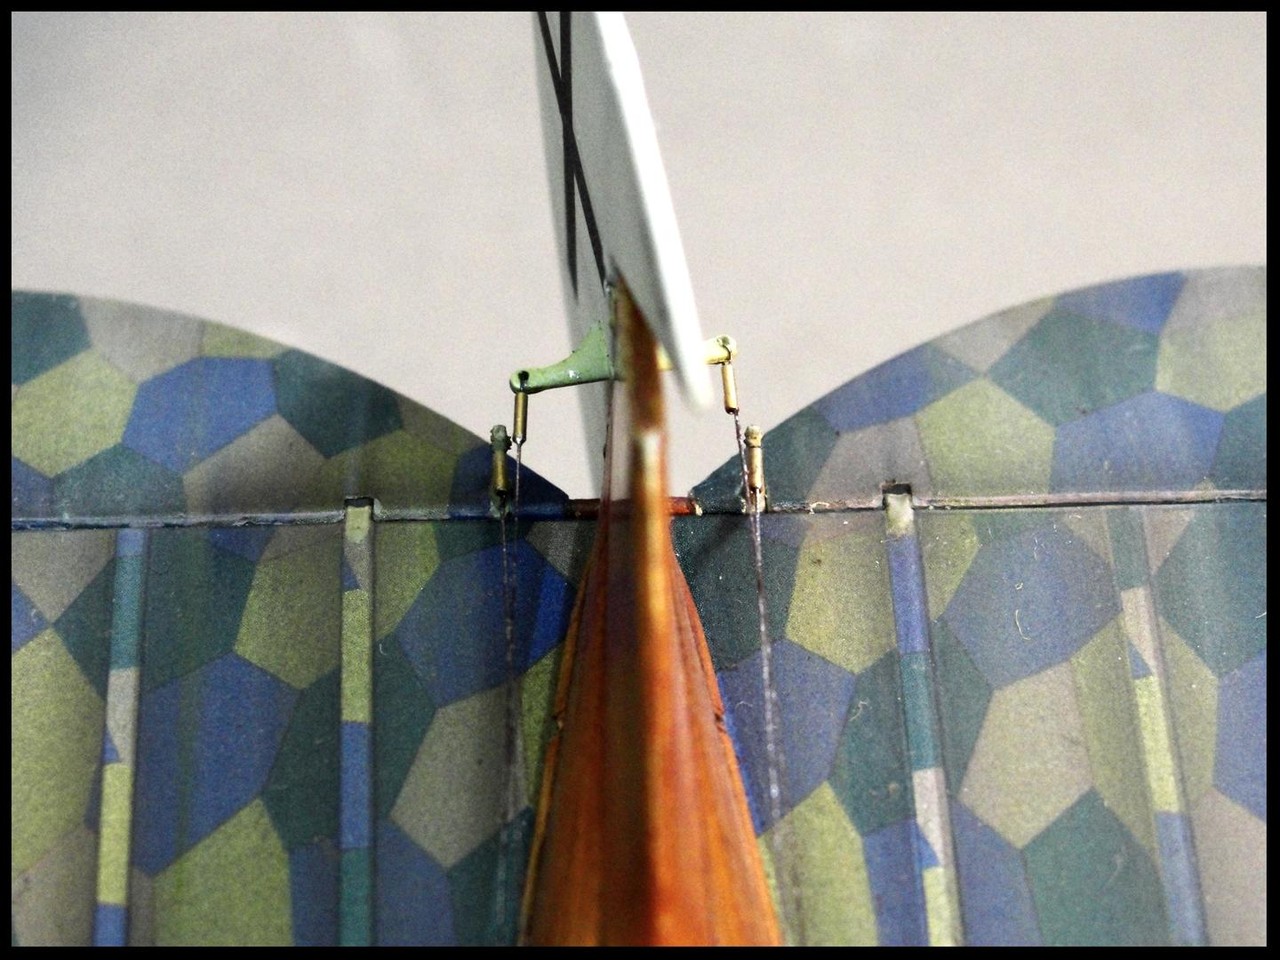
Next task should be the PE parts for the rigging, eyelets , turnbuckles etc, I know that they are going to give me nightmares so I’m putting off doing them for as long as I can, so although out of sequence I’ve started making the upper wing. Again all the parts are a very good snug fit which is making things quite easy, I’ll sand the ribs when they’re all in place, they’ll be a bit stronger then, again although fragile I still haven’t broken any.

I must tell you about these cyno application nozzles. I bought a pack off Ebay to try out and wow, they are magic, the best I’ve used and I’ve tried lots. I used them with medium viscosity, they let very small easy to control amounts through, even very small droplets, the cyno doesn’t stick to them, it is easily wiped away, when the tip finally gets blocked you just cut away a small part of the tip and they’re then as good as new, two lasted me for a whole bottle. These are very cheap and I couldn’t recommend them highly enough.


082.jpg


083.jpg


084.jpg
 
Hello again and thanks for your interest. I’m making good headway with this build so here’s my update. The missing cylinder head arrived and I was then able to complete the engine, I’m pretty pleased with the result, it’s detailed enough and looks fairly authentic. AL. parts replacement service seems to work very well and they should be complimented on their excellent customer service.

I’ve finished building the upper wing along with its internal bracing rig, if you can live with the PE outline it’s pretty good and feels fairly strong. I mentioned that I started this wing to put off doing the large amount of PE needed on the fuselage, it didn’t do me much good as it required well over sixty PE parts on its build. I’ve also now completed the lower wings, adding the ailerons and rigging, so moving forward nicely.

I'll add that I dumped the supplied fishing line and for the rigging use .25 rigging thread from my stash, it's so much easier to use and looks better, I can't understand why they chose the fishing line instead.


085.jpg

086.jpg

087.jpg

088.jpg

090.jpg

091.jpg


092.jpg

Underside of the lower wing

093.jpg
 
Hello, again thanks for your likes. The build continues, this time I’m showing you the almost completed rigging. It wasn’t difficult to follow the instructions but it was difficult to achieve. There are about ninety rigging eyelets and turnbuckles made up of PE. the lines crossed the frames and each other, many at awkward angles with some of the eyelets difficult to access, rigging my Victory was easier. I started using .25 thread which looked about right in the wings but it looked too heavy along the fuselage so I used a dark grey sewing thread from my wife’s stash, this looks right and being thinner was easier to thread for which I was thankful. The eyelets only have a small contact area on the frames and a few came away when I tensioned the line, this caused me a problem as some of the mounting points have four eyelets attached causing other lines to be also affected and needed re doing. With all the lines crossing close to each other and with the control cables running inside the fuselage I found it almost impossible to focus on the line that I was doing, needless to say that I didn’t enjoy this part of the build, I found it frustrating, but at least it’s now behind me.


094.JPG

095.JPG

096.JPG

097.JPG

098.JPG

099.JPG
 
Last edited:
Hello again. Moving on with the build I’ve now fitted the additional fuel tank as well as the oil tank, I also made up the exhaust shields at the sides of the firewall from PE sheets. I put into place the instrument consol and ammo tray which completes the cockpit interior. Wing templates are used to set the lower wings, these are attached to the template that was used to make up the fuselage. I hadn’t realized that once used this template would be needed again, it was broken up when I removed the completed fuselage and I nearly threw it away, I think that my modelling angel stayed my hand, I kept it just in case putting it in my stash box.


100.jpg

101.jpg

102.jpg
 
Your plane is looking great! If I may suggest, from the plastic modeling world, to try EZ Line or Uschi line for the rigging lines. I have used EZ line a lot for antennas and such on my model ships. Uschi line is suppose to be similar. Both are elastic so you glue them in place with a little tension and they maintain their tightness for a very realistic look.


They come in different colors and thicknesses.
 
Hi Rob, Thanks for your like and suggestion, I’ve used EZ line before on smaller scale models and also found it very good. I had thought of it but it’s not cheap and I would need three thicknesses, I found that the thin sewing thread worked very well so I just continued with that and was happy with the result, I would happily use it again.
 
Hello. Just a small update on my progress. Using the jig I attached the lower wings to the fuselage, I found that it was necessary to join them outside of the jig then before the glue had set place them into the jig so that they would set in their correct position. I used thick cyno to give me more time and only did one wing at a time. PE brackets were used on the joints and the whole structure feels quite strong. I finished off the internal wing rigging and the aileron control cables so I’m now up to the point where I need to fit the cast parts around the fuselage. I’d painted earlier but there are sections which I need to paint on a wood effect, whist I’m doing this I’ll also do a wood effect on other bits, struts, wheel supports etc. this should be fun.

103.jpg

104.jpg

105.jpg
 
Last edited:
Good morning all. Today I’m showing you my alchemy process of turning metal into wood. First after cleaning the castings I sprayed a mid brown matt enamel coat as a base layer, I find that on this type of casting enamel gives better adhesion. When dry I gave a streaky coat of Tamiya acrylic deck tan, using a worn old stiff brush, not too wet. Again when dry I did the same with a slightly darker brown. The next coat was a dark brown with a touch of red mixed in, then a light dry brush of black. After leaving it for a few hours I gave it a liberal coat of Tamiya clear orange, this tied in all the streaks leaving a warm colour with a satin finish. If you do this each coat must be dry and hard otherwise the streaks will just blend together. It does take time to do but as you can see it’s pretty effective, you really can’t tell it from genuine wood.


106.jpg

107.jpg

108.jpg

109.jpg

110.jpg
 
Last edited:
Good morning all. Today I’m showing you my alchemy process of turning metal into wood. First after cleaning the castings I sprayed a mid brown matt enamel coat as a bass layer, I find that on this type of casting enamel gives better adhesion. When dry I gave a streaky coat of Tamiya acrylic deck tan, using a worn old stiff brush, not too wet. Again when dry I did the same with a slightly darker brown. The next coat was a dark brown with a touch of read mixed in, then a light dry brush of black. After leaving it for a few hours I gave it a liberal coat of Tamiya clear orange, this tied in all the streaks leaving a warm colour with a satin finish. If you do this each coat must be dry and hard otherwise the streaks will just blend together. It does take time to do but as you can see it’s pretty effective, you really can’t tell it from genuine wood.


View attachment 428940

View attachment 428941

View attachment 428942

View attachment 428943

View attachment 428944
That is impressive work.
 
Good morning all. Again I see that many of you have given likes, to those I give my thanks, they are appreciated. Today’s update is showing you the painted side panels which are now fitted into place, the cowl is just a push fit, it is a good tight flush fit, I don’t think it could’ve been any better. There were some more internal castings that needed fitting but you can only see small parts that exit the panels, ammo chutes and some sort of vents. I’m now studying the next step, setting up the struts for the upper wing mounting, I think that this may prove a bit tricky.


111.jpg

112.jpg

113.jpg
 
Hello, welcome once again. The build continues, this time it’s the fitting out of the wing struts and the attachment of the upper wing. I did have an issue, the PE turnbuckles and eyelets are flat when they come off their sheet and like origami they have to be folded into a shape that includes the clamp to the strut and three eyelet/turnbuckles which angle down and face different directions. Each one needed to be folded differently, front strut, rear strut, left and right, I tried my best to understand the concept but never grasped how it should be done, but you only get one go at the fold before it breaks off. I think I’ve got a set that may function, when mounted they’ll most likely need to be seriously adjusted. This is the first time that I couldn’t understand the excellent instructions, so not too bad.

Using the jig I fitted the outer struts to the lower wing then the upper wing to the struts, the fit was perfect and no issues were encountered. Next I fitted the fuselage struts, the forward ones went into there housing nicely but the rear ones wouldn’t, the PE brackets fouled and prevented them from seating correctly, I had to cut away part of the bracket and a turnbuckle before I could get it to fit, I can always make good the missing turnbuckle later.

I couldn’t resist making up and painting the guns, I finished them off with a little dry brushing with silver, I think that they look good.


Origami, you think that you've got it right until you try and fit them.

114.jpg

115.jpg

116.jpg

117.jpg

118.jpg

119.jpg

120.jpg

122.jpg
 
Good morning. Another small update on the build. It’s now got its teeth, the guns are now fitted as well as the upper cowling. I’ve fitted the screen and a large gun sight, I’m waiting for a chance to photograph these, and I’ll put up pics another time. I’ve also started the exterior rigging which is proving to be quite difficult, but I’ll get there.

About thirty years ago I went to a vintage air show, the whole of the Shuttleworth collection was being flown, there was some pretty amazing stuff flying, including a Wright Flyer, the original Bleriot as well as a Sopwith Camel which I was able to take some snaps of. In real life it didn’t look or sound like I’d expected, it looked robust, flew and performed surprisingly well and what a lovely thunderous sound.


123.jpg

124.jpg

125.jpg

Scan_20240224 (2).jpg

Scan_20240224 (3).jpg

That is one brave man.

Scan_20240224 (4).jpg
 
Hello, again thanks for your likes. Today’s update is showing you the completed rigging, the mounted engine, a few bits and bobs and the very nice display stand. The rigging was a real pain to do, the eyelets being stainless steel PE have very sharp internal edges, the thread could only be pulled through if it was vertical to the eyelet and not at even a slight angle otherwise the sharp edges gripped and prevented the thread from sliding through, it was therefore very difficult to get any tension whilst tying off. Another issue was the eyelets only had a small contact area on the wooden frames and easily came away when tension was applied, some pieces even had three eyelets attached to one small piece of PE making things even more precarious, all pretty frustrating, but with a bit of ingenuity I prevailed. I started to make up the undercarriage, but I broke one of the two axles, I wasn’t worried as I have found that the replacement service to be excellent so I requested a new one. In the meantime I started to make up the second axle unit, knowing how brittle the first had been I was very careful, unfortunately I broke that one as well in exactly the same place so I’ve decided to make my own axles. I think that a couple of days at the bench will see this project finished and I’ll be moving on to my next one.


126.jpg

127.jpg

128.jpg

130.jpg

131.jpg

132.jpg
 
Back
Top