- Joined
- Aug 14, 2018
- Messages
- 484
- Points
- 323

Thank you Paul, It really means a lot to me that you like her.Love your work, Jack! Every posting is a feast of details!
Mianta is fearr JJ..

Thank you Paul, It really means a lot to me that you like her.Love your work, Jack! Every posting is a feast of details!

Cheers Peter, she is coming on nicely.Beautiful detailing Jack.


A very nice scratch build A-frame, Jack. It’s nicely detailed.The ‘A’Team, Frame
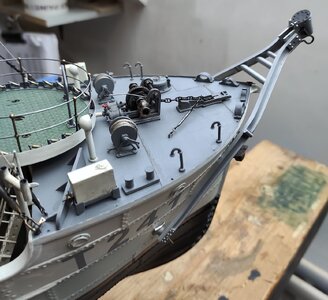
The last piece of actual construction is the ‘A’ frame boom supporting the SA Type A Mark II pneumatic hammer. The air driven ‘road hammer’ proving more reliable than the electric ‘Kango’ and was use right up to the end of the war. The white metal bits from Caldercraft looked very good in this case and I would have happily used them except they proved to be too short. I think not Caldecraft fault this time as their parts measure the same as the Lambert drawings they look to have copied. I have noticed a few inaccuracies in these drawings in the past but other wise they are very good.
So I thought it better to have a go and make one from scratch , for the main struts I used some styrene ‘I’ frames that I bent using a hot air gun. I think it turned out ok.
As well as the frame I have added the forecastle deck detail including an escape hatch, a bow fairlead and a anchor chain stop, none of these where included with the kit. The anchor I painted as if it had a bit of rust.
On the hull I have added the ships pennant number and started to add the depth markings, they are meant to be 1/48 scale but look big to me, so I left them to have a think. The finished ‘A’ frame will not be added until I ‘weather’ the hull a bit.
Here are some more photographs of my progress. Rigging next.
View attachment 444685View attachment 444686View attachment 444687View attachment 444688View attachment 444689View attachment 444690View attachment 444691View attachment 444692View attachment 444693View attachment 444694View attachment 444696
Cheers JJ..
View attachment 444695


You flatter me Paul.Once again this is simply superb modeling Jack!
True storyOnce again this is simply superb modeling Jack!


Thank you Paul for your encouraging comments. I think I am lucky in that by building a ship from the WW2 era I have a lot of photographs to look at and this gives me an idea of what I need to add. I must say I am getting to like building in this larger scale and might be tempted to build another, maybe something from WW1 next. As for the hull, I will be adding a few bumps and bruises near the end but I have to add some depth markings and other odds and sods first. All along the deck I have tried to graduate the 'grime' the boat getting dirtier the further towards the stern you go. Sir Kay spent her whole service life in British home waters so I wont be turning her into a rust bucket like the photos of some that returned from Artic convoy duty.I have to say that I'm starting to feel sort of overwhelmed by the level of detailing. I'm building at the same scale, but you manage a level of realism that escapes me.
Question: the hull looks too pristine - am I missing something?

Pleased to allay your concern. JJLooking forward to seeing some grime on the hull- that will resolve my 'concern.'
