La Toulonnaise 1823 - French schooner - Billing Boats 1:50

Hi Richie,
Thread has gone a bit quiet, hope all is well.
I'm just starting to build the Billings La Toulonnaise and while searching the web for any opinions on this old kit I found your very useful thread.
I'm an ex-pat Brit living in France who enjoys all sorts of modelling, most recently model railways, but since retiring I've finished two very long term boat models, both R/C, one started in 1969! I bought the Toulonnaise in a model shop in Al Khobar in 1983 when I was working in Saudi Arabia as I thought I would need something to keep me occupied. This was not the case and the kit came back to UK and then France un-started. Luckily I bought the fittings kit at the same time, this should save a lot of hunting for parts on the web or repetitive scratch building, but I note an earlier comment about generic parts. The ship's boats certainly look a bit dodgy!
I also obtained the excellent AAMM pack which cleared up a few queries.
The minimal instructions mean you have to really think ahead to avoid trouble later e.g. cutting a slot in bulkhead 4 for clearance for the fore-mast, and arrange mast steps on the keel. Which brings me to my first question. I'm almost ready to lay the deck halves (I found cutting and trying cardboard templates helpful in cutting them accurately), but I'm unsure of how the upper hull planking finishes at the stern. I think part 17 (4mm ply) should be trimmed and chamfered such that the planks can be glued to it flat, with the plank ends trimmed and angled to fit flush under the end of the deck sheet. The sketch bottom left Page 19 isn't very helpful, but is that how you did it?
Second question. I've done a part planked hull before but a long time ago. As I understand it from the Billings and AAMM advice you start with the top (soaked) hull plank pinned in place then lay the next one up to it mid-ships, curve it round to stem and stern and mark the first plank where the second one overlaps it. Take the first plank off and trim it to the marked line. Then I guess you pin the first plank back, still wet, let it dry to shape then glue it. Repeat for next plank. Sounds a pain but is that how to do it?
Hope you can help.
I might do an occasional progress report, would you mind if I put them on this thread or would it be better to start a new one?
Happy modelling!
Pete
Hey Pete,

Welcome to my somewhat slow build, sorry about that its slow going interpreting the instructions and me executing them.
I don't know what an AAMM pack is, please enlighten me.
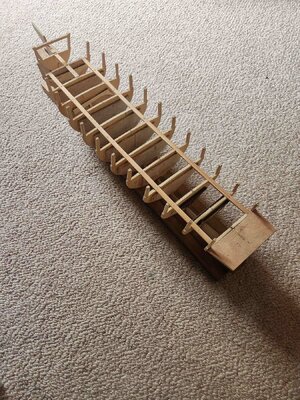
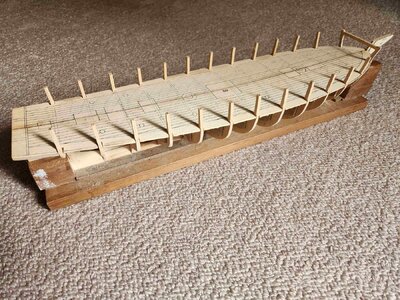
I found a couple of photos that should explain your first question, part 17 is fitted as per page 13 then the deck plates are fitted flush over the top and as you mention the diagrams in the manual sometimes need interpretation.

Keel & Bulkheads (2).jpgLa Toulonnaise Hull.jpg

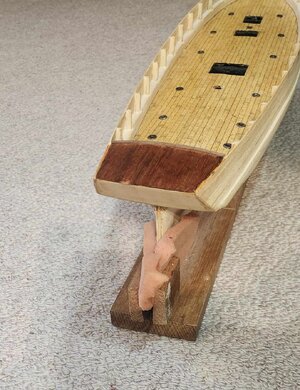
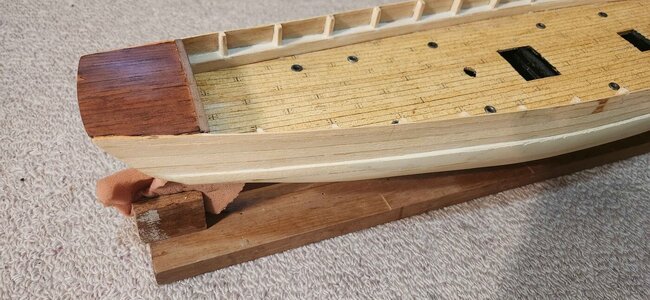
The diagram on page 19 is further into the build, you get the idea from my image, I am yet to work out exactly how the other stern gallery pieces fit together.

Stern (1).jpgStern (2).jpg

Planking is more an art than a science, I am not the best person to guide you here as my style is well quite adhoc.
There are many youtube videos that show different ways to do it and not everyway works the same for everyone.
I didn't take any photos of progress on my planking effort for the first layer but I am about to start the second layer.
Yes you do need to soak the planks to enable bending, I then use a soldering iron to heat the soaked planks then they bend easily.

By all means start your own build log, its a good way to document your build, if you do let me know the link and I will follow along.
If not and you have any questions I will help where I can.

Cheers
Richie
 
Hi Richie,
Many thanks indeed for your prompt and helpful reply.

I'm a bit puzzled as to why you are adding a second layer of planking, I can't see any mention of that anywhere.

The AAMM pack was mentioned by Maxipoo in post 16 on this thread "Now I am back to it. It is a nice model. I found the original plans not detailed enough and inaccurate, and I recently bought the plans, booklet and pictures of the ship published by the French “Association des Amis du Musée National de la Marine” (Association of the friends of the national maritime museum) https://boutique.aamm.fr/monographies?page=3."
For 36 euros plus p&p you get a beautiful very detailed 1/75 scale sheet of drawings, a booklet (in French) with a history of the ship, brief construction advice for various scales and description of the numbered items on the plans, and 6 sharp coloured photos of the museum model. I found the latter useful even bearing in mind the old maxim 'never model a model'. e.g they show a proper brass bilge pump instead of the peculiar wooden insulated device on the Billing plan.
The plans have already answered a couple my questions; where are the scuppers (3 each side, and rectangular) and what was going on at the poop deck, answer, it contains the lavatories, lift up hatches and little doors. Much easier to model when you know what the purpose of an item is. Incidentally poop deck and it's French name dunette perhaps provide a link to some of our slang 'toilet vocabulary'. I'm sure the plans will help further as work progresses.

So it seems the Billings 'instructions' leave you to pretty much find your own way, which actually suits me. It would have been a different story in the 70s and 80s when the kit was current, no internet at your fingertips, just library books and magazines.

The kit owes me nothing after some 40 years on the shelf, I shall be thinking 'Given the tools and materials of the day and the need to produce a seagoing vessel, how would I have tackled that job?' Hopefully our projects will provide us both with many happy hours of modelling. I'll keep in touch.
All the best
Pete
No problem.

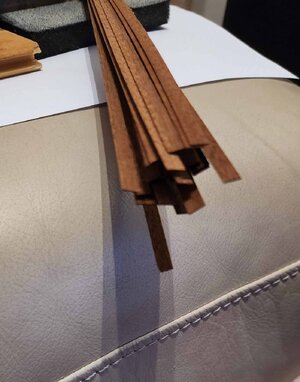
It was always my intention to double plank, did you get these strips in your kit this is what I am using.
Personal preferance if you don't want to follow this method.

Thanks for the reply on AAMM, maybe I should look into it a bit more.
As this kit was free to me my goal was to not spend much money extra to finish it.

Definitly don't recommend this kit as a starter if you are looking for a full step by step guide to complete a model wooden ship build.

Good luck with your build and I look forward to seeing how you go, if you start a log please let me know.

Cheers
Richie


Strips.jpg
 
No problem.

It was always my intention to double plank, did you get these strips in your kit this is what I am using.
Personal preferance if you don't want to follow this method.

Thanks for the reply on AAMM, maybe I should look into it a bit more.
As this kit was free to me my goal was to not spend much money extra to finish it.

Definitly don't recommend this kit as a starter if you are looking for a full step by step guide to complete a model wooden ship build.

Good luck with your build and I look forward to seeing how you go, if you start a log please let me know.

Cheers
Richie


View attachment 442200
Hi Richie,
If those strips are 0.5 x 5 x 550they are part number 91 and intended for deck planking (See plan view just forward of starboard ship's boat, 91 0.5 x 5 with arrow to deck). Says there should be 22, my kit has 30. Yours look mahogany colour, mine are light oak. Anyway each to his own, that's what it's all about!
According to the AAMM booklet the ship should be black above the water line with natural wood deck and furniture, and fitted with copper plates below the water line (probably what your reel of tape was bought for). I'm going for that finish. I built a WW2 corvette with welded overlapping plates hull and used old fashioned brown paper parcel tape for the plates on a varnished balsa planked hull, worked well but it will be much more of a fiddle with tiny bits of copper foil, we shall see!
Is the conversation facility on here private? If so I could scan and send you the AAMM photos if you are interested. I can see why you want to keep expenses down, I guess you've still got to buy a fittings kit or equivalent.

Cheers
Pete
Hi Pete,

Yes the ligher coloured strips part number 22 I have already used for the deck planking which you can make out from my images above, there were some narrow mahoganny strips supplied which I have used on the upper stern deck so this area will end up a little of my own creation.
I also don't see the larger mahogooany strips in the parts list or instructions so maybe the original owner brought them extra, thats what I will use at least below the water line, my first planking layer was pretty rough with a bit of filling so I want to cover that up.
An internet search showed quite a few other builds have just gone with a wood finish on the lower hull and black above the water line so thats what I think I will do.
Yes I suspect the copper was also purchased extra for the hull, but it's quite thick and mangled up now so I just don't think it would lay very well, at least in my hands.
I will need to purchase a few of the fittings extra so for now I am trying to get away with materials I have on hand for everything else, it will not end up accurate to the real thing but I am ok with that, the pleasure I get is more the actual building not so much see how close I got to the original.
I like your thinking so am interested to see how you go on your build.
The coversation area is private in that it's not for public view but maybe admins have extra privilages.
I was trying to find some more detail on rigging the deadeye area as this looks quite different to what I know so any help there would be appreciated thank you.

Cheers
Richie
 
Back
Top