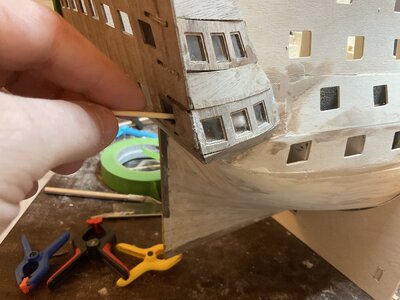
Hobby shops will or should have Cock Pit Canopy glues that will not fog plastic. Just a thought for you.Thanks,, I was thinking that, thought I was smart, used the safe glue to get the glaze/window attached, then used the regular glue to attach the panel to the frame and I guess it dripped on,, Will be more carefull next time….
You are using an out of date browser. It may not display this or other websites correctly.
You should upgrade or use an alternative browser.
You should upgrade or use an alternative browser.
Hms Victory by Caldercraft - Build Log
- Thread starter traumadoc
- Start date
- Watchers 50
-
- Tags
- caldercraft jotika victory
Kurt Konrath
Kurt Konrath
I think it was Testers used to sell a glue for windows specifically to prevent fogging of plastic. I know a decal company, Micro Scale, also sold a liquid to make or glue in window or canopy glass on models.
Thanks,, I appreciate it, I tried to cut out the panel and realized I was only gonna break it. Something I learned in Surgery, perfection is the enemy of good. I am gonna do more damage than fix by ripping they panel out. I think it is gonna have to be good enough. If I can figure out a way to “tint” them safely I will do that,, perhaps a tint adhesive or something like that.. I will look around.I think it was Testers used to sell a glue for windows specifically to prevent fogging of plastic. I know a decal company, Micro Scale, also sold a liquid to make or glue in window or canopy glass on models.
Old models used mica sheets for window glass. I found a 6" square of it online inexpensively. It is clear, but to add some shade to your windows, you could get a darker mica sheet or partially opaque colored plastic. Choose a material that works for you.Thanks,, I appreciate it, I tried to cut out the panel and realized I was only gonna break it. Something I learned in Surgery, perfection is the enemy of good. I am gonna do more damage than fix by ripping they panel out. I think it is gonna have to be good enough. If I can figure out a way to “tint” them safely I will do that,, perhaps a tint adhesive or something like that.. I will look around.
Kurt Konrath
Kurt Konrath
Just remember most folks won’t see the windows on both side of the ship unless it’s mounted on table in middle of room. So just display with best side showing and they won’t see minor issues like a foggy window
Good morning Doc. Looking really good. Just something you may or may not want to change. I have noticed that Caldercraft and Mantua (I had to change mine ) do this. The quarter galleries windows run more in line with the gunports and don’t angle up. I see @TonyH has confronted the same scenario on His Caldercraft Victory. Like this :Latest update, I have completed the first planking, sanded, It is not horrible, could be better, but I will take it and move on. I completed the roughing in of the stern galleries, and will start cleaning that up tomorrow. Minor problem I had a slip of the brain and used superglue near one of the windows and got the white fog on the inside of it. I guess I am going to have to cut it out and replace it, not sure what else to do,,, I have the rudder post fixed, sanded , and the ready for the lower stern plate.
View attachment 348273
View attachment 348274
View attachment 348275
View attachment 348276
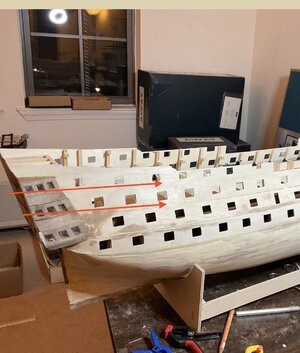

I thought I would point this out before you progress further in case you would like to make this change.
The glue on the window: I would redo this as I have a feeling it will bug you every time you see it.
Your first planking layer is great. Ready for the layer 2
Cheers Grant
Happy new year Doc.
Thanks for the thoughts,, yea,, I noticed that,, unfortunately after I had it locked in. It isn’t as bad as the picture which is distorted by perspective, but it is definetly there. I am struggling with how to fix the windows, I tried to cut out the panel with the window and rapidly realized I was going to break it, and I don’t have a replacement within reach easily, as it is a two layered piece, I can’t just cut out another one. I thought about cutting out the windows and trying to replace, but can’t figure out how replace them from the outside,,, (sigh). I am thinking about using a Tinting paint, I always liked the old blueish tinted windows and I think it might hide the nasty glue mark. I really thought I was okay, I used the safe glue attaching the glaze, but then got sloppy I guess using regular superglue to attach the panel with the windows.Good morning Doc. Looking really good. Just something you may or may not want to change. I have noticed that Caldercraft and Mantua (I had to change mine ) do this. The quarter galleries windows run more in line with the gunports and don’t angle up. I see @TonyH has confronted the same scenario on His Caldercraft Victory. Like this :
View attachment 348431View attachment 348432
I thought I would point this out before you progress further in case you would like to make this change.
The glue on the window: I would redo this as I have a feeling it will bug you every time you see it.
Your first planking layer is great. Ready for the layer 2.
Cheers Grant
Hi traumadoc,Thanks for the thoughts,, yea,, I noticed that,, unfortunately after I had it locked in. It isn’t as bad as the picture which is distorted by perspective, but it is definetly there. I am struggling with how to fix the windows, I tried to cut out the panel with the window and rapidly realized I was going to break it, and I don’t have a replacement within reach easily, as it is a two layered piece, I can’t just cut out another one. I thought about cutting out the windows and trying to replace, but can’t figure out how replace them from the outside,,, (sigh). I am thinking about using a Tinting paint, I always liked the old blueish tinted windows and I think it might hide the nasty glue mark. I really thought I was okay, I used the safe glue attaching the glaze, but then got sloppy I guess using regular superglue to attach the panel with the windows.
I hate to say this but in my experience tinting paint works best on the inside of the window, I would also recommend airbrushing instead of brushing.
White wood working glue works well for gluing windows in, and dries clear.
Cheers,
Stephen.
I didn't know you had access to the inside of the window. Glad that was solved!
Time for the next update,, hoping to get some thoughts on ideas,,, I am done with the rough second planking stage,, Still needed sanding and a little bit of filling, but that will get done in time. I noticed that the metal drop ornaments on the stern gallery don’t fit well, ( I learned that on the hard way on my last model HMS VANGUARD) so in anticipation I made some balsa inlays to fill the space and prepare the stern galleries early so when I paint everything is ready. (See photos). Also I am thinking about changing things up a little, I directions tell me to put the upper gun deck in, plank it, then put the wales on,, then the gunport linings. I am thinking of doing the middle deck gun port linings before I put the deck over them so I can have access to both sides while I am doing that,,, Being the surgeon I am I get nervous when I go off the beaten path, but push forward anyway.. Wondering what peoples thoughts are to this change in sequence?? Lastly , in terms of the stern gallery windows”lining up”. I think they are okay,,, With a photo taken in the right angle,, the are in line,,,,thanks for all the thoughts, ideas, and help, I really appreciate this forum,,,, 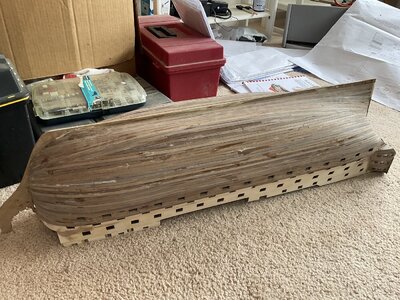
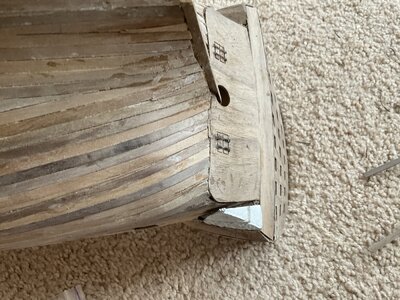
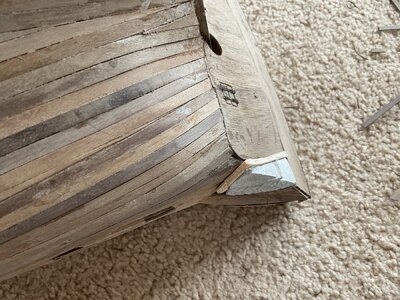


Nice work on the planking, you've been busy. You're gallery windows look OK to me I know some photos make them look out of line. You can see from my log how they look when they're not right.Time for the next update,, hoping to get some thoughts on ideas,,, I am done with the rough second planking stage,, Still needed sanding and a little bit of filling, but that will get done in time. I noticed that the metal drop ornaments on the stern gallery don’t fit well, ( I learned that on the hard way on my last model HMS VANGUARD) so in anticipation I made some balsa inlays to fill the space and prepare the stern galleries early so when I paint everything is ready. (See photos). Also I am thinking about changing things up a little, I directions tell me to put the upper gun deck in, plank it, then put the wales on,, then the gunport linings. I am thinking of doing the middle deck gun port linings before I put the deck over them so I can have access to both sides while I am doing that,,, Being the surgeon I am I get nervous when I go off the beaten path, but push forward anyway.. Wondering what peoples thoughts are to this change in sequence?? Lastly , in terms of the stern gallery windows”lining up”. I think they are okay,,, With a photo taken in the right angle,, the are in line,,,,thanks for all the thoughts, ideas, and help, I really appreciate this forum,,,, View attachment 350272View attachment 350273View attachment 350274View attachment 350275View attachment 350276
Good morning Doc. That is really awesome. Super happy you found the way to redo the window on the quarter gallery. Cheers GrantTime for the next update,, hoping to get some thoughts on ideas,,, I am done with the rough second planking stage,, Still needed sanding and a little bit of filling, but that will get done in time. I noticed that the metal drop ornaments on the stern gallery don’t fit well, ( I learned that on the hard way on my last model HMS VANGUARD) so in anticipation I made some balsa inlays to fill the space and prepare the stern galleries early so when I paint everything is ready. (See photos). Also I am thinking about changing things up a little, I directions tell me to put the upper gun deck in, plank it, then put the wales on,, then the gunport linings. I am thinking of doing the middle deck gun port linings before I put the deck over them so I can have access to both sides while I am doing that,,, Being the surgeon I am I get nervous when I go off the beaten path, but push forward anyway.. Wondering what peoples thoughts are to this change in sequence?? Lastly , in terms of the stern gallery windows”lining up”. I think they are okay,,, With a photo taken in the right angle,, the are in line,,,,thanks for all the thoughts, ideas, and help, I really appreciate this forum,,,, View attachment 350272View attachment 350273View attachment 350274View attachment 350275View attachment 350276
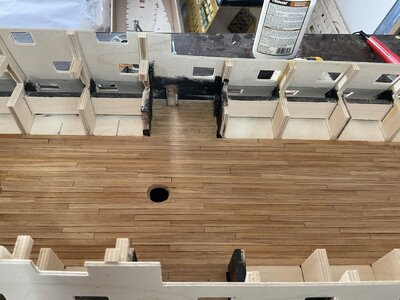
 ,, weekly update,,, I have deviated from the directions,, lots of sanding, filling, sanding, filling, sanding filling. (Wax on, Wax off). And the hull seems to be okay, although Everytime I look at it, I find another problem and more filling and sanding. I put the lower and middle wales on out of sequence to give me the middle gun deck ports planked so I can put the gun port linings before I drop the upper gun deck on and have access to work on them from above. It seem to to be going okay, but really struggling, keeping the perpendicular. The directions are unclear about how “deep” the gun port linings should be on the middle and lower gun deck but imply 16 mm wit the special 1mmX16 mm plank to be used. I am not sure it has to be that deep but for the moment I am doing it. Wondering how much back light will be there after I put the upper decks on. I built the tool to hold the gunport linings, and it seems to help, but I end up struggling with each. Enclosed is picture of the above view of the gunport lining. Almost reminds me of a preperitoneal hernia repair, working in the hole from my surgery days. As always I struggle with what is good enough, trying to remember perfection is the enemy of good and at what point am I only going to make things worse.
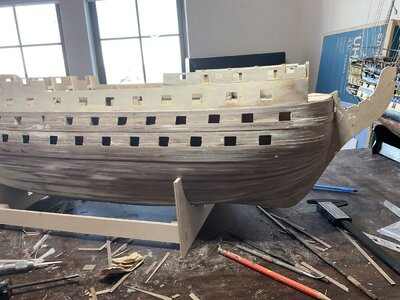
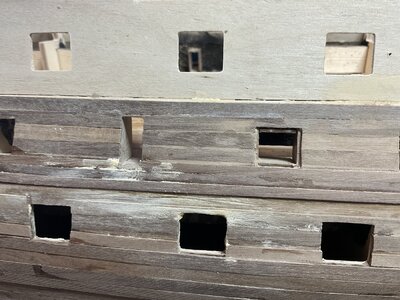
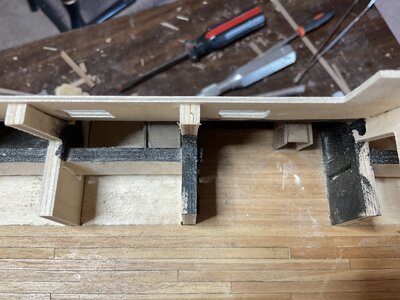
You are making great progress, I am still plugging along with second planking, taking me a lot of time. Not looking forward to the gunport lining but the "special tool" should help. Looking good !!,, weekly update,,, I have deviated from the directions,, lots of sanding, filling, sanding, filling, sanding filling. (Wax on, Wax off). And the hull seems to be okay, although Everytime I look at it, I find another problem and more filling and sanding. I put the lower and middle wales on out of sequence to give me the middle gun deck ports planked so I can put the gun port linings before I drop the upper gun deck on and have access to work on them from above. It seem to to be going okay, but really struggling, keeping the perpendicular. The directions are unclear about how “deep” the gun port linings should be on the middle and lower gun deck but imply 16 mm wit the special 1mmX16 mm plank to be used. I am not sure it has to be that deep but for the moment I am doing it. Wondering how much back light will be there after I put the upper decks on. I built the tool to hold the gunport linings, and it seems to help, but I end up struggling with each. Enclosed is picture of the above view of the gunport lining. Almost reminds me of a preperitoneal hernia repair, working in the hole from my surgery days. As always I struggle with what is good enough, trying to remember perfection is the enemy of good and at what point am I only going to make things worse.
View attachment 351832
View attachment 351833
View attachment 351834
View attachment 351835
Good morning Doc. This is solid advice. Unless we run at the skill level of some of the perfectionist builders on SOS, I also agree striving for perfection at time makes things worse. That cut off point is always the challenge tho. Your Victory planking is looking lovely. Re the back light. Some does come through even after putting on the upper gun deck (well on the Mantua model). It is minimal tho.I struggle with what is good enough, trying to remember perfection is the enemy of good and at what point am I only going to make things worse.
Cheers Grant
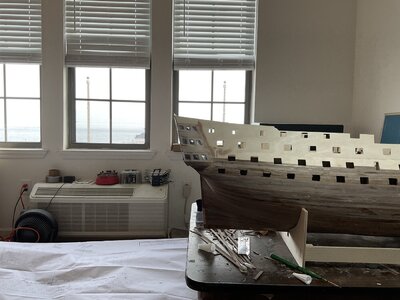
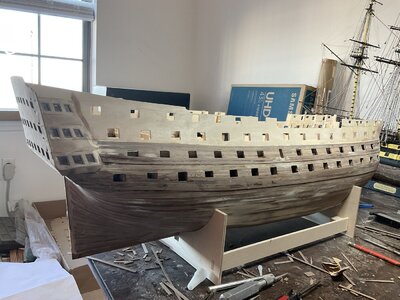
Time for the update,, I need some help. I have completed the middle gun deck gunport linings, I think it worked out really well doing the wales first and the linings before dropping the upper gun deck into place. I was able to access both sides of the gun ports to put the linings in and I think it went well. I screwed up a little using 1X16 mm plank for the first 3 before I released my error but rest were done with 1X6” as instructed. Hopefully I wont run out of the 1X16 now. I am looking at other builds and noticing they had to “level out” the upper gun deck holes so the bases were level with the ground. I am concerned if I do that like others it will creat an uneven flow on the inner bulwarks and the cannons will not be level,,, At this point I think it is a matter of which problem do you want,, (Pick hours poison). I will take a break and start the upper gun deck planking now, I find that to be very zen and relaxing,
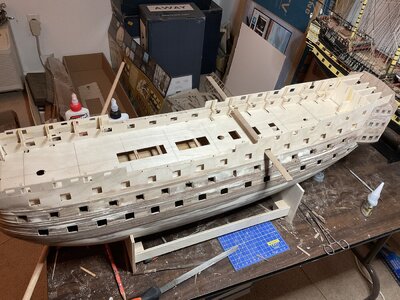
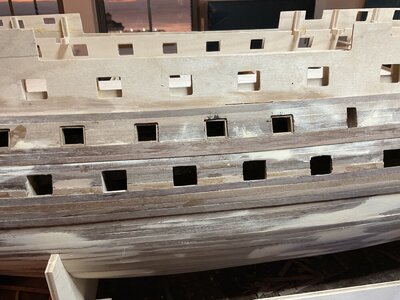
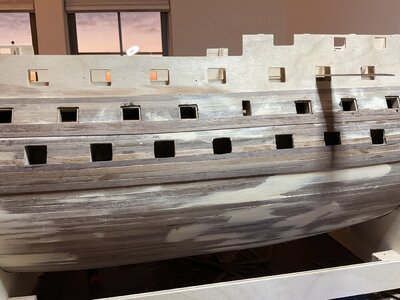


Good morning. This is good work- starting to take shape into a fine Victory. Cheers GrantTime for the update,, I need some help. I have completed the middle gun deck gunport linings, I think it worked out really well doing the wales first and the linings before dropping the upper gun deck into place. I was able to access both sides of the gun ports to put the linings in and I think it went well. I screwed up a little using 1X16 mm plank for the first 3 before I released my error but rest were done with 1X6” as instructed. Hopefully I wont run out of the 1X16 now. I am looking at other builds and noticing they had to “level out” the upper gun deck holes so the bases were level with the ground. I am concerned if I do that like others it will creat an uneven flow on the inner bulwarks and the cannons will not be level,,, At this point I think it is a matter of which problem do you want,, (Pick hours poison). I will take a break and start the upper gun deck planking now, I find that to be very zen and relaxing,
View attachment 353341
View attachment 353342
View attachment 353343


