HMS Victory 1:78 by Mantua ,Panart - Build log

Joined
Nov 20, 2023
Messages
19
Points
48

Location
Italy
Hi everybody,
in the end, I decided to open my build log for the Victory model, made by Panart in 1:78 scale.
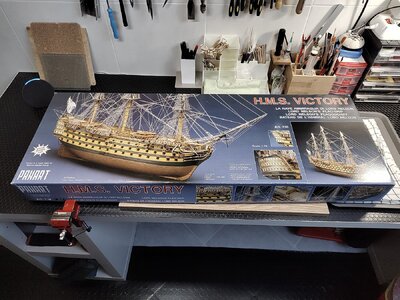
IMG_20231217_145737776.jpg

Opened the packaging I was impressed by the general quality of the materials and I continued to evaluate the instructions and drawings.
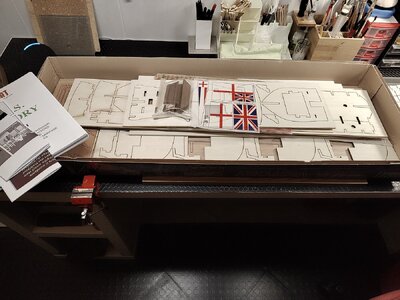
IMG_20231217_171852274.jpg

Although there are very negative judgments on the web about the scarcity of explanations, the manual and tables seem to me sufficient for a generic approach to the identification of the pieces and to the constructive bases (in fact, the manuals provided by Occre and Artesania Latina are better).
Of course it is not a very simple kit and I would not recommend it to those who have not already faced some simpler model.
I decided to devote some time to the study of previous achievements, consulting some forums, getting the PDF manuals of Caldercraft, Artesania Latina and DeAgostini, plus a hundred photos of the real Victory displayed in Porthsmouth.
I could not find online the PDF files of the nine tables provided, which would be very convenient to consult from tablet, instead of having to keep them open, since they are very large.
So I photographed it and turned it into PDF files; if they may interest someone, let me know so as to make them available.
It'll take me a few days to put the keel and the bulwarks together, since the laser cuts performed seem very precise and careful filing work will be necessary to obtain solid and precise joints.

In the meantime, having decided that the decks must be definitely covered with the planking provided, I would like to highlight two themes, hoping that someone will want to provide me with his opinion:
1. In my previous models I used a contact glue (Bostik) to coat the decks with the planking, finding it very convenient to spread a layer of glue on the deck, one on the back of the planks joined together with adhesive tape and then join everything under pressure, avoiding burrs and inaccuracies in the positioning.
But those strips (because of the larger scale) were wider than the 3 mm of those supplied to Victory; so I think it is necessary to change the type of glue, but I'm uncertain which one to use. I would avoid the cyanoacrylic glue and I would lean for the aliphatic one, which allows you to sandpaper any burrs. What do you think?
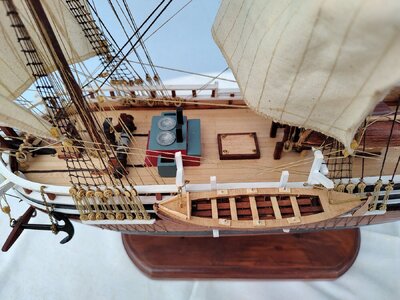
2. to simulate the caulking between the planks, many recommend rubbing a B2 pencil beforehand on the sides of the planks themselves. I tried (in the Beagle model) to replace the pencil with a black wax crayon, obtaining a result that seems better to me.

Here you can see the difference of the planking between the Beagle
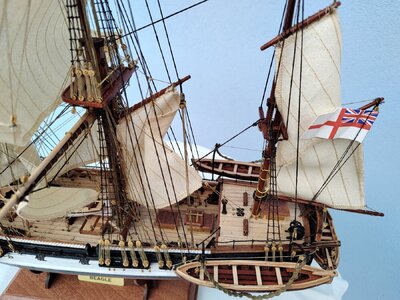
IMG_20221117_144724556.jpg

and the Essex
IMG_20221117_144347075.jpg

Has anyone else used this technique yet?
 
I am looking forward to see your work on the Victory......
 
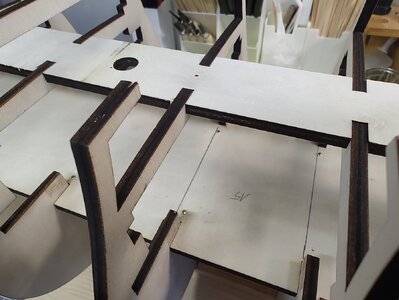
I started to mount the bulkheads on the keel and I confirm what has already been said in other logs: the laser cuts are very precise and the pieces have no room for maneuver between them.
So, wanting to keep them as tight as possible, I tried with a light sanding of the parts to be stuck and then I treated them with a thin veil of wax.
With this method the first two bulkheads are easily and perfectly wedged with the keel, maintaining a solid rigidity, but can be easily removed to allow the insertion of the deck support.
I will continue with this method by inserting all the bulkheads and the deck support and only at the end I will proceed to insert with brush the glue in the corners between the bulkheads and the keel.
In this way I hope to obtain a rigid and correctly aligned structure.
 
I have completed the assembly of the bulkheads on the keel.
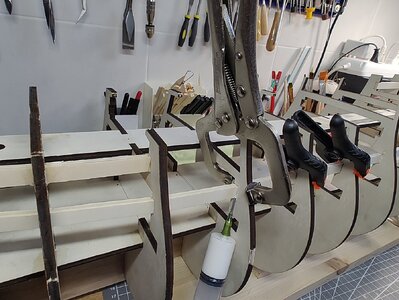
Since the pieces were really well cut and all the joints were very tight, I fixed everything with little nails between the supports of the decks and the bulkheads and smearing vinyl glue at the corners of the joints, first with a syringe and then with a brush to facilitate penetration.
In this way it seems to me that I have obtained a solid and well-aligned structure.
Then I proceeded to assemble the dummy-barrels supports.
IMG_20231222_094420943.jpg IMG_20231222_151732395.jpg
 
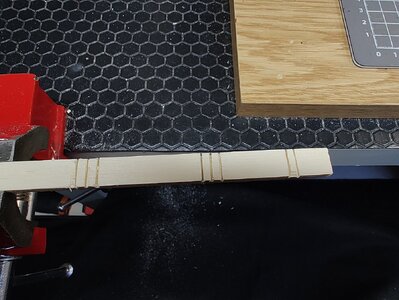
I followed the advice from the build log of Mark Frazier (which I thank) and I also made small cuts to allow bending without breaking the dummy cannon rails.
In fact it seems to me an indispensable trick.

IMG_20231222_153202630.jpg

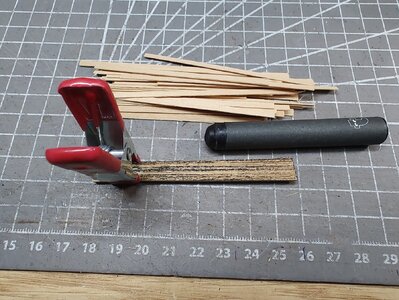
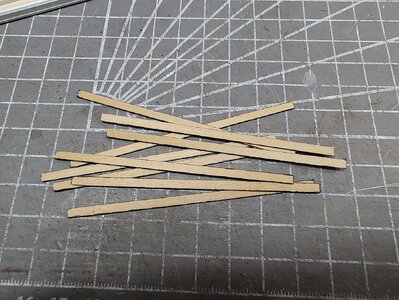
Then I started to prepare the 80x3 mm pieces to be used as deck planking.
As mentioned above, I finally decided to use aliphatic glue and a black wax crayon to simulate the caulking between the planks.

IMG_20231227_153116867.jpg

We will see the result when I have installed and completed the lower deck, which in any case is quite hidden and lends itself to experimentation that leaves room for any corrections on the upper decks.
 
You are welcome to view my log of the same kit for reference.

 
I followed the advice from the build log of Mark Frazier (which I thank) and I also made small cuts to allow bending without breaking the dummy cannon rails.
In fact it seems to me an indispensable trick.

View attachment 416749

Then I started to prepare the 80x3 mm pieces to be used as deck planking.
As mentioned above, I finally decided to use aliphatic glue and a black wax crayon to simulate the caulking between the planks.

View attachment 416751

We will see the result when I have installed and completed the lower deck, which in any case is quite hidden and lends itself to experimentation that leaves room for any corrections on the upper decks.
Hi Ismaele thanks for starting a log on your Victory, I will watch with interest as these are the most challenging of kit builds.
I see that you have some experience already.

You discuss the best way to duplicate the caulking in between deck planks. Looking at your photo it appears that the deck planks have very irregular edges. I would suggest you will get a more even colour and appearance if you sand them lightly to get a more even finish and uniform edge. I have used a Pigma black art brush pen on my Vanguard and find it to be very satisfactory.

IMG_3722.jpeg
 
Hi Ismaele thanks for starting a log on your Victory, I will watch with interest as these are the most challenging of kit builds.
I see that you have some experience already.

You discuss the best way to duplicate the caulking in between deck planks. Looking at your photo it appears that the deck planks have very irregular edges. I would suggest you will get a more even colour and appearance if you sand them lightly to get a more even finish and uniform edge. I have used a Pigma black art brush pen on my Vanguard and find it to be very satisfactory.

View attachment 416884
Hi Chestcutter,
In fact I specifically left the rough edges, hoping that the uneven result would make the deck more like reality. Similarly, I thought wax accentuated realism.
Your solution is certainly interesting and I will certainly do a separate test.
Can you kindly post a picture of the finished deck? Thank you very much
 
Hello and happy new year to all!
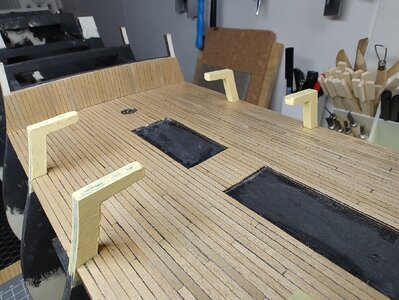
I followed the advice of Chestcutter and the result on the lower deck seems satisfactory to me.

IMG_20240105_095418856.jpg

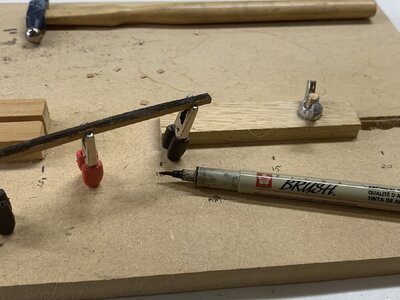
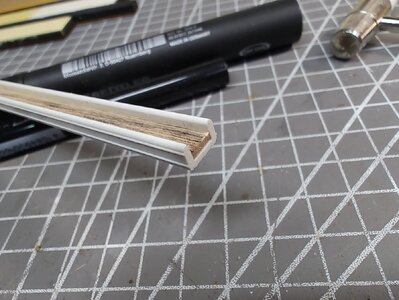
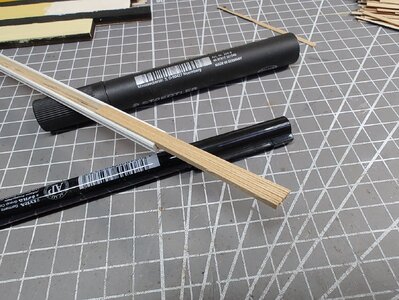
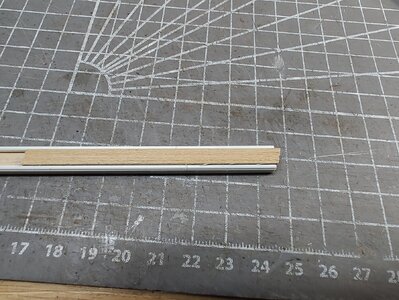
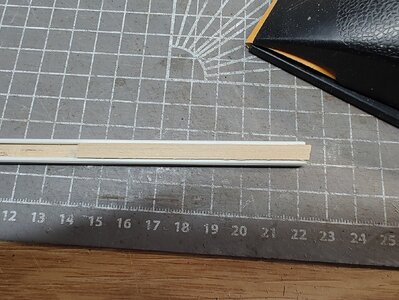
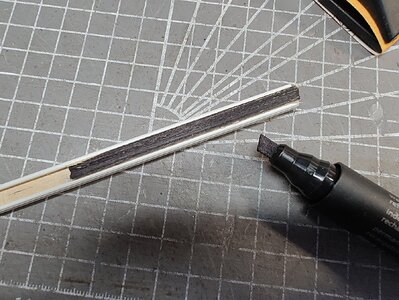
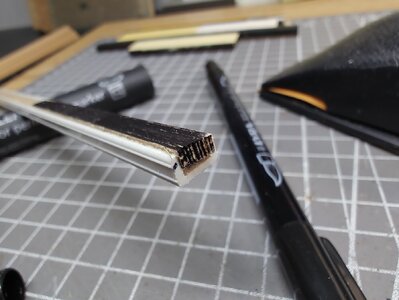
To hold together, sandpaper and blacken the 8 cm strips that simulate the deck boards I used a plastic profile that I got from the hardware store.

IMG_20231231_161631519.jpg IMG_20231231_161815805.jpg
IMG_20231231_161843530.jpg IMG_20231231_161910303.jpg
IMG_20231231_161950159.jpg IMG_20231231_162017168.jpg
IMG_20231231_162231842.jpg
Finally, I would like to have some opinions about the color I used to paint the bulkheads.
It is true that these will become little visible once the upper deck is installed, but I am quite convinced that the same color will then have to be used for the stripes on the hull and for the masts, so (although there is still a lot of work to get to that point..) it is good to think about it in time.
 
Hi everybody,
in the end, I decided to open my build log for the Victory model, made by Panart in 1:78 scale.

View attachment 414797

Opened the packaging I was impressed by the general quality of the materials and I continued to evaluate the instructions and drawings.

View attachment 414798

Although there are very negative judgments on the web about the scarcity of explanations, the manual and tables seem to me sufficient for a generic approach to the identification of the pieces and to the constructive bases (in fact, the manuals provided by Occre and Artesania Latina are better).
Of course it is not a very simple kit and I would not recommend it to those who have not already faced some simpler model.
I decided to devote some time to the study of previous achievements, consulting some forums, getting the PDF manuals of Caldercraft, Artesania Latina and DeAgostini, plus a hundred photos of the real Victory displayed in Porthsmouth.
I could not find online the PDF files of the nine tables provided, which would be very convenient to consult from tablet, instead of having to keep them open, since they are very large.
So I photographed it and turned it into PDF files; if they may interest someone, let me know so as to make them available.
It'll take me a few days to put the keel and the bulwarks together, since the laser cuts performed seem very precise and careful filing work will be necessary to obtain solid and precise joints.

In the meantime, having decided that the decks must be definitely covered with the planking provided, I would like to highlight two themes, hoping that someone will want to provide me with his opinion:
1. In my previous models I used a contact glue (Bostik) to coat the decks with the planking, finding it very convenient to spread a layer of glue on the deck, one on the back of the planks joined together with adhesive tape and then join everything under pressure, avoiding burrs and inaccuracies in the positioning.
But those strips (because of the larger scale) were wider than the 3 mm of those supplied to Victory; so I think it is necessary to change the type of glue, but I'm uncertain which one to use. I would avoid the cyanoacrylic glue and I would lean for the aliphatic one, which allows you to sandpaper any burrs. What do you think?
2. to simulate the caulking between the planks, many recommend rubbing a B2 pencil beforehand on the sides of the planks themselves. I tried (in the Beagle model) to replace the pencil with a black wax crayon, obtaining a result that seems better to me.

Here you can see the difference of the planking between the Beagle
View attachment 414799

and the Essex
View attachment 414800

Has anyone else used this technique yet?
I have used Titebond II to glue almost all of my wood parts on 5 previous models with very good results and am using it on the two I a brown Sharpie with similar results.
Hi everybody,
in the end, I decided to open my build log for the Victory model, made by Panart in 1:78 scale.

View attachment 414797

Opened the packaging I was impressed by the general quality of the materials and I continued to evaluate the instructions and drawings.

View attachment 414798

Although there are very negative judgments on the web about the scarcity of explanations, the manual and tables seem to me sufficient for a generic approach to the identification of the pieces and to the constructive bases (in fact, the manuals provided by Occre and Artesania Latina are better).
Of course it is not a very simple kit and I would not recommend it to those who have not already faced some simpler model.
I decided to devote some time to the study of previous achievements, consulting some forums, getting the PDF manuals of Caldercraft, Artesania Latina and DeAgostini, plus a hundred photos of the real Victory displayed in Porthsmouth.
I could not find online the PDF files of the nine tables provided, which would be very convenient to consult from tablet, instead of having to keep them open, since they are very large.
So I photographed it and turned it into PDF files; if they may interest someone, let me know so as to make them available.
It'll take me a few days to put the keel and the bulwarks together, since the laser cuts performed seem very precise and careful filing work will be necessary to obtain solid and precise joints.

In the meantime, having decided that the decks must be definitely covered with the planking provided, I would like to highlight two themes, hoping that someone will want to provide me with his opinion:
1. In my previous models I used a contact glue (Bostik) to coat the decks with the planking, finding it very convenient to spread a layer of glue on the deck, one on the back of the planks joined together with adhesive tape and then join everything under pressure, avoiding burrs and inaccuracies in the positioning.
But those strips (because of the larger scale) were wider than the 3 mm of those supplied to Victory; so I think it is necessary to change the type of glue, but I'm uncertain which one to use. I would avoid the cyanoacrylic glue and I would lean for the aliphatic one, which allows you to sandpaper any burrs. What do you think?
2. to simulate the caulking between the planks, many recommend rubbing a B2 pencil beforehand on the sides of the planks themselves. I tried (in the Beagle model) to replace the pencil with a black wax crayon, obtaining a result that seems better to me.

Here you can see the difference of the planking between the Beagle
View attachment 414799

and the Essex
View attachment 414800

Has anyone else used this technique yet?
I have used Titebond II to glue al most all the wood parts on 5 previous models. I am using it on the two I am currently building and have very good success with it. It has a reasonably quick set-up and drying time (unlike Titebond III, slower drying time) and can be sanded. I have used a black sharpie to simulate caulking for planks. One could use a brown Sharpie depending on one's taste. The Beagle deck is more distinctive.
 
Hello and happy new year to all!
I followed the advice of Chestcutter and the result on the lower deck seems satisfactory to me.

View attachment 418858

To hold together, sandpaper and blacken the 8 cm strips that simulate the deck boards I used a plastic profile that I got from the hardware store.

View attachment 418859 View attachment 418860
View attachment 418862 View attachment 418863
View attachment 418864 View attachment 418865
View attachment 418866
Finally, I would like to have some opinions about the color I used to paint the bulkheads.
It is true that these will become little visible once the upper deck is installed, but I am quite convinced that the same color will then have to be used for the stripes on the hull and for the masts, so (although there is still a lot of work to get to that point..) it is good to think about it in time.
Hi Ismaele

I think the planks and deck look good. You have done a nice three butt shift pattern. Your use of a jig, from the hardware store is a great idea.The deck timbers should be lightly sanded or better still scrapped with a razor blade or wood scrapper, then sealed with a polyurethane finish. I used Minwax wipe on poly, which adds a very subtle colour depending on the number of coats and enhances and contrasts the wood grain.
As to your colour choice used on the bulkhead horns, it is a similar yellow to what I used on my Vanguard. It is a Humbrol colour called Linen, a pale yellow. I like it in preference to the richer ochre yellow, and when made Matt contrasts nicely to the blacks and will be what I use on my masts.
In a word looks great.
 
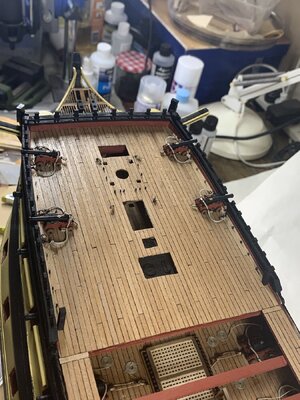
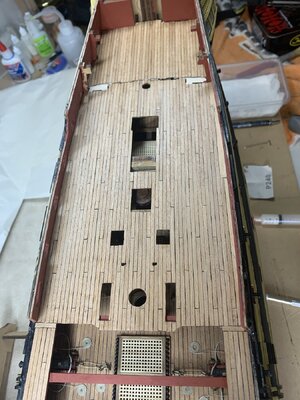
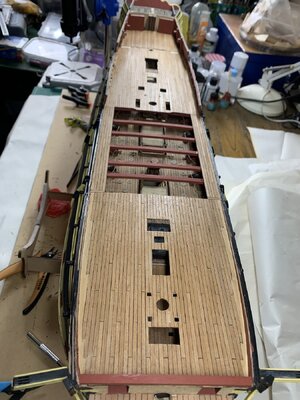
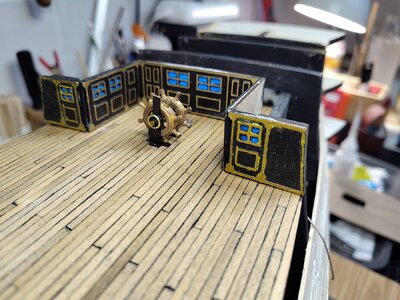
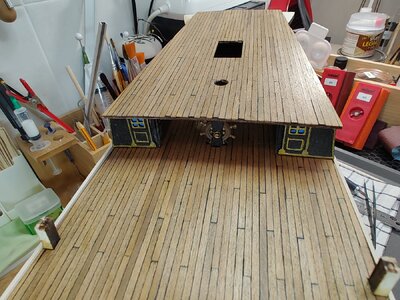
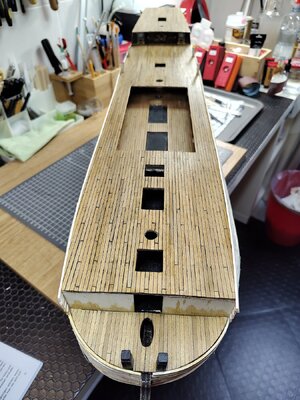
Hello everyone, I have completed the planking and assembly of the decks, the construction and installation of the officer cabins and rudder wheels and I have started the first hull planking.
Here are the results:
IMG_20240115_144928588.jpg IMG_20240117_144907788.jpg

IMG_20240117_144827945.jpg

For the final treatment of the covering of the decks I gave a hand of wood filler and three coats of shellac.
Then I made a light passage with very fine steel wool and the overall result seems satisfactory to me.

Having installed the part of the hull where later the holes for the gun hatches will be made, I checked that the latter did not interfere with the bulkheads.
In fact, some modelers in the forums had complained that the template provided in this kit did match some hatches with bulkheads, making it necessary to manually reposition them.
Fortunately it seems that this problem has been solved by the manufacturer and all the hatches can be made as expected in the template.
 
Hello everyone, I have completed the planking and assembly of the decks, the construction and installation of the officer cabins and rudder wheels and I have started the first hull planking.
Here are the results:
View attachment 421863 View attachment 421874

View attachment 421875

For the final treatment of the covering of the decks I gave a hand of wood filler and three coats of shellac.
Then I made a light passage with very fine steel wool and the overall result seems satisfactory to me.

Having installed the part of the hull where later the holes for the gun hatches will be made, I checked that the latter did not interfere with the bulkheads.
In fact, some modelers in the forums had complained that the template provided in this kit did match some hatches with bulkheads, making it necessary to manually reposition them.
Fortunately it seems that this problem has been solved by the manufacturer and all the hatches can be made as expected in the template.
Good afternoon Ismaele. Wow seeing you start this kit takes me back (I did the Sergal version)a few years when I began mine. It is a fun journey so enjoy it. You are off to a great start and I will follow your build. Cheers Grant
 
Hello and happy new year to all!
I followed the advice of Chestcutter and the result on the lower deck seems satisfactory to me.

View attachment 418858

To hold together, sandpaper and blacken the 8 cm strips that simulate the deck boards I used a plastic profile that I got from the hardware store.

View attachment 418859 View attachment 418860
View attachment 418862 View attachment 418863
View attachment 418864 View attachment 418865
View attachment 418866
Finally, I would like to have some opinions about the color I used to paint the bulkheads.
It is true that these will become little visible once the upper deck is installed, but I am quite convinced that the same color will then have to be used for the stripes on the hull and for the masts, so (although there is still a lot of work to get to that point..) it is good to think about it in time.
You are correct you don’t really see them however they are the same colour as the Victory yellow or salmon(as the new colours are). 5D6D6B94-3702-4098-B203-C3E45B354A31.jpeg
Cheers Grant
 
Hello everyone,
I haven't published the construction developments of Victory in a while, but I caught a bad cold and after finishing laying the first planking I had to suspend the sanding of the hull (which I want to do in the garden to avoid dirtying the entire laboratory).
So, waiting to have a couple of days with less cold and more sun (it feels like I'm in England, not Italy...) I started building some of the many details I'll need later.
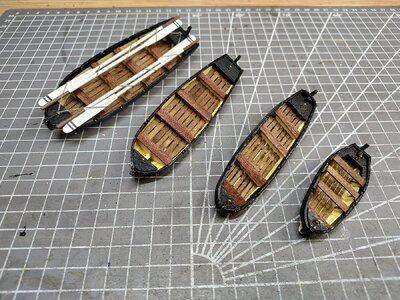
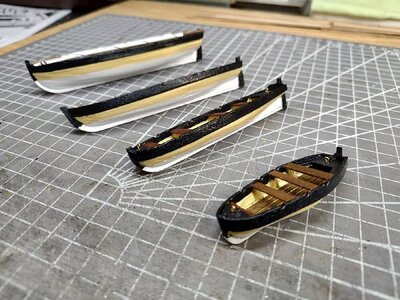
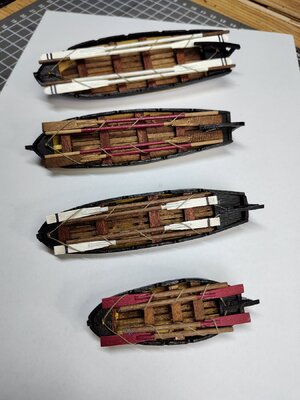
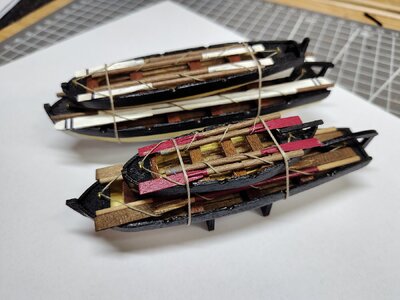
So far I have built the four boats, which will then be installed on the main deck, trying to improve and enrich the details compared to what is provided in the assembly kit, which appears very sparse.
Here's the result
IMG_20240227_104949090_HDR.jpg

IMG_20240227_105023980_HDR.jpg


IMG_20240228_150039628.jpg

IMG_20240228_152428975.jpg


Now I will proceed with the cannons to be placed on the deck.
 
I have used Titebond II to glue almost all of my wood parts on 5 previous models with very good results and am using it on the two I a brown Sharpie with similar results.

I have used Titebond II to glue al most all the wood parts on 5 previous models. I am using it on the two I am currently building and have very good success with it. It has a reasonably quick set-up and drying time (unlike Titebond III, slower drying time) and can be sanded. I have used a black sharpie to simulate caulking for planks. One could use a brown Sharpie depending on one's taste. The Beagle deck is more distinctive.
After I treenald (sp?) the deck boards, cut the ends off them and scraped/sanded the deck smooth. Then I super-saturated pure mineral spirits with beeswax and rubbed several coats of that onto the surface, it did a pretty good job and looked pretty good as well.
 
Hi everybody,
in the end, I decided to open my build log for the Victory model, made by Panart in 1:78 scale.


Opened the packaging I was impressed by the general quality of the materials and I continued to evaluate the instructions and drawings.


Although there are very negative judgments on the web about the scarcity of explanations, the manual and tables seem to me sufficient for a generic approach to the identification of the pieces and to the constructive bases (in fact, the manuals provided by Occre and Artesania Latina are better).
Of course it is not a very simple kit and I would not recommend it to those who have not already faced some simpler model.
I decided to devote some time to the study of previous achievements, consulting some forums, getting the PDF manuals of Caldercraft, Artesania Latina and DeAgostini, plus a hundred photos of the real Victory displayed in Porthsmouth.
I could not find online the PDF files of the nine tables provided, which would be very convenient to consult from tablet, instead of having to keep them open, since they are very large.
So I photographed it and turned it into PDF files; if they may interest someone, let me know so as to make them available.
It'll take me a few days to put the keel and the bulwarks together, since the laser cuts performed seem very precise and careful filing work will be necessary to obtain solid and precise joints.

In the meantime, having decided that the decks must be definitely covered with the planking provided, I would like to highlight two themes, hoping that someone will want to provide me with his opinion:
1. In my previous models I used a contact glue (Bostik) to coat the decks with the planking, finding it very convenient to spread a layer of glue on the deck, one on the back of the planks joined together with adhesive tape and then join everything under pressure, avoiding burrs and inaccuracies in the positioning.
But those strips (because of the larger scale) were wider than the 3 mm of those supplied to Victory; so I think it is necessary to change the type of glue, but I'm uncertain which one to use. I would avoid the cyanoacrylic glue and I would lean for the aliphatic one, which allows you to sandpaper any burrs. What do you think?
2. to simulate the caulking between the planks, many recommend rubbing a B2 pencil beforehand on the sides of the planks themselves. I tried (in the Beagle model) to replace the pencil with a black wax crayon, obtaining a result that seems better to me.

Here you can see the difference of the planking between the Beagle


and the Essex

Has anyone else used this technique yet?
Hallo @Ismaele
we wish you all the BEST and a HAPPY BIRTHDAY
Birthday-Cake
 
Back
Top