Good morning Maarten. Sooo Good! A fabulous Alert with so much extra. Thank you. Cheers GrantView attachment 359734View attachment 359735View attachment 359736View attachment 359737View attachment 359738View attachment 359739View attachment 359740View attachment 359741View attachment 359742View attachment 359743View attachment 359744View attachment 359745View attachment 359746View attachment 359747View attachment 359748View attachment 359749
- Home
- Forums
- Ships of Scale Group Builds and Projects
- HMS Alert 1777 1:48 PoF Group Build
- HMS Alert 1777 1:48 Group Build Logs
You are using an out of date browser. It may not display this or other websites correctly.
You should upgrade or use an alternative browser.
You should upgrade or use an alternative browser.
- Joined
- Jan 9, 2020
- Messages
- 10,378
- Points
- 938

Dear Maarten. I am late to congratulate you on the completion of the Alert, but that does not mean I am any less appreciative of the masterful work you have - once again - displayed. Now ahead lies the most beautiful lady in the world and then the workhorse of the sea. It is hard to imagine two more different builds, but I have no doubt that both the RC and the Fluyt will be perfect showcases for your vast and diverse talents.
This is absolutely superb - unbelievable - I love the water effect with the anchor - just amazing.
Thx for all your comments and likes.
Hope we will see a lot of sawn and epoxy poured models in the future.
It is fun to do and makes this hobby even more exciting to do.
In my next model sofar no planning to use l large saws or epoxy, but I never plan before hand.
Hope we will see a lot of sawn and epoxy poured models in the future.
It is fun to do and makes this hobby even more exciting to do.
In my next model sofar no planning to use l large saws or epoxy, but I never plan before hand.
Fantastic build @Maarten ,congrats!!View attachment 359734View attachment 359735View attachment 359736View attachment 359737View attachment 359738View attachment 359739View attachment 359740View attachment 359741View attachment 359742View attachment 359743View attachment 359744View attachment 359745View attachment 359746View attachment 359747View attachment 359748View attachment 359749
One of the most impressive buildings/protocols.
Dear Martin, congratulations on the completion of your beautifully built Alert. Simply WOW
Dear Martin, congratulations on the completion of your beautifully built Alert. Simply WOW

I have not realized that this wonderful build is already over. It is sad... but at the same time a very happy moment for all of us who watch the Alert build in progress. It is obviously one of the fine examples of how you can turn a commercial kit into a fine model, with no limits! I will definitely add my voice to the choir of others! If anyone asked me to describe your build in three words, I would say - Innovation, Precision, and Accuracy! Congrats, mon ami!!
P.S. I still don't understand how you decided to cut the case in half, you are a brave Man!
P.S. I still don't understand how you decided to cut the case in half, you are a brave Man!
- Joined
- Aug 8, 2019
- Messages
- 4,157
- Points
- 688

He got up one morning and thought, "I'm going to cut something in half with my new saw, I fancy it."P.S. I still don't understand how you decided to cut the case in half, you are a brave Man!
Good thing there was a model ship nearby - otherwise that urge could have gone horribly wrong...He got up one morning and thought, "I'm going to cut something in half with my new saw, I fancy it."
- Joined
- Aug 8, 2019
- Messages
- 4,157
- Points
- 688

You are absolutely right, there are, like magicians, who saw through other things. Before you know it, you'll have the NCIS on the scene......Good thing there was a model ship nearby - otherwise that urge could have gone horribly wrong...

Good thing there was a model ship nearby - otherwise that urge could have gone horribly wrong...
I can say it even stronger: worked for many years as a CSI, bought a rasor sharp Japanese saw, looked to my wife ………. asked her: may I ? …….. and sawed ……. my BN in halfYou are absolutely right, there are, like magicians, who saw through other things. Before you know it, you'll have the NCIS on the scene......
 .
.So, Maarten did it, I did it, Uwe did it ……… who is next?
Regards, Peter
Last edited:
- Joined
- Aug 8, 2019
- Messages
- 4,157
- Points
- 688

I seeeeeee now, the key for all those cuts is the Japanese saw, glad I don't have one.can say it even stronger: worked for many years as a CSI, bought a rasor sharp Japanese saw, looked to my wife ………. asked her: may I ? …….. and cut ……. my BN in half.
Hi Gents,
I see you all have a rich imagination, can't understand why you didn't cut and cast your own models
I see you all have a rich imagination, can't understand why you didn't cut and cast your own models
Last edited:
...mostly because we don't own a sharp Japanese saw!I see you all have a rich imagonation, can't understand why you didn't cut and cast your own models
- Joined
- Apr 20, 2020
- Messages
- 5,180
- Points
- 738

Dear Maarten
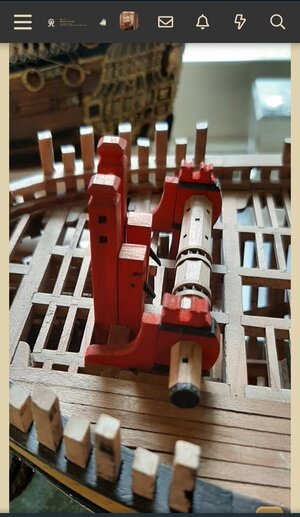
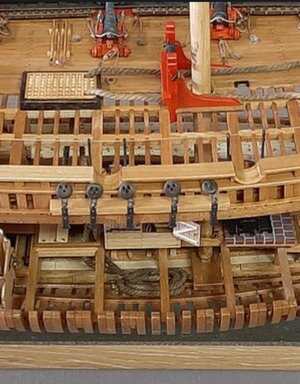
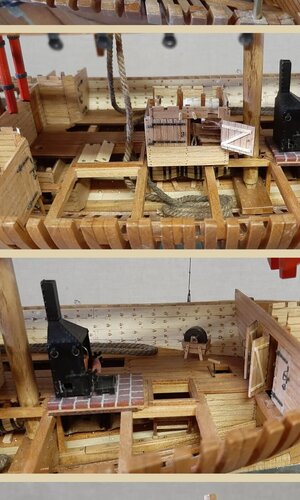
I need your help in understanding the rope that moves from the winch to the anchors on one side and on the other side to the belly of the ship.
I saw in your photos that one end goes down to the lowest deck and is placed in a snail shape and the other end is placed along the middle deck (The plan lacks a detailed reference to where the ends of the rope are located).
I would appreciate it if you or any other member could explain the installation route of the rope.
In fact, we are talking about two parallel ropes for each anchor and which go down from the winch to two holes to the belly of the ship, where one is placed in the middle deck and the other in the lower one in the form of a snail?
Any explanation, photos and drawings are most welcome.
I ask this to plan when to lay the rope as the later it may be more complex.
Thank you


Last edited:


