CNC Machining of Composite Wood at 1:65 Scale

I
Well, today my story took an interesting turn.
It's no longer about wooden composite materials; now it's about plastic, specifically plexiglass. But in order not to produce a lot of threads, I decided to write here.

We all know that plexiglass melts easily and has low thermal conductivity, making it challenging to work with.
Despite the difficulties, I decided to give it a try using a 30° engraver with a thin end measuring only 0.1 mm.
Due to the scale of the details I'm currently working with, using a larger tool was not an option.
For the Lantern glass, I used plexiglass 0.2 mm thick, and for cabin windows - 0.4 mm.

To prevent excessive melting, I needed a cooling solution for both the tool and the material. Simply using air proved to be insufficient based on my previous experience. I thought that using some liquid might be a viable idea. However, using water alone was not ideal due to its poor adhesion to organic materials, and it could potentially damage my MDF wasteboard. Fortunately, during the COVID times, I happened to have a small spray bottle containing a mixture of water and alcohol. To enhance the cooling effect, I added more alcohol to the mix and sprayed it onto the plexiglass while machining.

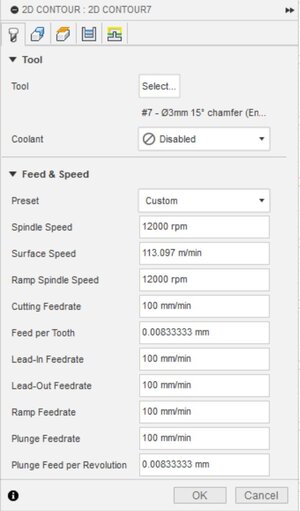
The spindle speed was 12000 RPM.

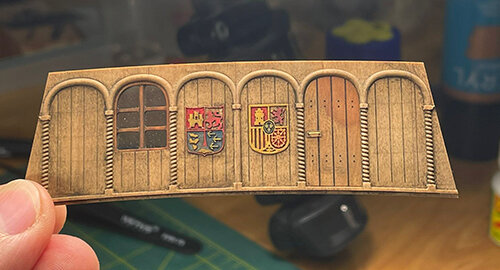
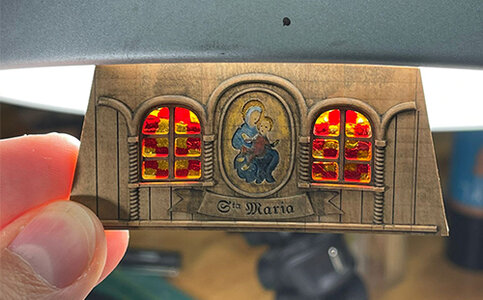
I must say, the results were quite satisfactory. Although the cutter didn't cut all the way through due to some melting, both the tool itself and the cutting lines remained clean. They were clean enough to meet my expectations. You can see the results in the pictures below.

View attachment 379616


View attachment 379617

The tool remained absolutely clean!!!
View attachment 379618

Although it is not completely cut through, now I have clear lines to cut. I used small scissors to finish:)
View attachment 379619

View attachment 379620

Do you have a similar experience? How do you cut plexiglass when necessary?
Definitely, for this thickness, the usual knife is always an option. But in this case, I wanted more preciseness, especially for the Lantern.

Have a nice time of the day,
Max
Congratulations on your success. I never thought of using plexiglass. Rather I used an acetate sheet
 
Well, today my story took an interesting turn.
It's no longer about wooden composite materials; now it's about plastic, specifically plexiglass. But in order not to produce a lot of threads, I decided to write here.

We all know that plexiglass melts easily and has low thermal conductivity, making it challenging to work with.
Despite the difficulties, I decided to give it a try using a 30° engraver with a thin end measuring only 0.1 mm.
Due to the scale of the details I'm currently working with, using a larger tool was not an option.
For the Lantern glass, I used plexiglass 0.2 mm thick, and for cabin windows - 0.4 mm.

To prevent excessive melting, I needed a cooling solution for both the tool and the material. Simply using air proved to be insufficient based on my previous experience. I thought that using some liquid might be a viable idea. However, using water alone was not ideal due to its poor adhesion to organic materials, and it could potentially damage my MDF wasteboard. Fortunately, during the COVID times, I happened to have a small spray bottle containing a mixture of water and alcohol. To enhance the cooling effect, I added more alcohol to the mix and sprayed it onto the plexiglass while machining.

The spindle speed was 12000 RPM.

I must say, the results were quite satisfactory. Although the cutter didn't cut all the way through due to some melting, both the tool itself and the cutting lines remained clean. They were clean enough to meet my expectations. You can see the results in the pictures below.

View attachment 379616


View attachment 379617

The tool remained absolutely clean!!!
View attachment 379618

Although it is not completely cut through, now I have clear lines to cut. I used small scissors to finish:)
View attachment 379619

View attachment 379620

Do you have a similar experience? How do you cut plexiglass when necessary?
Definitely, for this thickness, the usual knife is always an option. But in this case, I wanted more preciseness, especially for the Lantern.

Have a nice time of the day,
Max

Hi, what was the depth of cut (in case you didn't cut it in one path) and how many mm/turn?
 
just with scissors. It was thin enough for me to do that.
I also used to cut, eg for a lantern in one of models in the past. With knife. But the problem was to keep a right angle, as detail is rather small… so I spent quite some time then. Therefore this time I decided to try the CNC.
 
Hi, what was the depth of cut (in case you didn't cut it in one path) and how many mm/turn?
I also used to cut, eg for a lantern in one of models in the past. With knife. But the problem was to keep a right angle, as detail is rather small… so I spent quite some time then. Therefore this time I decided to try the CNC.

Here are the tool Feeds&Speeds from F360.
But I made them slightly more conservative on the machine.
2023-06-15_140859.jpg
 
Beautiful job. Could you put some infos about your CNC machine ?
I'm hoping for the same thing. If I thought I could afford one, I'd scrap the rest of my workshop and design an entire ship using Fusion 360 from scratch. I would LOVE to do that! But I have a hunch I can't afford it. Please prove me wrong! ;-)
 
I'm hoping for the same thing. If I thought I could afford one, I'd scrap the rest of my workshop and design an entire ship using Fusion 360 from scratch. I would LOVE to do that! But I have a hunch I can't afford it. Please prove me wrong! ;-)

Signet, Fish&Chip,​

Well, if this topic is interesting, I will create a separate thread. Not that I have too much to say. However, before I acquired my machine, I conducted some research on what I could find online. I can share that information along with some details about my current machine. Perhaps it will be helpful to someone.
 
But here, since the thread is about composite wooden materials, I wanted to share one more observation that might be useful if someone decides to use such kind of "sandwich" materials.

Different types of wood have varying abilities to absorb water and different levels of humidity. Additionally, the layer of glue can cause the surface to shrink, leading to twisting and flexing of the composite stock. Moreover, I have noticed that certain combinations of materials are rather sensitive. Even a slight change in humidity and temperature (such as moving the stock to another room, just one floor higher) can result in noticeable flexing.

Obviously, this is not something I would want to happen to my piece, especially after it is installed. Therefore, I decided to conduct a small research.

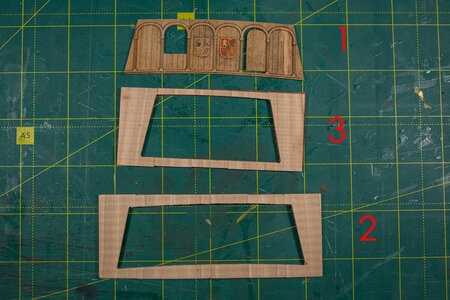
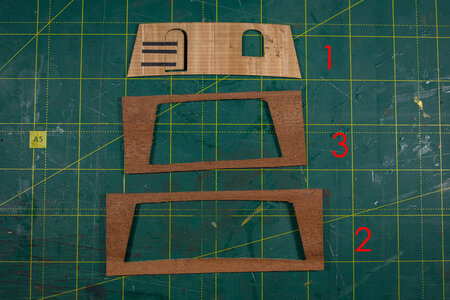
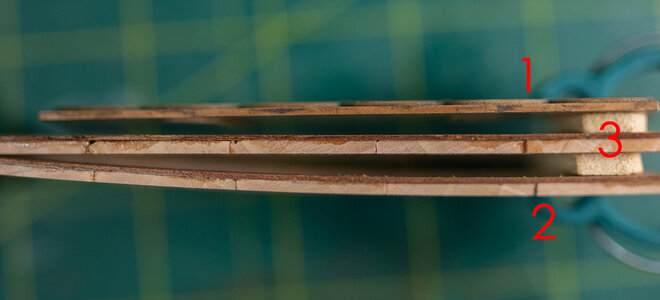
In the image provided, you can see three different materials (apologies for the numbering mix-up):

1) A single layer of pearwood glued together from separate vertical slices.
3) A composite of two layers: pearwood, similar to (1) above, combined with cherry veneer.
2) The same as (3) above, but with the backside of the veneer layer covered generously with PVA glue.

Front side:
MVV_5990.jpg

Back side:
MVV_5991.jpg

The edge:
MVV_5995.jpg

As you can see, materials 1 and 3 maintain their straight/flat shape, while material 2 has flexed.

After conducting several experiments, I have found that the best approach for achieving "flatness" is to use a single layer of material stitched (glued) from several vertical strips. In this case, the seams cause the fibers between the planks to become disconnected, preventing flexing.
However, the issue with such material is that it is the most fragile. This is particularly important to consider when using the "sticky tape approach" to fix the material on a CNC wasteboard. This particular detail was broken when I was separating it from the tape.

When working with composite materials, a compensatory layer may be required. In my case, the layer of PVA glue corrected material 2 and transformed it into material 3. Nonetheless, I believe this can vary depending on the type of wood used.

It is important to be aware of this issue.

Have a nice day,
Max
 

Signet, Fish&Chip,​

Well, if this topic is interesting, I will create a separate thread. Not that I have too much to say. However, before I acquired my machine, I conducted some research on what I could find online. I can share that information along with some details about my current machine. Perhaps it will be helpful to someone.
Hi, if you want to take the short way because of lack of time, could you just tell us wich cnc you have. We can do search then after. Thanks in advance.

Michel
 
Hi, if you want to take the short way because of lack of time, could you just tell us wich cnc you have. We can do search then after. Thanks in advance.

Michel
Exactly. What ShipmodelIdeas is doing it EXACTLY what I would want to do (but may fail with the carvings - as an Engineer, I'm great at drawing straight lines and circles, but fluid carving is harder for me). Anyhow, I would think copying ShipmodelIdea's uh, ideas, would represent the best possible chance of success.

But even if I don't do it, I just LOVE watching him do it and explain how! :)
 
One thing I might add is that the type of glue has an affect too. I was working on the Titanic by Amati and I warped one of the decks because I used PVA glue. After seeing this, I immediately switched over to contact cement, for the deck planking. It helped me immensely. A side note is that if the material is too thin, like veneer, then contact cement is not a good solution. But I don't know if your layers are as thin as veneer or not.
 
One thing I might add is that the type of glue has an affect too. I was working on the Titanic by Amati and I warped one of the decks because I used PVA glue. After seeing this, I immediately switched over to contact cement, for the deck planking. It helped me immensely. A side note is that if the material is too thin, like veneer, then contact cement is not a good solution. But I don't know if your layers are as thin as veneer or not.
Absolutely!
PVA, being water-based, certainly affects wood, especially when it is thin.
Therefore, I prefer using PVA for thicker details. When working with thin objects, like walls (less than 1 mm thick), I am extremely cautious and often avoid using PVA. Instead, I typically opt for CA gel as a substitute.
 
Exactly. What ShipmodelIdeas is doing it EXACTLY what I would want to do (but may fail with the carvings - as an Engineer, I'm great at drawing straight lines and circles, but fluid carving is harder for me). Anyhow, I would think copying ShipmodelIdea's uh, ideas, would represent the best possible chance of success.

But even if I don't do it, I just LOVE watching him do it and explain how! :)

Dear Michael (Fish&Chip), Signet,

Here it is, some info in a nutshell...
 
Back
Top