My husband bought the Mantua Black Falcon ship model 768 relatively cheaply off of ebay a couple of years ago so he could do the project with our 12 year old son. He started but soon realized, being new to ship modelling, that this was going to be more difficult than he expected, so he bought a simpler project not related to ship building which he and our son enjoyed putting together. I decided I would look into doing the Black Falcon with our son since we already have the kit. Well, being new to this myself I didn't know what to expect. What I found appears to be a very old version of the kit, possibly 1979 as there is a 1979 kit catalog in the box . It has two large papers showing the building plans. One of these has what seems to me very minimal instructions in multiple languages one of which, luckily, is English. There is a small 4 page booklet not in English which when I try to translate it on google translate says it is Dutch. This also gives some instructions but at least in the small part that I have translated seems to be in a slightly different order than the other instructions. It also contains a list of the items in the box with dimensions which have been very helpful to figure out what the various pieces are. I have looked for any threads for doing this model and came across another newbie on a different ship modelling site who got this kit for a present, and it was suggested he start with a different model first. The only place I have found anyone mentioning actually doing this model is on this site, where Anthony (booted) said he was returning to work on this model after 5 years. He showed pictures which looked really good and are helpful. Well, I know this all makes my success at this difficult, but I am going to try. At worst, the ship won't look as I would like, but I will have spent time with my son, but I am hoping for even better than that, so I decided to join this group in hopes that you might be willing to help guide me as I go through this process. Thanks in advance for any help.
I started following the instructions and have glued the frames to the keel. The instructions say to then plank the hull, but it doesn't say how. In my search to learn how to do this I have learned about fairing the frames and about a bearding line and needing to cut a rabbet line. None of this was mentioned in the instructions.
So my questions are:
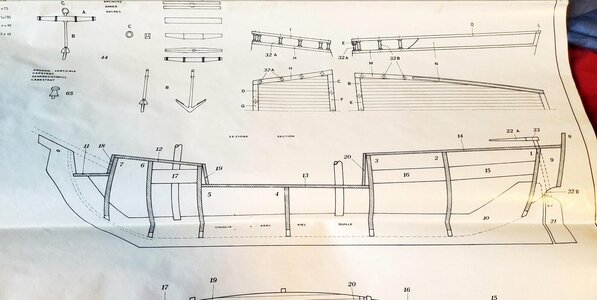
1. Are all kits meant to cut a rabbet line? Does the double dotted line on the building plan (see attachment) at the front of the ship that extends as a single dotted line along the bottom of the ship to the back mean I am supposed to cut a rabbet line or does it mean something else? I assume this line is showing where the planks are to end and if so, how are the planks to end past frame 1 over block 9 to frame 8 as there is no dotted line?
2. Is it even possible for me to cut a rabbet line now that the frames are already glued?
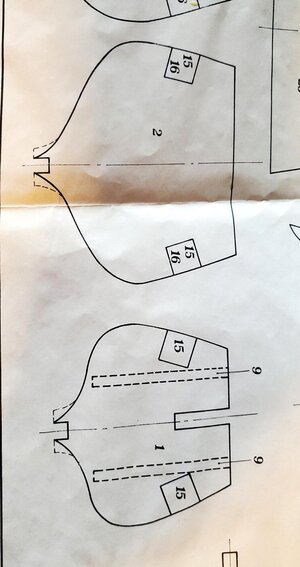
3. On frames number 1 and 2 (2nd attachment) does the dotted line at the bottom of each mean that part is ultimately supposed to be sanded away to get to the solid line?
I am sorry for these very naive questions but again appreciate your help.
I started following the instructions and have glued the frames to the keel. The instructions say to then plank the hull, but it doesn't say how. In my search to learn how to do this I have learned about fairing the frames and about a bearding line and needing to cut a rabbet line. None of this was mentioned in the instructions.
So my questions are:
1. Are all kits meant to cut a rabbet line? Does the double dotted line on the building plan (see attachment) at the front of the ship that extends as a single dotted line along the bottom of the ship to the back mean I am supposed to cut a rabbet line or does it mean something else? I assume this line is showing where the planks are to end and if so, how are the planks to end past frame 1 over block 9 to frame 8 as there is no dotted line?
2. Is it even possible for me to cut a rabbet line now that the frames are already glued?
3. On frames number 1 and 2 (2nd attachment) does the dotted line at the bottom of each mean that part is ultimately supposed to be sanded away to get to the solid line?
I am sorry for these very naive questions but again appreciate your help.