Tutorial Making the Pawl Rim using Proxxon MF70

Jimsky

Administrator
Staff member
Administrator
Forum Moderator
Joined
Nov 3, 2018
Messages
12,220
Points
938

Location
Brooklyn, New York USA
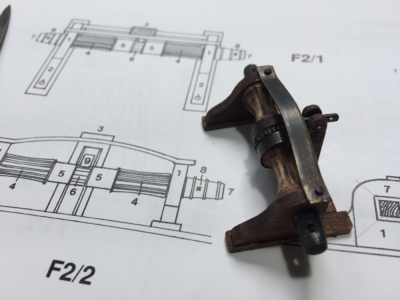
Hello, fellas! I am continuing the series of posts using the Proxxon MF70 mill to fabricate different parts for our models. Today, we will make a Pawl Ring found in windlasses. So a brief history of Windlass to start with...

The Windlass

This piece of equipment was generally used as an alternative to the capstan on such vessels as cutters, schooners, lugers, and smaller classes of gun brigs. Unlike the capstan, its barrel was set horizontally between two vertical bits and, turned with either handspikes or a ratchet and crank device. The barrel was usually made from oak, it was eight-sided and tapered towards its extremities. To prevent the windlass reversing when either hauling or veering a pawl and pawl ring were fitted. The pawl was made from cast iron and was located at the center of the length of the barrel, with securing bolts that were flush at their heads.
In some cases, two pawl rims were fitted at the extremities of the barrel, instead of the center. This appears to be a later style. In most cases the internal diameter of the pawl ring was eight-sided, to conform to the shape of the barrel, and also prevent any slip. See some images courtesy of Peter Goodwin.
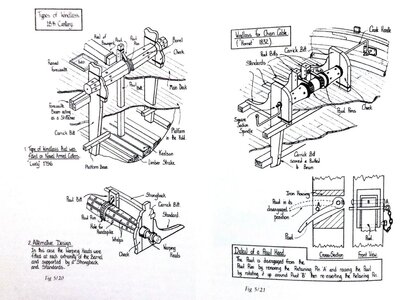
IMG_2629.jpeg

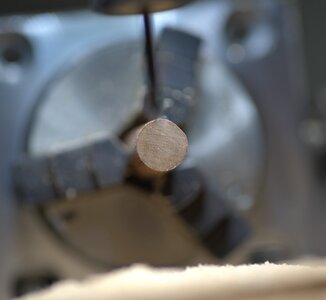
I was experimenting with dividing head for my Proxxon mill where I just mil the round stock and... something interesting came to mind, Can I make a gear, seriously? I do realize that the dowel stock I have is not round, I mean it is not round as you can see below ;)
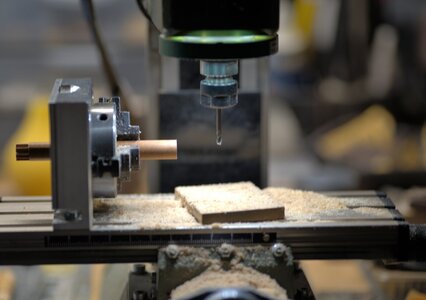
600_3790.jpg 600_3789.jpg

To make the stock 'round', I just use the endmill and rotate the head all the way, then slide the table a bit and again turn the dividing head. I think it is an improvement and

600_3791.jpg600_3792.jpg

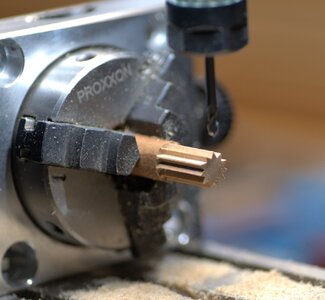
For this setup, I use a 9.5 ~9.7mm cherry wood dowel and a 2.50mm endmill. Before you will make the first cut take a look and position the endmill about 10 minutes before noon. I came to this position through various experiments. Different offsets would yield different shapes of the gear (pawl rim). The deep of the cut should be the size of the diameter of the endmill. I start with a small cut, adjust and make sure it is the way it should be, and cut the entire length.

600_3795.jpg 600_3794.jpg

The next step will require good eyesight (If you come up with a better, mathematical approach I will owe you a lunch). While the wood stock is still tightened in the jaws, turn the divided head counterclockwise (towards yourself). Position the endmill exactly on the top edge of the first cut. I found it is a requirement if you want to make perfect gear. Make a small cut and adjust accordingly (if necessary). DO NOT adjust by sliding the 'X' and 'Y' axis tables, rotate only the dividing head, not the wood stock!

600_3797.jpg 600_3800.jpg

Once the next cut is done, repeat the same procedure as described above. Rotate the head to the point where the endmill will be on the top edge of the cut. *HINT: I set on the small stool (my grandkids) so my eyes are in the line of the endmill. This way, I can position the end mill correctly.

600_3801.jpg600_3803.jpg

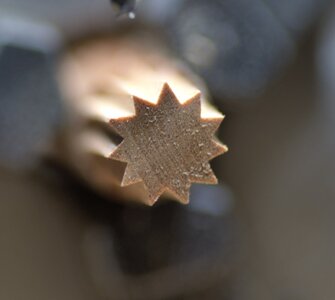
Alright...you will have to repeat the same task until your first cut becomes a 'tooth' of a gear. If everything goes well, you should have a perfect shape gear!!

600_3807.jpg 600_3806.jpg

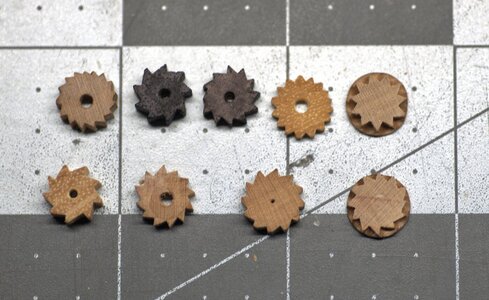
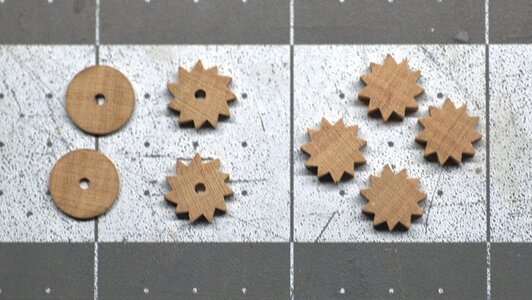
If you play with the different sizes of the endmills and position the endmill 15 minutes before noon, you will have a bit different shape of the gear. This was made by using the 'trial and error' method, If you know a better way to calculate the number of teeth to make a 'perfect' pawl rim, please share it. On the left side, are the results of my initial experiments and practices. On the right side are the results I will mostly use on my models. What do you think?

600_3809.jpg 600_3810.jpg
600_3814.jpg

Hope this was informative and may help you develop some mill skills. Please give me your feedback or better the way you would do your own Pawl Rim!! Thank you for stopping by!

P.S. Click on an individual image to make it bigger.
 
Hello, fellas! I am continuing the series of posts using the Proxxon MF70 mill to fabricate different parts for our models. Today, we will make a Pawl Ring found in windlasses. So a brief history of Windlass to start with...

The Windlass

This piece of equipment was generally used as an alternative to the capstan on such vessels as cutters, schooners, lugers, and smaller classes of gun brigs. Unlike the capstan, its barrel was set horizontally between two vertical bits and, turned with either handspikes or a ratchet and crank device. The barrel was usually made from oak, it was eight-sided and tapered towards its extremities. To prevent the windlass reversing when either hauling or veering a pawl and pawl ring were fitted. The pawl was made from cast iron and was located at the center of the length of the barrel, with securing bolts that were flush at their heads.
In some cases, two pawl rims were fitted at the extremities of the barrel, instead of the center. This appears to be a later style. In most cases the internal diameter of the pawl ring was eight-sided, to conform to the shape of the barrel, and also prevent any slip. See some images courtesy of Peter Goodwin.

View attachment 351864

I was experimenting with dividing head for my Proxxon mill where I just mil the round stock and... something interesting came to mind, Can I make a gear, seriously? I do realize that the dowel stock I have is not round, I mean it is not round as you can see below ;)
View attachment 351866 View attachment 351865

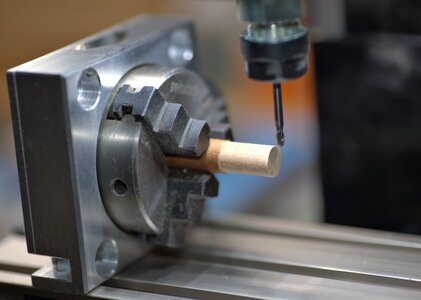
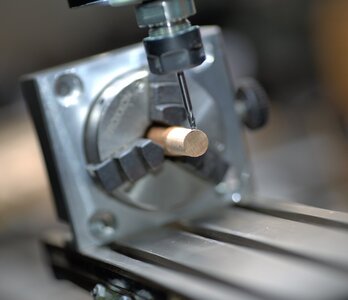
To make the stock 'round', I just use the endmill and rotate the head all the way, then slide the table a bit and again turn the dividing head. I think it is an improvement and
View attachment 351877View attachment 351878

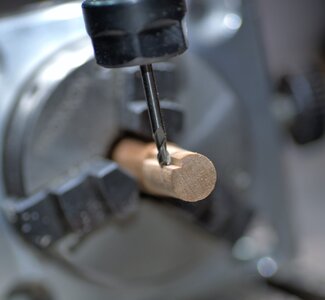
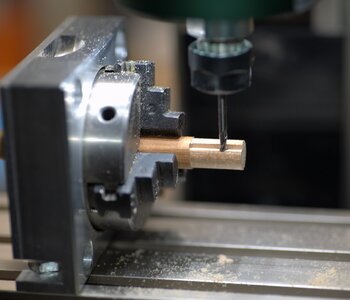
For this setup, I use a 9.5 ~9.7mm cherry wood dowel and a 2.50mm endmill. Before you will make the first cut take a look and position the endmill about 10 minutes before noon. I came to this position through various experiments. Different offsets would yield different shapes of the gear (pawl rim). The deep of the cut should be the size of the diameter of the endmill. I start with a small cut, adjust and make sure it is the way it should be, and cut the entire length.
View attachment 351879 View attachment 351880

The next step will require good eyesight (If you come up with a better, mathematical approach I will owe you a lunch). While the wood stock is still tightened in the jaws, turn the divided head counterclockwise (towards yourself). Position the endmill exactly on the top edge of the first cut. I found it is a requirement if you want to make perfect gear. Make a small cut and adjust accordingly (if necessary). DO NOT adjust by sliding the 'X' and 'Y' axis tables, rotate only the dividing head, not the wood stock!
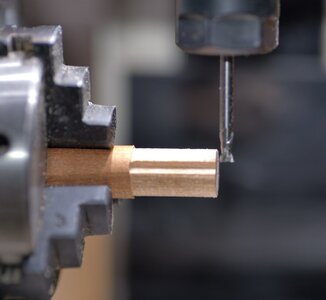
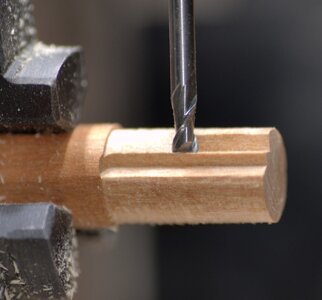
View attachment 351882 View attachment 351883

Once the next cut is done, repeat the same procedure as described above. Rotate the head to the point where the endmill will be on the top edge of the cut. *HINT: I set on the small stool (my grandkids) so my eyes are in the line of the endmill. This way, I can position the end mill correctly.
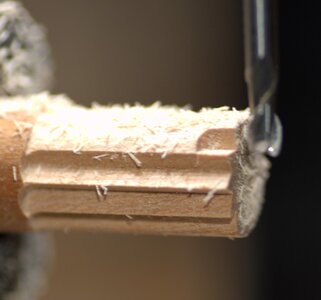
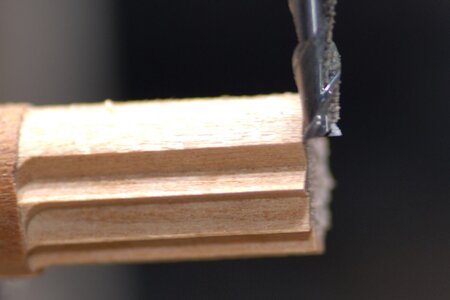
View attachment 351884View attachment 351885

Alright...you will have to repeat the same task until your first cut becomes a 'tooth' of a gear. If everything goes well, you should have a perfect shape gear!!
View attachment 351886 View attachment 351887

If you play with the different sizes of the endmills and position the endmill 15 minutes before noon, you will have a bit different shape of the gear. This was made by using the 'trial and error' method, If you know a better way to calculate the number of teeth to make a 'perfect' pawl rim, please share it. On the left side, are the results of my initial experiments and practices. On the right side are the results I will mostly use on my models. What do you think?
View attachment 351897 View attachment 351898
View attachment 351899

Hope this was informative and may help you develop some mill skills. Please give me your feedback or better the way you would do your own Pawl Rim!! Thank you for stopping by!

P.S. Click on an individual image to make it bigger.
Thanks Jim,
A very useful tutorial, and I cannot wait to give it a go. However could you clarify several points for me please. Firstly you are on the east coast of USA while I reside in Ireland, a time difference, at this time of the year, of five hours, do I have to adjust for the difference? or do I mimic New York time? i.e. if you set up at 10 min before noon (UTC-5) do I do the same my time 4:50 pm or do I get to work five hours earlier? Secondly, what about fine-tuning? I live on longitude 5.5 degrees west which equates to 22 minutes time, is this a factor? Finally what will happen when our separate countries move to summer time on different dates?
Seriously though a great piece of work and well explained, Chapeau Sir.
Cheers JJ..
 
Hello, fellas! I am continuing the series of posts using the Proxxon MF70 mill to fabricate different parts for our models. Today, we will make a Pawl Ring found in windlasses. So a brief history of Windlass to start with...

The Windlass

This piece of equipment was generally used as an alternative to the capstan on such vessels as cutters, schooners, lugers, and smaller classes of gun brigs. Unlike the capstan, its barrel was set horizontally between two vertical bits and, turned with either handspikes or a ratchet and crank device. The barrel was usually made from oak, it was eight-sided and tapered towards its extremities. To prevent the windlass reversing when either hauling or veering a pawl and pawl ring were fitted. The pawl was made from cast iron and was located at the center of the length of the barrel, with securing bolts that were flush at their heads.
In some cases, two pawl rims were fitted at the extremities of the barrel, instead of the center. This appears to be a later style. In most cases the internal diameter of the pawl ring was eight-sided, to conform to the shape of the barrel, and also prevent any slip. See some images courtesy of Peter Goodwin.

View attachment 351864

I was experimenting with dividing head for my Proxxon mill where I just mil the round stock and... something interesting came to mind, Can I make a gear, seriously? I do realize that the dowel stock I have is not round, I mean it is not round as you can see below ;)

View attachment 351866 View attachment 351865

To make the stock 'round', I just use the endmill and rotate the head all the way, then slide the table a bit and again turn the dividing head. I think it is an improvement and

View attachment 351877View attachment 351878

For this setup, I use a 9.5 ~9.7mm cherry wood dowel and a 2.50mm endmill. Before you will make the first cut take a look and position the endmill about 10 minutes before noon. I came to this position through various experiments. Different offsets would yield different shapes of the gear (pawl rim). The deep of the cut should be the size of the diameter of the endmill. I start with a small cut, adjust and make sure it is the way it should be, and cut the entire length.

View attachment 351879 View attachment 351880

The next step will require good eyesight (If you come up with a better, mathematical approach I will owe you a lunch). While the wood stock is still tightened in the jaws, turn the divided head counterclockwise (towards yourself). Position the endmill exactly on the top edge of the first cut. I found it is a requirement if you want to make perfect gear. Make a small cut and adjust accordingly (if necessary). DO NOT adjust by sliding the 'X' and 'Y' axis tables, rotate only the dividing head, not the wood stock!

View attachment 351882 View attachment 351883

Once the next cut is done, repeat the same procedure as described above. Rotate the head to the point where the endmill will be on the top edge of the cut. *HINT: I set on the small stool (my grandkids) so my eyes are in the line of the endmill. This way, I can position the end mill correctly.

View attachment 351884View attachment 351885

Alright...you will have to repeat the same task until your first cut becomes a 'tooth' of a gear. If everything goes well, you should have a perfect shape gear!!

View attachment 351886 View attachment 351887

If you play with the different sizes of the endmills and position the endmill 15 minutes before noon, you will have a bit different shape of the gear. This was made by using the 'trial and error' method, If you know a better way to calculate the number of teeth to make a 'perfect' pawl rim, please share it. On the left side, are the results of my initial experiments and practices. On the right side are the results I will mostly use on my models. What do you think?
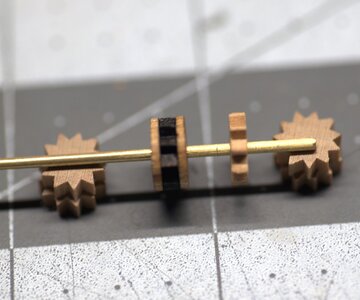
View attachment 351897 View attachment 351898
View attachment 351899

Hope this was informative and may help you develop some mill skills. Please give me your feedback or better the way you would do your own Pawl Rim!! Thank you for stopping by!

P.S. Click on an individual image to make it bigger.
Well....now I got to try it! But first, I need the 3-jaw chuck/dividing head....off to the internet I go! Nice work!
 
Last edited:
Thank you all! I am glad it could be useful despite various geographical locations and climate zone mixups. :cool: This dividing head is suitable exactly for what it is designed for, a hobby. The biggest drawback is the locking mechanism. Don't expect precision quality from it, but it is a good tool to expand the mill's capabilities.
 
Jimsky, Must be ESP. first up thank you for another great tutorial and demonstration. Pity is I don't have an MF70 or Lathe something that is in my 'Want but will never have' list. Yesterday which was your day before I finally finished making the windlass for my Santa Maria. Wish I'd known the barrel was or were eight sided.
LOL my started as a brass Chicago screw clip with a serrated cap that was drilled through the middle and filed down so the pawl ring has about 20 teeth. :oops: .
Anyway this is what my final result is;

image_2023-01-22_153131010.png
 
Jimsky, Must be ESP. first up thank you for another great tutorial and demonstration. Pity is I don't have an MF70 or Lathe something that is in my 'Want but will never have' list. Yesterday which was your day before I finally finished making the windlass for my Santa Maria. Wish I'd known the barrel was or were eight sided.
LOL my started as a brass Chicago screw clip with a serrated cap that was drilled through the middle and filed down so the pawl ring has about 20 teeth. :oops: .
Anyway this is what my final result is;

View attachment 352882
Different years have different shapes\technologal construction windlass. I like your final result!! Very handsome windlass.
 
Hello, fellas! I am continuing the series of posts using the Proxxon MF70 mill to fabricate different parts for our models. Today, we will make a Pawl Ring found in windlasses. So a brief history of Windlass to start with...

The Windlass

This piece of equipment was generally used as an alternative to the capstan on such vessels as cutters, schooners, lugers, and smaller classes of gun brigs. Unlike the capstan, its barrel was set horizontally between two vertical bits and, turned with either handspikes or a ratchet and crank device. The barrel was usually made from oak, it was eight-sided and tapered towards its extremities. To prevent the windlass reversing when either hauling or veering a pawl and pawl ring were fitted. The pawl was made from cast iron and was located at the center of the length of the barrel, with securing bolts that were flush at their heads.
In some cases, two pawl rims were fitted at the extremities of the barrel, instead of the center. This appears to be a later style. In most cases the internal diameter of the pawl ring was eight-sided, to conform to the shape of the barrel, and also prevent any slip. See some images courtesy of Peter Goodwin.

View attachment 351864

I was experimenting with dividing head for my Proxxon mill where I just mil the round stock and... something interesting came to mind, Can I make a gear, seriously? I do realize that the dowel stock I have is not round, I mean it is not round as you can see below ;)

View attachment 351866 View attachment 351865

To make the stock 'round', I just use the endmill and rotate the head all the way, then slide the table a bit and again turn the dividing head. I think it is an improvement and

View attachment 351877View attachment 351878

For this setup, I use a 9.5 ~9.7mm cherry wood dowel and a 2.50mm endmill. Before you will make the first cut take a look and position the endmill about 10 minutes before noon. I came to this position through various experiments. Different offsets would yield different shapes of the gear (pawl rim). The deep of the cut should be the size of the diameter of the endmill. I start with a small cut, adjust and make sure it is the way it should be, and cut the entire length.

View attachment 351879 View attachment 351880

The next step will require good eyesight (If you come up with a better, mathematical approach I will owe you a lunch). While the wood stock is still tightened in the jaws, turn the divided head counterclockwise (towards yourself). Position the endmill exactly on the top edge of the first cut. I found it is a requirement if you want to make perfect gear. Make a small cut and adjust accordingly (if necessary). DO NOT adjust by sliding the 'X' and 'Y' axis tables, rotate only the dividing head, not the wood stock!

View attachment 351882 View attachment 351883

Once the next cut is done, repeat the same procedure as described above. Rotate the head to the point where the endmill will be on the top edge of the cut. *HINT: I set on the small stool (my grandkids) so my eyes are in the line of the endmill. This way, I can position the end mill correctly.

View attachment 351884View attachment 351885

Alright...you will have to repeat the same task until your first cut becomes a 'tooth' of a gear. If everything goes well, you should have a perfect shape gear!!

View attachment 351886 View attachment 351887

If you play with the different sizes of the endmills and position the endmill 15 minutes before noon, you will have a bit different shape of the gear. This was made by using the 'trial and error' method, If you know a better way to calculate the number of teeth to make a 'perfect' pawl rim, please share it. On the left side, are the results of my initial experiments and practices. On the right side are the results I will mostly use on my models. What do you think?

View attachment 351897 View attachment 351898
View attachment 351899

Hope this was informative and may help you develop some mill skills. Please give me your feedback or better the way you would do your own Pawl Rim!! Thank you for stopping by!

P.S. Click on an individual image to make it bigger.
Great idea! I would never 'uv thunkit'.
 
Thank you for posting the tutorial on what a person can accomplish with the Proxxon mill and dividing head. I tried the same with mine and I need a little more practice. I think I was trying to go to fast and not taking the time with the alignment. Keep posing the tutorials I think they are fantastic, and it helps novices like myself, thanks.
 
Thank you for posting the tutorial on what a person can accomplish with the Proxxon mill and dividing head. I tried the same with mine and I need a little more practice. I think I was trying to go to fast and not taking the time with the alignment. Keep posing the tutorials I think they are fantastic, and it helps novices like myself, thanks.
Thank you for your feedback. We are here to help novices and also learn from them. Promise to post more tutorials...stay tuned. ;)
 
Thank you for your feedback. We are here to help novices and also learn from them. Promise to post more tutorials...stay tuned. ;)
Jimsky, two months ago I ordered an MF70. It's still untouched, unopened and securely packaged in storage. Regardless, I enjoy your tutorials and hope once I have a hobby room and start playing I may achieve something with destroying another. Thank you for these posts. cheers.
 
Thank you for posting the tutorial on what a person can accomplish with the Proxxon mill and dividing head. I tried the same with mine and I need a little more practice. I think I was trying to go to fast and not taking the time with the alignment. Keep posing the tutorials I think they are fantastic, and it helps novices like myself, thanks.
Hallo @dpktraf11
we wish you all the BEST and a HAPPY BIRTHDAY
Birthday-Cake
Sorry Jim to missuse your topic
 
Back
Top