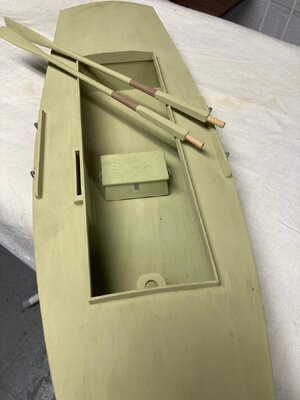
Lowell Grand Banks Dory, Scale 1:24, by Model Shipways, Beginner's kit [COMPLETED BUILD]

Jimsky, outstanding! I enjoyed your coverage of the construction process, photos of details and impeccable workmanship.
Thank you.
Thank you, I missed the photoshoot of the planking process, but please check Dave's log. He discusses it all in greater detail.

 
Nicely done. I had fun with the kit (3rd model I did) when I made mine awhile ago.
 
Cap'n Jimsky:
Excellent model making and tutorial! I have but one quibble: while the spoon blade oars show off your model making skill, no bank dory ever carried them. Spoon blade oars were/are used for lighter, faster craft that can take advantage of marginal increase in speed from a long pull. They are usually of softwood and much too delicate for use on a heavy, burdensome bank dory. Oars on a bank dory were usual of ash... heavy and tough. Big dories are best rowed with a short, hard pull and a slow recovery.

Other references for aspiring dory modelers out there:
  • American Small Sailing Craft. Howard Chapelle. A definitive volume with a section on dories.
  • Captains Courageous. Rudyard Kipling.
  • Captains Courageous. The 1937 movie. Lots of shots of bank dories both from documentary footage and on a sound stage.
Fair winds!
 
Excellent model making and tutorial! I have but one quibble: while the spoon blade oars show off your model making skill, no bank dory ever carried them. Spoon blade oars were/are used for lighter, faster craft that can take advantage of marginal increase in speed from a long pull. They are usually of softwood and much too delicate for use on a heavy, burdensome bank dory. Oars on a bank dory were usual of ash... heavy and tough. Big dories are best rowed with a short, hard pull and a slow recovery.
Thank you for the lesson, Andy! Live and learn ;)
 
Another thought about oars. The painting by Homer in the original post shows oars with a square cross section on the inboard portion of the loom.
This feature required less carving, put more weight inboard to balance the outboard weight, and kept the oars from rolling around when they were stowed. Attached is a photo of a similar pair of oars that I made for a model of a garvey duck boat (1:8 scale).

sneakerbox 11.jpg
 
Another thought about oars. The painting by Homer in the original post shows oars with a square cross section on the inboard portion of the loom.
This feature required less carving, put more weight inboard to balance the outboard weight, and kept the oars from rolling around when they were stowed. Attached is a photo of a similar pair of oars that I made for a model of a garvey duck boat (1:8 scale).

View attachment 421089
I like how your oars look as well as the boat. Why don't you submit images of your complete model? Is it feasible?

 
My two favorites are Tung and Linseed oils with a light coat of renaissance wax afterward.
Renaissance Wax is the best long term finish, over whatever else you choose. We have used it extensively in our book restoration business and it adds a hard protective sheen over almost any product. We see amazing results over leather bindings, where-as they used to use leather dressings such as Neatsfoot Oil etc. The British Library had a major disaster with bindings using their "special Leather dressing" over a number of years. Most Museums now use Renaissance Wax to protect their artifacts.

I have used Linseed Oil extensively on my Medea build and, stupidly, didn't think of Renaissance wax to seal and prevent dust from sticking. So thanks, Jim. Another thing I have to thank you for. I'll be going over as much of my build as I can with the wax now.
 
Thanks, Ian. I took the Renaissance wax recommendation from one of our members (shamefully, forgot who), and he was using it to protect gun barrels after blackening. The instructions said you can use it almost on everything... Time will tell... ;)
 
View attachment 420553
The Fog Warning, painted by Winslow Homer in 1885

To end the 2023 year with finishing at least one model, hence helping novice scale modelers who are just new to the hobby or switching from plastic, I decided to assemble the Lowell Grand Banks Dory, the kit made by Model Shipways (beginner series). I went to the Model Expo and 'clicked the button'. ;) Sure enough, less than a week later, my kit has been arrived. The idea was to build this ship in a few days (weekend project)... so let's see what happened.

Dories. What is a Dory?
Information on dories is varied and contradictory. This is because there are many different styles of dories and boatbuilders have adapted the dory for local conditions. The name Dory usually brings to mind the Grand Banks Dory, with its straight sides, flat bottom, narrow transom, and characteristic straight bow. Relatively Light and simple to build and stackable they were used as fishing dinghies.
There are many types of dory type boats in the world. VanGogh left us a drawing of dory-like boats. Another example is the Portuguese fishing boats that have very similar lines.
John Gardener in his book The Dory Book, defines a dory as " A dory is a flat-bottomed boat, with sides and bottom planked lengthwise and with no keel structure other than the bottom planking". Dories were cheap and quick to make and as in the case of the Grand Banks Dory stackable. The mother ship would go out with large piles of dories on deck. When they reached the fishing grounds the dories would be launched. At the end of the day, the dories would be brought back on board.
Dories can vary a lot in shape. It seems that every locality has a brand of boat they call a dory. Various designs evolved depending on the use the dory was to be put to and the nature of the water in the area.

Grand Banks Dory
Thinking about Grand Banks Dory makes you want to break out in a rousing chorus of "squid jigging ground". The legend is dear to modern boaters but the reality of these dories was harsher. They were tricky boats to handle until you had half a load of fish. Luckily they were rarely empty. Going out the boat would have fishing gear and bait, coming in they would have fish. Their great claim to fame was that they were quick and cheap to make and stackable. This was a great advantage.

The model
Model designed and instruction book written by David Antscher. Kit made in the USA by Model Shipways (a decision of Model Expo). Kit #MS1470 at scale 1:24 (1/2" 1'0"). All materials are basswood. If you decide to paint your Dory, then you will need to purchase the paint suggested.
Model overall length 10'
Width 3",
height 1 1/2"

View attachment 420630

The assembly
I will build mostly as per instruction using suggested tools (listed on pages 26-28 manual) and the video listed in the Model Expo as New Model Shipways Shipwrights Series So...Let's begin...

Dories are bottom-flat, preparing the bottom first. Kit provides 2 versions of the bottom: making from a single piece or if you want to make from three laser-cut pieces (image below). I choose to use a three-piece bottom and glue them together. Make sure the engraving marks should match to create a solid line.

View attachment 420575
View attachment 420576
The next step is to add the cleats (bottom reinforcement). I use one of my dyes to make the strip for cleats darker and cut the required sizes. I forgot to mention, that my Dorry will not be painted, as I have no skills necessary, I will play with different colors of the wood.
NOTE: I identify the bow with engraved dots.

View attachment 420577

While the glue dried, I prepared the stern and stem posts.
View attachment 420578

...and the manual suggested gluing them to the bottom. NOTE: the curvature at the bow and stern (I didn't take the photo, but the manual mentioned this.
View attachment 420579
View attachment 420580

...to be continued...
Hallo @Jimsky
we wish you all the BEST and a HAPPY BIRTHDAY
Birthday-Cake
Enjoy your special day
 
Back
Top