Keel question

Joined
Aug 10, 2022
Messages
10
Points
8

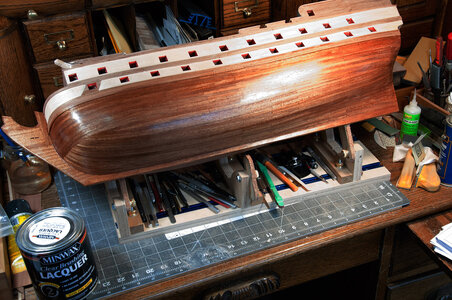
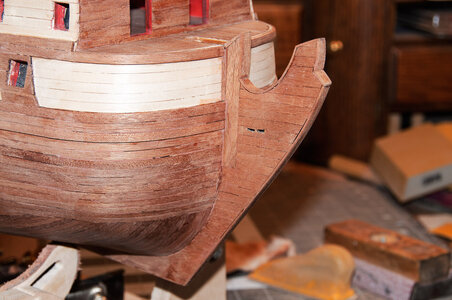
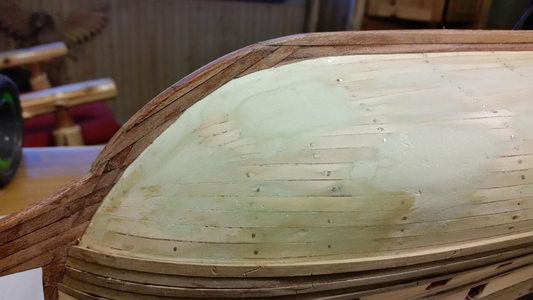
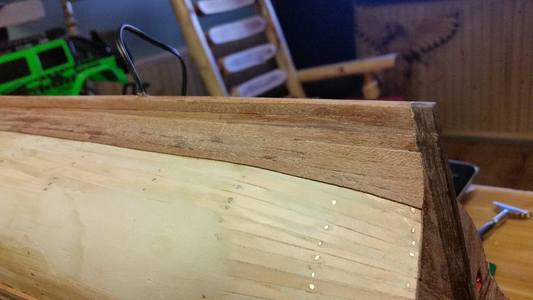
So I am working on my first model.. I downloaded plan templates and printed them out. I took those and glued them to some birch plywood and cut it all out.. took it to the mini belt sander and took the cut right up to the line.. Everything is going fairly smooth, but I have a question about the keel. As it stands now, the keel will show the 3 layers of the plywood. I'd love for my keel to be made from some type of nicer wood, and I'd like to cut it into the segments and assemble the pieces like I've seen on some scratch builds, for realism..

I guess my question is how to achieve this. Should I do all the planking first? Get the structure solid, come back and cut the plywood keel off, then replace it with a scratch made keel? Or would it be better to do before the planking (or after the first plank layer, but before the second) so the edge gets hidden behind a layer of plank? Am I missing some other method? How do most people get a nice, non-plywood keel?
 
I'm the least experienced of those whose will answer you, but I wouldn't want to cut the keel off a planked hull and replace it. I would think you could add a piece of quality wood along the bottom of the keel, stained and finished to match, and bent up the bow and all, maybe 0.5 to 1mm thick x the keel width. That should look pretty good IMHO.

Also, many/most ships have a false keel, a more substantial piece of wood on the bottom of the actual keel, to protect it. On a model, this might be 2mm or more thick, and represents a real structure on many ships. I don't think the false keel would curve up the bow/stem, but it would certainly cover the bottom of the keel. OTOH, the bottom of the keel of a model will normally not be visible, so even filler for the plywood might work fine. Oh, and this also depends on the color of the hull below the water line; if painted, you can fill any gaps in the plywood, and sand smooth. If natural wood, you may want to cover it as described.

And - if you post the ship you are building, I'm sure others can give you better answers. Hope this helps.
 
So I am working on my first model.. I downloaded plan templates and printed them out. I took those and glued them to some birch plywood and cut it all out.. took it to the mini belt sander and took the cut right up to the line.. Everything is going fairly smooth, but I have a question about the keel. As it stands now, the keel will show the 3 layers of the plywood. I'd love for my keel to be made from some type of nicer wood, and I'd like to cut it into the segments and assemble the pieces like I've seen on some scratch builds, for realism..

I guess my question is how to achieve this. Should I do all the planking first? Get the structure solid, come back and cut the plywood keel off, then replace it with a scratch made keel? Or would it be better to do before the planking (or after the first plank layer, but before the second) so the edge gets hidden behind a layer of plank? Am I missing some other method? How do most people get a nice, non-plywood keel?
Have you considered planking the keel? Use a thin plank (or veneer). Consider Sapele, Mahogany, or another wood to suit.Nuestra_330.jpgNuestra_289.jpg
 
Signet is right about how good layering hardwood over the plywood false keel can look. Here is what you can do without cutting off the false keel and replacing it with solid hardwood. The advantage in leaving the false keel in place is that the strength of the hull framework is maintained, such that you can mount the model in a keel vise to hold it while you work on upper parts of the ship such as the deck and do the rigging. Attaching a new keel is slightly weaker, and bumping the ship while in the keel vice in an accident could break off the keel.

You can simulate the individual sections of the keel using hardwood veneers applied to the false keel, and the effect is pretty good, and easier than jig-sawing and assembling a solid keel in pieces. An example of a veneered keel is shown below on the French man of war La Couronne. Using a brown permanent marker on ONE side of each joint will darken the lined between the veneer strips, which are made from mahogany below. You can cut the plank ends with sharp scissors for quick fitting. A strip of 1mm hardwood along the bottom edge of the keel simulates the false keel (not to be confused with the plywood model keel piece). The false keel was a strip designed to take wear and damage from grounding, and could be easily replaced compared to repairing the keel if damaged. In the example below, the seam between the false keel and the side veneer strips is practically invisible, and veneer was used on this model because I was unaware of the false keel construction found on actual ships at the time. The pattern of even strips on the stem assembly is only partially accurate. (Keep reading).
1665631813326.png

Here you can see how the keel veneers blend into the hull planking near the stern, which will be installed later. Note how the surface of the planking is even with the sides of the sternpost, in this case made from solid walnut. Your wood choices will vary.
1665632276305.png

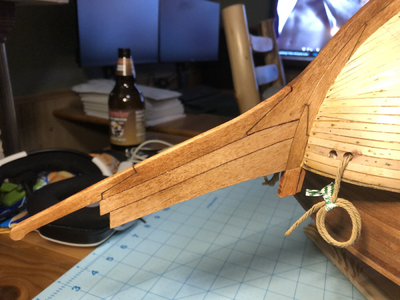
Unlike the first model, the stem assembly on this model below was not veneered with strips, but assembled from solid hardwood. Even strips of veneer on the previous ship's stem were not the proper joint arrangement. The seams are actual glued seams mixed with simulated seams made with cuts from a chisel shaped razor knife and stained. The shapes of the parts of the stem assembly could be simulated much more easily with sheets of veneer cut into puzzle piece shapes like this which properly simulate the timber piece shapes and glued to the plywood false stem, and the final effect would look very close. The hard part is locating a historic reference source that can show you what these shapes are for your type of vessel, and all ships varied greatly in this regard if you tell us which ship your are building. Other members can help you with this information. Also, when assembling solid pieces of hardwood and eliminating gaps in the joints is a real pain. Gaps have to be filled with a thick mixture of PVA glue and sawdust, and stained after sanding. The stem assembly below is made from solid maple, and needs to be stained a few shades darker.
1665632818500.png

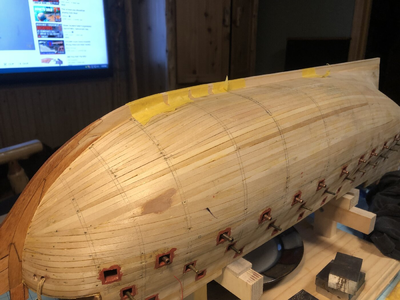
Here you can see the 1.5mm thick false keel with masking tape holding it until the glue dries. It is a series of strip sections, about 4-5 of them starting from a point at the forward edge of the forward most piece of yellow tape, and extending aft until it touched the forward most edge of the sternpost.
1665633201409.png
 
Last edited:
Signet is right about how good layering hardwood over the plywood false keel can look. Here is what you can do without cutting off the false keel and replacing it with solid hardwood. The advantage in leaving the false keel in place is that the strength of the hull framework is maintained, such that you can mount the model in a keel vise to hold it while you work on upper parts of the ship such as the deck and do the rigging. Attaching a new keel is slightly weaker, and bumping the ship while in the keel vice in an accident could break off the keel.

You can simulate the individual sections of the keel using hardwood veneers applied to the false keel, and the effect is pretty good, and easier than jig-sawing and assembling a solid keel in pieces. An example of a veneered keel is shown below on the French man of war La Couronne. Using a brown permanent marker on ONE side of each joint will darken the lined between the veneer strips, which are made from mahogany below. You can cut the plank ends with sharp scissors for quick fitting. A strip of 1mm hardwood along the bottom edge of the keel simulates the false keel (not to be confused with the plywood model keel piece). The false keel was a strip designed to take wear and damage from grounding, and could be easily replaced compared to repairing the keel if damaged. In the example below, the seam between the false keel and the side veneer strips is practically invisible, and veneer was used on this model because I was unaware of the false keel construction found on actual ships at the time. The pattern of even strips on the stem assembly is only partially accurate. (Keep reading).
View attachment 334060

Here you can see how the keel veneers blend into the hull planking near the stern, which will be installed later. Note how the surface of the planking is even with the sides of the sternpost, in this case made from solid walnut. Your wood choices will vary.
View attachment 334063

Unlike the first model, the stem assembly on this model below was not veneered with strips, but assembled from solid hardwood. Even strips of veneer on the previous ship's stem were not the proper joint arrangement. The seams are actual glued seams mixed with simulated seams made with cuts from a chisel shaped razor knife and stained. The shapes of the parts of the stem assembly could be simulated much more easily with sheets of veneer cut into puzzle piece shapes like this which properly simulate the timber piece shapes and glued to the plywood false stem, and the final effect would look very close. The hard part is locating a historic reference source that can show you what these shapes are for your type of vessel, and all ships varied greatly in this regard if you tell us which ship your are building. Other members can help you with this information. Also, when assembling solid pieces of hardwood and eliminating gaps in the joints is a real pain. Gaps have to be filled with a thick mixture of PVA glue and sawdust, and stained after sanding. The stem assembly below is made from solid maple, and needs to be stained a few shades darker.
View attachment 334065

Here you can see the 1.5mm thick false keel with masking tape holding it until the glue dries. It is a series of strip sections, about 4-5 of them starting from a point at the forward edge of the forward most piece of yellow tape, and extending aft until it touched the forward most edge of the sternpost.
View attachment 334066

This is very helpful. I really appreciate it. I've got a plan now, and a little bit more inspiration.

The ship I am doing is the Golden Hind(e). It's from the Mamoli plans in 1:53, but I re-scaled it and printed it to be 1:48. Probably a little ambitious for a 1st try, but I didn't want to shell out hundreds of dollars for a kit.

I do realize that the Mamoli version is painted white up to the waterline, and it would be easier to do that. If I followed that path, this keel business would be unnecessary. The 1973 recreation in London is black, the Essex version looks unpainted to me below the waterline, and the modelships.de version is walnut colored. I supposed I have options, and can take artistic liberties if I wanted.. but I like the look of the wood grain and the segments. I suppose if it doesn't look great, I'll paint it all black like the London museum as a back up plan.
The thing with building your first ship is that halfway through your build, you learn something about ship construction in your research that you want to incorporate into the model, but it's too late and you don't have access to that area. It happens to all of us in the first few ships. I'm on model #2 and the difference in accuracy and detail is stunning.

The Golden Hind is one of those ships which doesn't have much in the way of complex decoration, so scaling it up and scratch building is easier for that galleon than other ships. All the fun will be in painting the hull. Ships of the late 16th century up to the mid to late 17th century covered their hull bottoms with "white stuff", hence the off-white color. It is made of whale or fish oil, pine pitch (rosin), and sulfur (brimstone) and was painted between the last two layers of planking and over the last layer of planking to try to stop teredo worms (shipworms) from turning the hull into swiss cheese like carpenter ants tried to do to my house. So, you won't have to worry about super-detailing the trenails below the waterline. There are two other hull coatings used, black stuff made of tar and pitch (shown on that Essex model you saw) and brown stuff, which was black stuff with brimstone added to black stuff.

All of these were partially effective against shipworm, but if you sail the ship to temperate waters like the Americas, the worms will have a hay-day on your hull and nothing will stop them short of copper sheathing. Spanish galleons in the late 16th century desperately tried sheathing the hull in lead, which worked fairly well, but slowed the ship with weight and water resistance. Take a look at various sources that depict Golden Hind and pic the most likely one for the hull color on the bottom.
 
So I am working on my first model.. I downloaded plan templates and printed them out. I took those and glued them to some birch plywood and cut it all out.. took it to the mini belt sander and took the cut right up to the line.. Everything is going fairly smooth, but I have a question about the keel. As it stands now, the keel will show the 3 layers of the plywood. I'd love for my keel to be made from some type of nicer wood, and I'd like to cut it into the segments and assemble the pieces like I've seen on some scratch builds, for realism..

I guess my question is how to achieve this. Should I do all the planking first? Get the structure solid, come back and cut the plywood keel off, then replace it with a scratch made keel? Or would it be better to do before the planking (or after the first plank layer, but before the second) so the edge gets hidden behind a layer of plank? Am I missing some other method? How do most people get a nice, non-plywood keel?
I bought some thin stips of Basswood, and then glued them to the edges of the ply on my keel and other areas of exposed ply. It can be found in various thicknesses and the 1/32" easily bends to suit the keel curvature. I used water resistant wood glue such as Titebond II. When sanded and stained, it looks just like a solid piece. Once the surfaces were dry I used sanding sealer to render them waterproof.
 
I bought some thin stips of Basswood, and then glued them to the edges of the ply on my keel and other areas of exposed ply. It can be found in various thicknesses and the 1/32" easily bends to suit the keel curvature. I used water resistant wood glue such as Titebond II. When sanded and stained, it looks just like a solid piece. Once the surfaces were dry I used sanding sealer to render them waterproof.
Hallo @Jack Fender
we wish you all the BEST and a HAPPY BIRTHDAY
Birthday-Cake
 
Back
Top