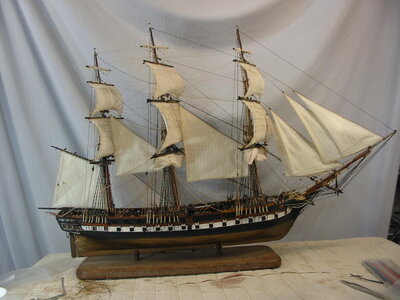
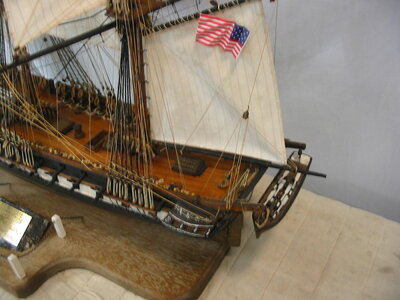
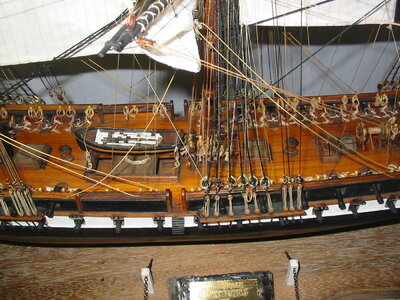
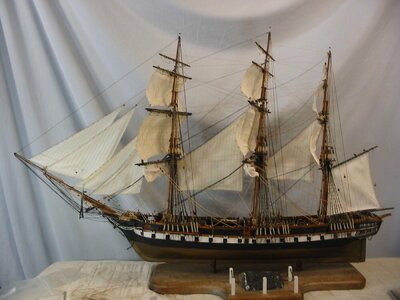
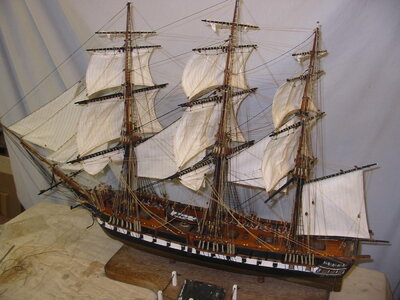
Completed restoration of a ca. 1920s scratch built model of the "Constitution"

Joined
Jun 17, 2021
Messages
1,642
Points
488

This model was a prized item in the possession of an avid collector living in Annapolis about ten years ago. The model was deteriorating at an alarming rate and much in need of rescuing: stabilizing; cleaning; conservation and restoration of irreparably decaying parts, e.g. all the sails and rigging.
I carefully removed each sail and stored them in clear zip lock bags, backed by a square, larger than the sail, of Bristol board and labeled. These sails were so desiccated by UV as to be virtually no more stable to handle than ash. All the rigging was in the same shape and had to be replaced. I saved all the original hand made blocks and deadeyes to reuse later.
I used photos of the model and MS plans as well as The Anatomy of the Ship Constitution book as a guide to put it back together. I removed all the parts that needed to be repaired and that were coming loose, such as the guns and ships boats. The sails I reproduced by carefully tracing the outline of each onto Bristol board and penciled in all the seamlines. I glued muslin fabric flat and securely to each Bristol board Pattern with Elmer's glue stick which is reversable with water. I put a weighted flat board over each to keep them flat and for good, wrinkle free adhesion. Once dry, I traced all the seam lines onto the fabric with a #3 pencil. I glued wire along all the edges of the sails as "bolt ropes" which could be used to shape the sails later to give the appearance of being filled with wind. I tacked the wire "bolt ropes" in place with dots of CA gel (VERY sparingly as there is a serious antipathy between CA and fabric). to finish securing the wire I ran a discreet bead of white glue along the inside of the wire where it met the fabric and let it dry over night. once thoroughly dry, I very carefully cut away all the scrap board pattern right along the edges of the sail with a pair of scissors right up next to the wire "bolt ropes" I released the sails from the card stock backing pattern daubing them with a damp rag and working a long thin, flexible palette knife between the fabric and the backing until they separated. I had to touch up the gluing of the "bolt ropes" here and there but fortunately,
"it's better to b e lucky than good" About halfway through the project my customer asked if I could rig the guns, which they had not originally been. I said yes and added not enough money to compensate for the added time, which I grossly underestimated. :rolleyes: The whole project took (I think) about three years. Fortunately my customer is a patient guy. None the less I got the occasional nudge along side.:DIMG_4616.JPG

IMG_4612.JPG

IMG_4611.JPG

IMG_4644.JPG

IMG_4642.JPG
 
Last edited:
By the way, the oak base is ostensibly from a scrap of original timber from the Constitution, replaced during the 1927 restoration of the ship. Which, If true, dates the model to around that time. Most of what you see in the pictures, if it could come loose, it did.
I think I got about $4k for the job, which probably works out to around 45 cents per hr. :rolleyes:
Any questions, go ahead and ask.

Pete:p
 
Last edited:
Thanks to all of the above. A global fan base: Austria, Spain, U.S. , Israel and Australia, Imagine that!
Thanks guys! Means a lot!
Thought I'd get in on the Constitution action. I didn't build the whole thing, but once I took it apart it was kind of like a kit with no instructions, from the deck up.(That's restoration for ya.) Same thing with period antique furniture.

Pete :p
 
Thanks Bill, you really get it!:D
And Darius; It was a privilege to pull this fat out of the Fire. My customer, still a world traveler, just turning ninety, and a veteran of both the Army, the Air Force AND as a contract pilot (CIA ?) in Viet Nam and beyond, was determined to save this one. A gift (I think) From his "young and beautiful wife" ( Quoting his accurate description, both in looks AND personality, I might add). He contacted the USNA museum workshop (the go to for many years for restoration referrals)
and it fell in my lap. Happily he was thrilled with the results. The trick is : exceed expectations and deliver on time. Fortunately he was pretty broad minded on the latter. But all's well that ends well and he subsequently bought two more models from me. He just calls out of the blue from time to time. I'm loathe to start any new projects for him. Not that he won't live long enough to see the thing finished, but I probably won't. :rolleyes:
(Looks like you've embarked on some pretty serious projects of your own, I'm duly impressed!)

Pete:cool:
 
Last edited:
The work done is never covered by the amount paid, these jobs are a labor of love to be completed.

When trying to figure costs, a local gentleman who made and sold ships to architects and interior designers said if you had to be paid for the knowledge of how to do the job most couldn't afford it.

Your work is fabalous on the rework. Maybe a short build log on how you went about making the new sails for others who want to help an old ship in distress.
 
Thanks for the kind and encouraging words, Kurt, most appreciated!
Like the old saying goes " If ya gotta ask ya can't afford it!" If I had to count the cost of building one of these models and the added cost of a case, then I'd never have started. Sick
I gave a fairly detailed description of how I made the sails in the opening descriptive notes. Mabey if I get around to it I'll make a sample sail and photo document it.
( Funny thing about those Round Tuits, they just seem to accumulate faster than I can cash them in!):rolleyes:

Pete:D
 
This model was a prized item in the possession of an avid collector living in Annapolis about ten years ago. The model was deteriorating at an alarming rate and much in need of rescuing: stabilizing; cleaning; conservation and restoration of irreparably decaying parts, e.g. all the sails and rigging.
I carefully removed each sail and stored them in clear zip lock bags, backed by a square, larger than the sail, of Bristol board and labeled. These sails were so desiccated by UV as to be virtually no more stable to handle than ash. All the rigging was in the same shape and had to be replaced. I saved all the original hand made blocks and deadeyes to reuse later.
I used photos of the model and MS plans as well as The Anatomy of the Ship Constitution book as a guide to put it back together. I removed all the parts that needed to be repaired and that were coming loose, such as the guns and ships boats. The sails I reproduced by carefully tracing the outline of each onto Bristol board and penciled in all the seamlines. I glued muslin fabric flat and securely to each Bristol board Pattern with Elmer's glue stick which is reversable with water. I put a weighted flat board over each to keep them flat and for good, wrinkle free adhesion. Once dry, I traced all the seam lines onto the fabric with a #3 pencil. I glued wire along all the edges of the sails as "bolt ropes" which could be used to shape the sails later to give the appearance of being filled with wind. I tacked the wire "bolt ropes" in place with dots of CA gel (VERY sparingly as there is a serious antipathy between CA and fabric). to finish securing the wire I ran a discreet bead of white glue along the inside of the wire where it met the fabric and let it dry over night. once thoroughly dry, I very carefully cut away all the scrap board pattern right along the edges of the sail with a pair of scissors right up next to the wire "bolt ropes" I released the sails from the card stock backing pattern daubing them with a damp rag and working a long thin, flexible palette knife between the fabric and the backing until they separated. I had to touch up the gluing of the "bolt ropes" here and there but fortunately,
"it's better to b e lucky than good" About halfway through the project my customer asked if I could rig the guns, which they had not originally been. I said yes and added not enough money to compensate for the added time, which I grossly underestimated. :rolleyes: The whole project took (I think) about three years. Fortunately my customer is a patient guy. None the less I got the occasional nudge along side.:DView attachment 380200
View attachment 380201

View attachment 380202

View attachment 380203

View attachment 380204
Very well done! I hope to be able to use some of your pictures as I build the ship.
 
Thanks to all of the above. A global fan base: Austria, Spain, U.S. , Israel and Australia, Imagine that!
Thanks guys! Means a lot!
Thought I'd get in on the Constitution action. I didn't build the whole thing, but once I took it apart it was kind of like a kit with no instructions, from the deck up.(That's restoration for ya.) Same thing with period antique furniture.

Pete :p
Minnesnowta also! We’re like Brigadoon… we come alive twice a year… once In construction season and once in the snowy part of Minnesnowta. For one day each season! No passport needed.
 
This model was a prized item in the possession of an avid collector living in Annapolis about ten years ago. The model was deteriorating at an alarming rate and much in need of rescuing: stabilizing; cleaning; conservation and restoration of irreparably decaying parts, e.g. all the sails and rigging.
I carefully removed each sail and stored them in clear zip lock bags, backed by a square, larger than the sail, of Bristol board and labeled. These sails were so desiccated by UV as to be virtually no more stable to handle than ash. All the rigging was in the same shape and had to be replaced. I saved all the original hand made blocks and deadeyes to reuse later.
I used photos of the model and MS plans as well as The Anatomy of the Ship Constitution book as a guide to put it back together. I removed all the parts that needed to be repaired and that were coming loose, such as the guns and ships boats. The sails I reproduced by carefully tracing the outline of each onto Bristol board and penciled in all the seamlines. I glued muslin fabric flat and securely to each Bristol board Pattern with Elmer's glue stick which is reversable with water. I put a weighted flat board over each to keep them flat and for good, wrinkle free adhesion. Once dry, I traced all the seam lines onto the fabric with a #3 pencil. I glued wire along all the edges of the sails as "bolt ropes" which could be used to shape the sails later to give the appearance of being filled with wind. I tacked the wire "bolt ropes" in place with dots of CA gel (VERY sparingly as there is a serious antipathy between CA and fabric). to finish securing the wire I ran a discreet bead of white glue along the inside of the wire where it met the fabric and let it dry over night. once thoroughly dry, I very carefully cut away all the scrap board pattern right along the edges of the sail with a pair of scissors right up next to the wire "bolt ropes" I released the sails from the card stock backing pattern daubing them with a damp rag and working a long thin, flexible palette knife between the fabric and the backing until they separated. I had to touch up the gluing of the "bolt ropes" here and there but fortunately,
"it's better to b e lucky than good" About halfway through the project my customer asked if I could rig the guns, which they had not originally been. I said yes and added not enough money to compensate for the added time, which I grossly underestimated. :rolleyes: The whole project took (I think) about three years. Fortunately my customer is a patient guy. None the less I got the occasional nudge along side.:DView attachment 380200
View attachment 380201

View attachment 380202

View attachment 380203

View attachment 380204
Beautiful work!
 
Back
Top