My current build in progress is the Anteo from Mantua Panart.
After finishing the first deck planking I decided to share the method that I used.
It is by all means not a claim of how this should be done but just an insight on how I did it it and how it can be done.
After all the method can be subject to improvements and I surely welcome any suggestions in this regard, if any.
The tools used
Laying out the deck
After gluing the false deck to the hull frame structure I removed the parts of the frame supporting the bulwarks. I found that the easiest way to do so was with the help of an angled drill (I used a Dremel 4000 with angle extension) and a wood cutting disk. Care must be take not to damage the false deck surface and bulwarks. Afterwards bulwarks and frame remainders sticking out of the false deck were sanded away partially with the angled drill and sanding disk and partially by hand.
The method to simulate caulking between the planks I took of one of the handbooks on ship building by Keith Julier. I used a black rope to be glued between the planks. The rope should be slightly thinner than the panks, so that if any sanding is done afterwards one does not sand into the rope.
This method resulted to the fact that the planking pattern lasered into the false deck could not be followed. I decided to accept that. I reckoned that reducing the width of the wood strips by hand would probably end up in a bunch of planks not having equal width, which was something that I wanted to avoid.
However the pattern still can be used as a guide to keep the laying out straight.
Laying Out:
First some planks were cut from the 6mm wide wood strips with the Amati plank cut extended with the home made part.
To deburr the planks, the edges of the planks were the rubbed in a circular movement across the sanding block holding the plank in the middle. Care should be taken not to push too hard or it will end up with a plank being somewhat narrower in the middle.
The laying out was started in the middle and the front of the ship. A first row of planks was laid from front to back. Planks were glued to the deck by dispensing a stroke of aliphatic resin over the back length of the plank and pushing it don to the deck. The holes in the deck allowed to hold down the planks by means of spring clamps in combination with the pusher beams if needed. In case a spot could not be reached the plank was held down with a finger an a small drop of Zap cyano was put at the side of the plank. As the cyano sets really quickly the plank needs to be held down only for a few seconds:
Between the buts of the planks a small piece of hardened rope was glued with a small drop of glue put in the corner of the plank but and the false deck. The piece of rope is then pushed in, an excess of glue wipe of. I simply use my finger which I then wipe of with a piece of kitchen paper.
To harden the rope I cut a piece of rope of approx. 30cm and attach a spring clamp at both ends. I then soak the rope with aliphatic resin by just putting some glue between the fingers and rub across the rope (multiple times). When the rope was soaked the clamp at one end was simply put in a vice with the other end hanging down. When dry the result is a piece of straight hardened rope which can be cut with the electronics cutters.
After laying out a first row the but ropes need to be cut flush with the side edge of the planks. Here the scraper blade comes in handy, because it is thin and sharp.
Then a rope is glued along the edge of the first row. Hereto a fine stroke of aliphatic resin is dispensed in the corner of the plank with the false deck along the length of the row.
A row is pushed into the glue an stretched along the edge of the row of planking. I simply use my finger. Excess of glue and fingers are wiped off with kitchen paper.
A next row of planks is then glued against the rope laid out. Again hardened rope is put and glued between the buts and cut flush with the planking side edge afterwards.
To control the distance between the planks the screwdriver is used. The distance between the planks should equal the thickness of the tip of the screwdriver, preferably slightly thinner than the thickness of the rope e.g. 0,65mm.
In addition the screwdriver can used to scrape out any excess of glue between the the planks, if any, and to push down the rope between the planks.
Laying out is continued this way working from the middle to the edges and to the back of the ship.
Care should be taken when working around the holes in the false deck not ending up with a gap too wide for the last plank. A little bit narrower is not too big of a problem since it is easier to reduce the width of a plank than to extend it, and the eye is easily cheated.
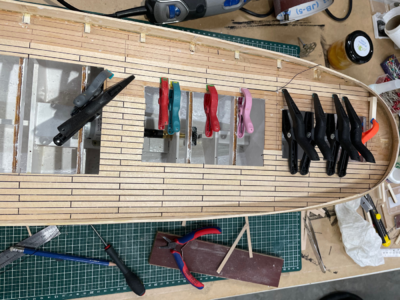
After laying down the last plank the deck was not sanded, but first a fair coat of varnish was applied. The varnish will soak down into the ropes between the planks and harden them. I applied 2 coats.
Then I sanded down the deck and removed the dust with a vacuum cleaner. There is not dust keeping stuck into the ropes since they are covered with hard varnish. Neither is there a risk of pulling out ropes with the vacuum cleaner as the varnish acts as a glue.
After sanding the deck is vanished again with 2 thinner coats.
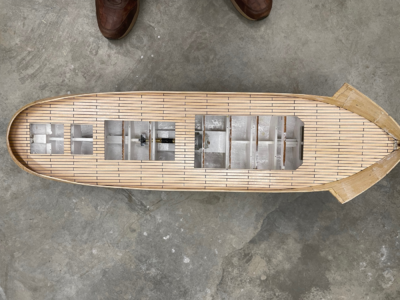
Happy Modeling!!!
Cheers,
Peter
After finishing the first deck planking I decided to share the method that I used.
It is by all means not a claim of how this should be done but just an insight on how I did it it and how it can be done.
After all the method can be subject to improvements and I surely welcome any suggestions in this regard, if any.
The tools used

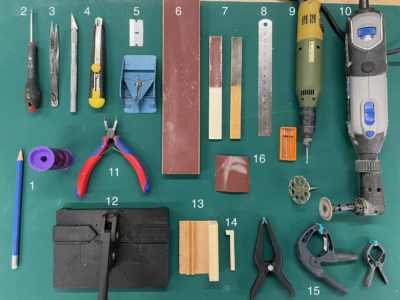
- A sharp pencil HB and pencil sharpner
- A small screwdriver
- Tweezers
- Sharp knives
- A scraper blade
- Sanding block (12mm thick piece of MDF with sanding tissue grit 180 glued on top) used to deburr deck planks after being cut.
- Home made files (5mm plywood with sanding tissue glued on it)
- A ruler (sometimes used as a guide for cutting)
- Drill unit with fine milling bits used to remove hardened residu of glue and clean out corners
- An angled drill with wood cutting disk and sanding disk, mainly used to cut the parts of the frame to free the bulwarks.
- Fine & sharp electronics cutter
- Amati plank cutter
- Home made extension for Amati plank cutter to assure equal lengths of deck planks when cut
- Home made pusher beams (8pcs) to hold down deck planks
- Wolfcraft spring clamps of various types (8pcs
of each type) - Sanding tissue. Grit 180 and Grit 320
- Kitchen paper (not on picture) to wipe off excess of glue and so.....
- A flat brush (not on picture)

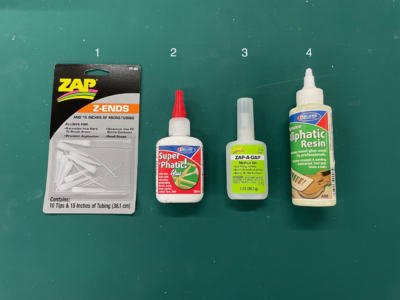
- Zap Z-ends. Not a real glue but I used it for all the various glues to control the dispensing of the glue. After used the tips can be cleaned by putting them in a jar with some aceton in case of using them with cyano, or flushed with some water in case of use with aliphatic glue. I use a 25ml syringe to flush them.
- Deluxe Super Phatic. A very thin and liquid glue which soaks into the wood. It can be used to add som extra glue to fix an object already in place and where immediate setting as with zap is not desired.
- Zap a gap. Fast setting cyano glue of medium thickness. I use a small drop at the side of a plank to hold it down when it could not be reached with a spring clamp.
- Deluxe Aliphatic Resin. The main glue used to glue down the planks onto the deck. A water resistant glue with fairly fast setting time drying up almost clear as regular PVA. Not as yellowish as other aliphatic glues as from Mantua or Tie Bond. It was transferred into another bottle though since I did not find the dispenser tip of the original bottle comfortable to work with. I Used an empty bottle of Mantua glue.
- Matt clear varnish (not on picture)

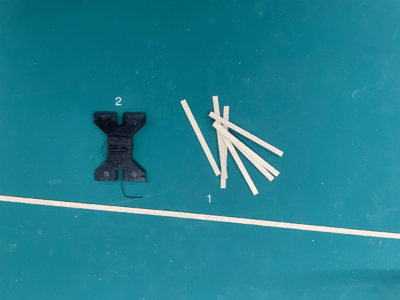
- The wood strips of 6mm wide, 1mm thick, as supplied with the kit. Partially shown in the picture cut to deck planking length.
- Mantua Black rope of 0,75mm.
Laying out the deck
After gluing the false deck to the hull frame structure I removed the parts of the frame supporting the bulwarks. I found that the easiest way to do so was with the help of an angled drill (I used a Dremel 4000 with angle extension) and a wood cutting disk. Care must be take not to damage the false deck surface and bulwarks. Afterwards bulwarks and frame remainders sticking out of the false deck were sanded away partially with the angled drill and sanding disk and partially by hand.
The method to simulate caulking between the planks I took of one of the handbooks on ship building by Keith Julier. I used a black rope to be glued between the planks. The rope should be slightly thinner than the panks, so that if any sanding is done afterwards one does not sand into the rope.
This method resulted to the fact that the planking pattern lasered into the false deck could not be followed. I decided to accept that. I reckoned that reducing the width of the wood strips by hand would probably end up in a bunch of planks not having equal width, which was something that I wanted to avoid.
However the pattern still can be used as a guide to keep the laying out straight.
Laying Out:
First some planks were cut from the 6mm wide wood strips with the Amati plank cut extended with the home made part.
To deburr the planks, the edges of the planks were the rubbed in a circular movement across the sanding block holding the plank in the middle. Care should be taken not to push too hard or it will end up with a plank being somewhat narrower in the middle.
The laying out was started in the middle and the front of the ship. A first row of planks was laid from front to back. Planks were glued to the deck by dispensing a stroke of aliphatic resin over the back length of the plank and pushing it don to the deck. The holes in the deck allowed to hold down the planks by means of spring clamps in combination with the pusher beams if needed. In case a spot could not be reached the plank was held down with a finger an a small drop of Zap cyano was put at the side of the plank. As the cyano sets really quickly the plank needs to be held down only for a few seconds:
Between the buts of the planks a small piece of hardened rope was glued with a small drop of glue put in the corner of the plank but and the false deck. The piece of rope is then pushed in, an excess of glue wipe of. I simply use my finger which I then wipe of with a piece of kitchen paper.
To harden the rope I cut a piece of rope of approx. 30cm and attach a spring clamp at both ends. I then soak the rope with aliphatic resin by just putting some glue between the fingers and rub across the rope (multiple times). When the rope was soaked the clamp at one end was simply put in a vice with the other end hanging down. When dry the result is a piece of straight hardened rope which can be cut with the electronics cutters.
After laying out a first row the but ropes need to be cut flush with the side edge of the planks. Here the scraper blade comes in handy, because it is thin and sharp.
Then a rope is glued along the edge of the first row. Hereto a fine stroke of aliphatic resin is dispensed in the corner of the plank with the false deck along the length of the row.
A row is pushed into the glue an stretched along the edge of the row of planking. I simply use my finger. Excess of glue and fingers are wiped off with kitchen paper.
A next row of planks is then glued against the rope laid out. Again hardened rope is put and glued between the buts and cut flush with the planking side edge afterwards.
To control the distance between the planks the screwdriver is used. The distance between the planks should equal the thickness of the tip of the screwdriver, preferably slightly thinner than the thickness of the rope e.g. 0,65mm.
In addition the screwdriver can used to scrape out any excess of glue between the the planks, if any, and to push down the rope between the planks.

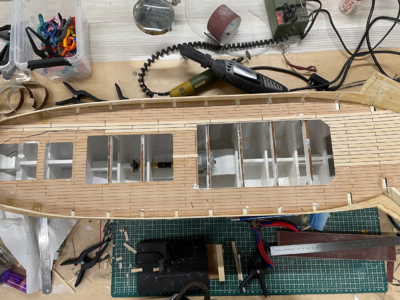
Laying out is continued this way working from the middle to the edges and to the back of the ship.
Care should be taken when working around the holes in the false deck not ending up with a gap too wide for the last plank. A little bit narrower is not too big of a problem since it is easier to reduce the width of a plank than to extend it, and the eye is easily cheated.

After laying down the last plank the deck was not sanded, but first a fair coat of varnish was applied. The varnish will soak down into the ropes between the planks and harden them. I applied 2 coats.
Then I sanded down the deck and removed the dust with a vacuum cleaner. There is not dust keeping stuck into the ropes since they are covered with hard varnish. Neither is there a risk of pulling out ropes with the vacuum cleaner as the varnish acts as a glue.
After sanding the deck is vanished again with 2 thinner coats.

Happy Modeling!!!
Cheers,
Peter


