Hi Kevin,
I believe I can help you with that problem. It requires a small table saw such as the one sold by Jim Brynes. I have his saw but I use my old Preac miniature table saw more than the Byrnes saw.
You'll need a blade with a kerf of .0625. You'll also need a small block of wood, preferably a hard wood, that is the thickness of your grating and slightly larger than the largest grating you want to make. You'll need a second block of wood about 1/4" to 1/2" thick and larger than your largest grating.
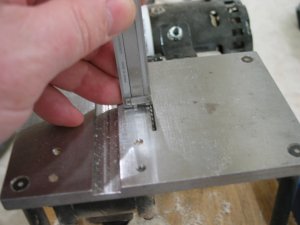
The first step is to set the height of the blade so that it will cut grooves in the block of wood that are about 1/2 the total thickness of the grating. I use a pair of calipers set to that height and use them to set the height of the blade as shown in this photo.
Next, set your fence to be .0625" from the inside edge of the blade. You will be making cuts across the block of wood you have that is the thickness of the grating. Each time you run the block of wood across the blade, after making the cut, you will set the block of wood down onto your blade, loosen your fence and place a spacer between the fence and the edge of the block of wood as shown in this photo. Notice that I'm cutting with the grain of the wood. For this demonstration, I'm using poplar but maple would work and the most preferable wood is boxwood.
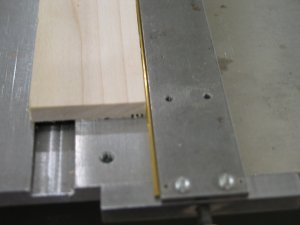
You can buy these brass spacers from Micro Mark. This spacer is exactly .0625" in width.
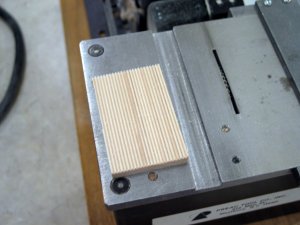
Now remove the spacer and make another cut across the block of wood by pressing it up against the fence as you run it across the blade. Repeat this process until you've cut grooves across the entire width of the block of wood. You'll end up with a block of wood that looks like this.
Now move the fence back into position so that it is .0625" from the inside edge of the blade. Raise the blade up to a height that will cut all the way through the block of wood. Turn the block of wood 90 degrees so that you're making cross cuts and just start cutting strips of grating as shown in this photo. (NOTE: These are strips of boxwood I made for another model I was building.) It's best to use a thin kerf blade for this step to prevent chipping and ruining your strips.
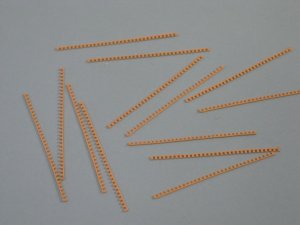
Now go back and lower your blade to the height you had it before. I actually cut my grating strips after I did the following step but I wanted to show that previous step so that you'd understand how you were to make the grating strips in the first place.
This next step is similar in that you're going to cut grooves in that second block of wood just as you did when you made the grating strips. It's exactly the same technique but now you're cutting the grooves in a much thicker block of wood. Again, the grooves are actually slightly less that 1/2 the depth of the grooves in the actual grating strips. This is important. If the grooves are too deep, this won't work. If they're the exact same depth as the ones in the grating strips, it won't work. They have to be less deep than the ones in the grating strips for this to work.
What you're going to make is a special jig for assembling the grating. Because your grating strips are .0625" wide and the grooves in this block are .0625" wide and the space between them is .0625", you have the perfect setup to assemble the gratings. This next photo shows how that's done after cutting the grooves in the 1/2" thick block of wood.
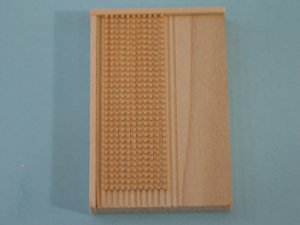
Notice the strips of wood along two sides of the block of wood. Those pieces of stripwood are taller than the block of wood so that they create a kind of fence along the two sides. First strips of grating are inserted into the grooves. Next, strips that are only the thickness of the grooves in the grating strips are glued into the grooves of the grating. It's best to lay a few of those strips into the grooves at intervals so that they will serve to hold the entire grating together as shown in this photo.
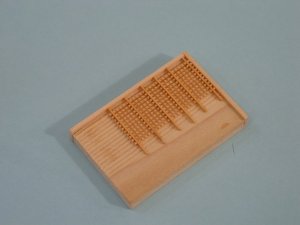
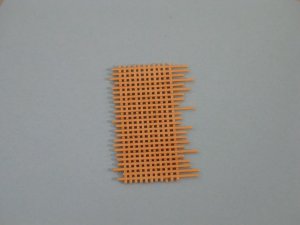
I didn't glue these strips, I just laid them in the grooves. Then using the tip of a #11 Xacto blade, I worked the ends of the grating out of the jig until I was able to lift the entire assembly out of the jig and set it down onto some wax paper. Then I applied the remaining strips into the remaining grooves to form the entire grating. Once that was done, I used Zap A Gap medium viscosity super glue (Micro Mark) with their special Z Ends (also Micro Mark) and applied the super glue at the intersections of all of the strips to glue the entire thing together. The Z Ends come with a piece of silicon tubing. I have a blog posting on my website on how to install that tubing. It is the key to being able to apply small amounts of the glue without making a total mess!
Once the glue is dry, sand the surface of the grating so that the cross strips glued into the grooved strips are flush with the surface of the grooved strips and that's it, you've just made a custom piece of grating.
I've been using this technique for years. The Preac and Byrnes saw will both take what is called slotting saw blades. These sawblades have not kerf. They're smooth on each side. The teeth are not angled like a normal table saw blade. This is one website that sells them:
Slotting sawblades -
https://www.mscdirect.com/browse/tn/Milling/Milling-Saws/Slitting-Slotting-Saws?navid=12106272
I've actually never found a .0625" thick blade that had a hole in the center that fit my Preac. Instead I used a .057" blade which in my book is close enough. Thinner blades are no problem. I've got one blade that is only .010" thick which is what I used to cut the strips off of the first block of wood. Because it's so fine in width, it produces beautiful cuts when making cross cuts without chipping the wood.
That's about it. Hope that helps.
Bob
 please.
 please.


