How do you bend your hull planks?

Joined
Aug 21, 2011
Messages
106
Points
38

Location
Phoenix, AZ
Planking the hull has to be the hardest part of the wood ship model building experience, at least it is for me anyway. What I have found that makes it a bit easier for me anyway is to soak them first (as you all probably knew already) but what do you soak them in? I went to the local Ace store and bought a wall paper trough. It measures 33" long and about 5" wide which gives enough room to soak and entire plank. I also bought from Model Expo an electric plank bender. Between the wet plank and the heat from the iron using the shaping jig that comes with the bender it makes for fairly quick and accurate bending of the planking. Hope that is a help to some of the newer members of the ship building community. Remember the most important thing is to have fun with it. Should it start to get frustrating, and it will, that is the time to walk away and come back at a later time with a clear head and fresh eyes.
Joe
 
Well, I guess I must be impatient in this area. I turn on the water in the sink (very hot) and hold the section of the Plank that I want to bend. Then after holding it there for about 2 to 3 min, then I will take my hands/fingers and start to slowly bend the plank while the plank is still under the water (of course keeping my hands from being burned by the hot water).

I have found this to give almost immediate results. I need to buy one of those hot planking benders, but I am finished with the Planking now !
:roll:

Donnie
 
I noticed several comments about soaking planks to get the proper curve. This is a lengthy process and streches the molucles to make the bend. Thus, creating a weaker plank. Amati came out with a heated plank bending iron. By using direct heat, the molecules are realigned to fit the curve desired. No weak spots. After learning how to use the heating tool, you can make bends very fast and check how they fit and apply them as soon as they are correct. Prior to heating, I use the Panart hull holder to taper the planks. The plank on the front of my paddlewheeler that goes around the bow was 2 mm thick and 6 mm wide plywood. Very hard to bend this without one of the ply layers seperating. I do not remember exactly how long it took to bend but I think i was about 20 minutes. Lots of checking and adjusting to get an even turn. Thinner planks bend a lot faster and limewood is almost instantly bent using this method.
 
Very carefully ! :text-lol: Nice thinking ! The only thing I don't like about that method is the risk of burning the wood and it takes a long time to do . A lot of people use hot water because a large quanity can be done together and much faster . It's all a matter of choice . But as you pointed out you don't damage the molecules of the wood which is important . Thanks for the info it's something to consider . How do you feel about using a steam box ? When they make real boats they have to steam the wood in a steam box and than make a jig to form the proper curve and keep it there . In ship modeling we have the option of using a plank bender instead . A lot to think about . I wonder how the master model builders do it ?
 
The iron does not burn the wood unless you leave it there for a length of time. It is designed to heat. When the wood starts to flex, take the iron away. I use a method of moving over the wood a little past the length of the bend. Thus, giving it a means of warming the the entire area. Use a few pieces of scape wood to get the technique down. Once it is warm, remove the iron but hold the piece in your hand at the desire shape until it cools. The thicker the wood, the more you want to use the back and forth method to distribute the heat and not over heat the same spot. You can bend it and let it cool and then bend it again. The one on the paddlewheeler I slightly bent it a few times before getting to the proper bend.
Steam is better than just soaking in hot water, but it is still using water to soften the wood. Since the wood that ships were made of were very thick, there was no way they could use heat to penetrate wood that is two feet thick without it caughting fire first.
In older times, some master modelers use ammonia or rubbing alcohol mixtures. I never tried that since I lived in an apartment when this method was popular and using it in apartment would have made me unpopular. lol.
 
I learned one trick you have to let the wood dry for the same amount of time you soak it to prevent damaging the wood .See example at Model Expo's Constitution under documents and look under planking and see the ways a master exsplains planking the hull for more .I agree with GaryM if you are careful you can use the wood burning tool . But around here electricity is very exspensive and would cost a small fortune to use .I found a hot water Tea pot works great for soaking the wood in hot steamy water . But the trick is to let it dry so the wood does not loose it's molecular structure . I have worked with some old Island boat carpenters repairing hulls . They use a tubular shaped box made of wood to put the wood into and put a pipe in the end and force steam from a steamer into the box . We bent 4" thick Oak about 12' long and made ribs from oak trees we found in the forest here .the trick was knowing which trees were ready to be used . It was amazing how easy the wood bent , And ribs have to be bent very drastically .In short time we repaired a wooden fishing boat about 45 feet long . Using nothing but steam to bend the wood . Although I know some master model makers use alchol like GaryM said . My father had used a wood bending machine and burnt his hands and the wood often maybe they are better today than in 1980's . For me I like GaryM's way he makes a lot of sense . But for others They will find using a steamer is the way to go and others will just soak them in water . So I just think each person needs to decide for them selves which is better for them. Since there are many ways to bend wood , :laughing-rofl: who knows as long as we get the wood bent and it doesn't break . :text-woo:
 
The iron is a heating tool. It never gets hot enough to ignite the wood. Thus, I think it uses only about enough energy as a night light. I agree that a wood burning tool uses a lot more. To actual etch the wood, it has to be very hot.
To test the heating tool, I lick my figure and quickly touch the iron to know if it is hot enough. The sizzle lets me know.
 
here are some u tube video links on Hull planking :

1. http://www.youtube.com/watch?v=UC4L3v2eUs0&feature=related
Steambending Wood bending ribs


2. http://www.youtube.com/watch?v=CwefZCBXOts

Steam bending Mahogany Plank replacement
 
For pre-cut gun-ports, I just soak 'em in hot steaming water in the kettle for about 30 mins dry fit to the bulkheads and temporarily hold them in place with clothespins. This is repeated several times until they follow the shape of the bulkheads.

For regular planks, I'm too lazy for soaking so I just use the plank nipper with brute force and superglue :twisted:

I personally find that the bending isn't too much the problem in planking, it's all the spiling, camfering and tapering of the planks that really bugs me :mad:
 
When you get to advanced kits, the gunports are not precut. Some give you a template to put on the ship to mark where to cut. A few kits cut the ports as part of the planks to be appplied. Mantua does not give you any of this.
For tapering the planks, I mark a few places along the plank and then put it in strip and hull clamp hold by Amati Art. 8155.
 
Is it possible to heat planks with a household iron ? Also if using the wet method is the plank then glued on wet of let dry in shape and then glued on. See I really know nothing about wooden ships !

Tony
 
It is possible to bend planks with the household item but not successfully and chance of burning is great. The Amati iron comes with a shaping set so you can get great bends. I love their product and it is reasonably priced.
 
One method I've used is to soak the plank in Isopropyl alcohol, 91%. It does leave the plank a little brittle but the alcohol seem to soften the fibers quickly and it also dries quicker than water. I 'borrowed' this method from Hubert Sicard at his "Wooden Ship Modeling for Dummies " site. http://www.shipmodeling.ca/index.html Tons of information on this site, BTW, well worth the subscription cost of $45.00 Canadian dollars.
 
I built several one inch PVC pipe sections of various lengths from 18 inches to about 40 inches, capped and sealed one end so that I can fill them with water. I then place the planks in the tube and let the excess water drain out and then tightly cap the top. I have one 2 inch diameter pipe that is aout 40 inches long that I am soaking alomst all of the Montanes hull planks in water.

I generally leave these soak for days since I only can work on my hobby weekends the planks are soaking all that time. When I pull out a thoroughly soaked plank I pin it to the frames / bulkheads with Planking Clamps I find online at MicroMart and let them dry overnight. Then the next day I glue that plank in place using the same planking clamps to hold the plank in place until the glue sets.

I also use the plank nipper, and I do have the heating tool and shape that GaryM refers to, but I have never been able to get the technique down and I wind up breaking the plank. Maybe I need to try again with that tool and go slower.

I had all of the first layer planks for the OcCre Albatross soaked completely and have since left them out to dry. Now when I plank that kit with the first layer they do seem to bend easier with the plank nipper and super-glue technique that rdsaplala uses to good effect. If anyone is interested in these planking clamps here is the website: http://www.micromark.com/10-piece-planking-clamp-set,6454.html and the item number is 60926. I have purchased several sets of these as they do wear out and break but the work well enough. I included a picture here.
 

Attachments

  • plankclamp.jpg
    22.4 KB · Views: 4,800
The secret to using the iron is to not just heat where you want the bend but to heat the area around it. You can feel the plank slightly bend and you can use a light pressure to continue bending. Then take it of the bending jig and finish by hand and hold until cool. For limewood, it bends very fast. The harder the wood, the more important it is to heat the adjacent area.
 
Thanks Gary, I will indeed try to use it again soon. I just hate to spend money on some tool and NOT use it at all. I read the instructions but don't remember warming the area around the bend. I will take your advice and instructions to heart and try it this weekend. I wonder where I put that darn thing? It couldn't be in the tool box could it??
 
I know I will not convince any of you, plank wetters or plank heaters, but on my current model, I do all my bending with my devoted Amati nipper. It is fairly quick, I don't burn or boil my fingers, and I don't spill water over the floor. Also, the terrible "dead cow effect" which happens when (mainly first planking) planks are glued in place when still wet, is something I don't have to care about.

I send a few pics: on one of them you see the well known tool with a plank ready to be glued in place. The 2 other pics speak for themselves.
1/ a thorough sanding/filling session still has to be done;
2/ the 6mm wide kit planks I was stupid enough to use for the 2nd planking. I wanted the planking to follow the ship's lines and of course they were way too wide and too stiff to allow pretty steep lateral bending. So I cut the planks lengthwise in two with a little jig of my own. As I hope can be seen, the plank nipper allows such bending too, with a little care of course;
3/ the "reverse" bending at the rear implied that I either soaked the planks which I did not want to do. As this part of the ship is under the waterline, I can always choose to paint it off white after filling up the nipper indents. I don't know, but the indents can be seen on the picture, and in my opinion tyhey are not too obvious and can be dealt with later on
4/ You may notice that the lower, part of the hull, still under construction, has a much better finish than the upper part. What I did is (of course) put a sufficient amount of white glue to the side of the planks, lay them down on the hull and sand the joint after removing the excess glue, thus before pinning down the plank. The idea is one I found on a French forum where a modeller said he used a mix of sanding dust and white glue to fill up any gaps in the planking, rather than wood filler, which never has the right colour.

In fact I still have to test with my tube of wood filler: the one I use is exactly the right colour when applied, but turns into a much paler brown when sanded. Tests will show if it gets dark enough after I apply the wood sealer.
 

Attachments

  • Whaler 056.jpg
    119 KB · Views: 2,061
  • Whaler 055.jpg
    113.7 KB · Views: 2,032
  • Whaler 054.jpg
    112 KB · Views: 2,028
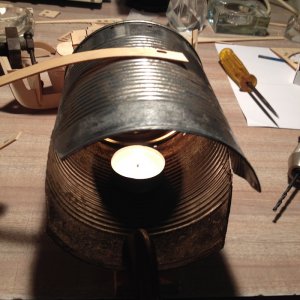
Teacandle bender_800.jpg
WARNING don't touch top of tin can or you will get burnt.
It is not hot enough to burn the wood. So, hold one end down (at top of can) with something else, like the flat edge of a screw driver. Then up down the plank to desired curvature.

The tea-candle only takes a few seconds to heat the top of the tin can. It takes less than a minute to heat and bend the plank.
The tin can rests on a piece of wood and is clamped to the workbench.

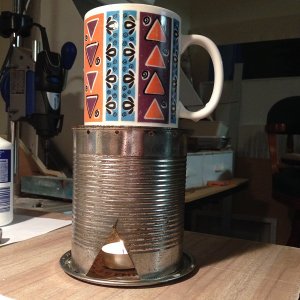
It's cheap, fast, effective.

In winter time I use this device to keep my mug of coffee warm in my workshop.
As you can see, it has 2 large inlets and dispersed outlets through small holes up top. These are needed to keep the flame going.
I used a large coffee tin.
IMG_3215_600.jpg
 
Hi all, I use a combination of hot water and steam, I just soak the plank in very hot water about 5min. then use my old tried and tru method of bending with my Remington hair curlere it works quite well sometimes I have to put it in hot water several times, with the wales and thicker material I use my tea kettle and steam it the use the hair curler, works pretty good.Don
 
Back
Top