Constructo 1799 Enterprise help

Greetings, ...Is that means we will have a kit review and possible build log soon? :cool:

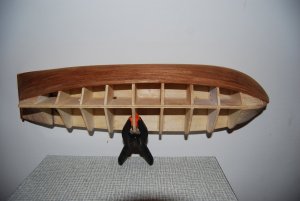
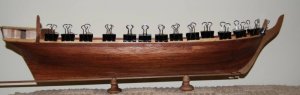
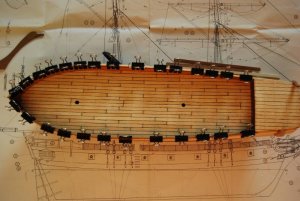
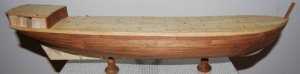
Yup, I’ll be glad to post a review and start a build a build log as I work on this kit. I’ve done some research on the Internet about this kit. Most of the comments were positive. The negative comments centered around the hull structure, planking and shortage of materials.

I’m not to worried about any build problems. I was given a business card with a phone number of one of their professional builders. So I can call for help should I get in trouble. Also as the saying goes “ the store is just up the road a bit”.
 
Last edited:
@Pathfinder65 Excellent! Thanks for the prompt response. It is a great experience, they presented you with a business card just in case the help will arise. Will look forward to the kit review as well as the build log!
Enjoy the weekend,
 
STEP 28 of the instructions:

This step of the instructions is a little vague.
1) Drill holes for the stanchions.
2) Tie a piece of yarn from one stanchion to another both top and bottom.
3) Attach the net.

CBF34CCB-9510-4A0B-919B-6F182B13F599.jpeg

I’ve mounted the stanchions and glued in the first piece of yarn but I’m having trouble visualizing how to do the net. The net looks like it is just glued to the yarn in the photo of the instructions.

2DB26888-3CCE-4EC1-96DF-0DCF0E017A50.jpeg

Any suggestions?
 
Well. it seems that the net is glued to both top and bottom yarns, so maybe you have to put the yarns to the outer side of the stanchions and not in the middle of them

JL
 
I agree with @Dicas, that the yarn should not in the center axis of the stanchions, but on the outside of the ship.
But I would not glue this net to one side against the yarn....why not try to thread it trough the mesh - means left side - right side - left side etc....

3F-Bandensystem_Netzbefestigung_oben02.jpg images.jpg

I found two links with photos of this model by other modelers, which shows it somehow.

http://www.steelnavy.net/images/entRM08.jpg
http://www.steelnavy.net/images/entRM10.jpg
https://servimg.com/image_preview.php?i=144&u=17802374


If the net is not the best, maybe you can find some alternatives materials
Do not ask me what is the correct english term for this material, maybe your wife knows it better - I do not know also the german term

pl13314989-wei_e_alternative_chiffon_maschen_gewebe_blumen_corsage_zus_tze_f_r_brauthochzeit.jpg
 
But I would not glue this net to one side against the yarn....why not try to thread it trough the mesh - means left side - right side - left side etc....

Good idea.

As for the material, in portuguese is "tule", I made some googling and it seems to be "tule mesh" in english.


JL
 
Last edited:
Good idea.

As for the material, in portuguese is "tule", I made some googling and it seems to be "tule mesh" in english.


JL
Dicas and Uwe thank you for the response.
Those are excellent ideas.

I was also leaning towards "sewing" the mesh on to the yarn. I couldn't see how I could glue it without gluing my fingers at the same time.

The mesh in the photo is called "tulle" in English.
 
Good day in the Shipyard yesterday.

I was going to tackle “sewing” the net onto to the yarn, but decided I should probably place the Carronades first. Both work areas are small spaces for big not so dexterous fingers.

C65ED172-AD42-465F-9AF4-0D9BD73BCD8B.jpeg

It took a loooong time fiddling and diddling with tweezers to place these. That’s the good news. The bad news is I have to place five more on this side and seven on the s’Board side.


Break time
 

Thanks for the response. I’m having a bit of trouble trying to download your file on my iMac. I’m going to switch to my Dell and Win 10 later and try again.

I appreciate the help, I’ve done many searches for build information but find that there are lots of completed steps but never many how does a first time builder even start.

Planking was my first major hurdle, the instructions by Constructo were OK for the start of the first plank, but after that there was no further information. There was absolutely no mention of the second planking.
I spent a lot of time trying to figure all that out. But in the end, that part of the build came out OK.


The experience was was beneficial when I did the planking on my Lobster Boat build.

https://shipsofscale.com/sosforums/threads/bluejacket-shipworks-lobster-boat-5-8”-1’.2679/page-2
 
Last edited:
I have only one layer :)

Wow, excellent work. My hull came very close to being kindling. But the help and encouragement from Forum members kept me going. I’m actually looking forward to doing the rigging, I’m fascinated by the fact that every rope tied to a belaying pin had specific purpose.
 
Bad weather day today, intermittent rain mixed with snow starting in the early AM.

Good reason to be at work in ship yard. I decided there had to be a better way to build the tackle for the carronades. Big fingers and tweezers on small blocks just didn’t get the job done, so it was down to the shop to see what else I could use. I found an old “third hand” that I had used when I was building circuit control boards for my large scale railroad.

My process was to drill holes in the end of the blocks, glue in a eyebolt and then add the tackle rope.

79498

I needed 24 blocks with one eyebolt and 24 blocks with two. Using the “third hand” clips the drilling and gluing process went much quicker than the big fumbling finger and tweezer method I had been using.

79499

Stringing the rope between blocks was much easier.


79500

I was able to complete the 24 sets in a couple of hours.

79501

All I need now is to complete rigging the Gun carriages.

Not a bad days chore for a “novice” builder.
 
Frustration and Carronades:

Some of the above posts outlined how to install the “netting”. I hadn’t decided what method to use and have been busy installing the Carronades. It became obvious very quickly that the Constructo Instructions should be revised. The stantions for the netting (without the netting installed) were a work around while installing the Carronade mounts, tackles and ropes. Big fumbly fingers, magnifying lamp , tweezers and a certain amount of frustration made the process a long event. But we’re getting it done.


2AC481B7-3CB4-4635-A8C3-264A2AD252DF.jpeg

The “netting” problem will be tackled when all the Carronades are installed.
 
Aha, Found more "Novice" builder errors.

The main mast channel on the Port side is installed wrong. Its too far forward. With that error I found that all the stanchions for the net (Port and Starboard) were also spaced wrong.

0fjqwWYiQaeLPibYn3JB+w.jpg

So a redo is in progress. Stanchions on the Starboard side have been redone and the error holes filled in. The channel on the Port side needs to be redone so it fits properly over the carronade. The old stanchion holes on the Port side have been filled in and new holes drilled.

Another lesson in check it once, twice, maybe three times and then check it once more.
 
Back
Top