
nicely done.

You are using an out of date browser. It may not display this or other websites correctly.
You should upgrade or use an alternative browser.
You should upgrade or use an alternative browser.
You aren't the only one this happened to my friend.After looking at the pictures I see that the center hole I drilled in bulkhead 17 isn't quite in the center so it's to close to redrill next to it so I'll fill it completely and redrill it. This is what happens when my mind over runs the task at hand sometimes.
Now I look twice and once again, before doing anything. It slower, but safer. As my grandfather once told me. 'Measure twice, than check again, then cut!' Its amazing this has helped me.
Happymodeling
Greg
I start seeing things I can do and my mind abandons reality for a moment. Back in my younger years I could do one thing and think of multiple others at the same time. I'm old Tired and Broken, but as long as I wake up every morning I'll keep moving forward even if my brain is still sleeping lol
Had some time today to get my Bow Blocks finalized into shape a couple more Decks laid down and the start of the deck planking. I can only go so far because the bulkhead uprights are in the way I cant cut those off until the Bulwarks are installed because they are needed to keep the proper angle on that part till the glue sets up. one thing I noticed it there are no scuppers so I'll be adding those.
Not sure what I'll get done on the Ship tomorrow. I have to wash my hunting cloths soak them in Premathrin bug repellent and air dry them outdoors. Pick up my Hunting License, go shoot my Bow one last time to make sure she's Dialed in. Pack my truck with gear and gas up for opening Day on Friday. I like to be in the woods 2 full hours before sun up so I'll be getting up and heading out around 3am, so early to bed tomorrow for me. I'll have a busy weekend ahead if it doesn't rain. Saturday the grandson and I have our weekly fishing date. I'm hoping to meet Gerald Todd a forum Member here on Sunday to drone video his amazing USS Constellation RC ship he built if the rain holds out. I will have time to work on the Pearl though.
Last edited:

Really good progress, so we can see, that brain and hands are still working well ")
@Peglegreg : My fathers sentence was "Cut twice and still too short?!?" - "Think before you do something"
@Peglegreg : My fathers sentence was "Cut twice and still too short?!?" - "Think before you do something"
Question for anyone who knows wood stain. What color would you say this deck is? I take it its stained because the natural color of the wood is to light to be this color with just a clear coat I have added a pic of the deck plank color once its sanded so you can see the wood color is very light in tone. the color almost looks orange-ish slightly to me but my eyeballs aren't so good anymore. I like this color so Id like to stain the decks this color


Wet it with a damp cloth, you see what color it comes up with. It will be a bit richer an oil based finish as the oil soakes in. You may be surprised..
Thank you Brother I was thinking that on a test piece. the color looks close to Colonial Maple, but also looks like Amber varnish to my eyes. I have True oil I use for Gunstocks, that usually brings the Rich color out of Wood so I'll try that. The sanded Wood color looks a lot like the gunstocks I make when I sand those down. I Took the day off work to get all my Tasks done in prep for hunting tomorrow morning. that also gives me some time to work on the Ship.Wet it with a damp cloth, you see what color it comes up with. It will be a bit richer an oil based finish as the oil soakes in. You may be surprised..
Got some more done today while I was running around getting my gear ready
Got some more deck planking done, entrance to captains Quarters installed planked Bulkheads that are visible in finished model. I'll work on her till I go to bed and see what I can get done.


Got some more deck planking done, entrance to captains Quarters installed planked Bulkheads that are visible in finished model. I'll work on her till I go to bed and see what I can get done.
hmm looks like my workbench..... great job

Looks great Joe! Have a great time in the woods, relax and enjoy yourself but most of all be careful.
lol I hate it honestly and I spend a lot of time cleaning it up only to mess it back up 2 seconds later. my wife tells me leave the mess till I'm done for the day then clean up, but I hate searching for a pencil in the mess only to find it laying on top of the pile, but its such a mess I just cant see it lolhmm looks like my workbench..... great job
Thank you Brother I will for sure be careful the great time starts as soon as I leave the truck because get something or not I'm in my own little slice of heaven and nothing can break my spirit as long as I'm in the woods. I have taken a deer every year for the past 10 years on opening day I hope to continue that, but if I don't I'm happy just being in Gods most beautiful place.Looks great Joe! Have a great time in the woods, relax and enjoy yourself but most of all be careful.
Last edited:
Just went for it with the Tru oil it really brings out the color better then satin poly does. I don't like using oil based products on my ships, but the grain jumps right out and the depth in the wood is amazing, so this will be my first oil based ship I'll hand rub the tru oil into the rest of the planking probably 3 coats polishing with 000 steel wool between coats and then a good coat of satin clear. whatcha good folks think? The dark piece is tru oiled the light colored wood is unfinished


Was a good day, shot a 10 point I been watching since last season. He would never commit to coming past me while Bow hunting and While I could have shot him during the last gun season I felt he would be a better Bow kill. Today my patience paid off and he came in almost right under my tree stand at 10 yards. 
Back to my Ship build today. going to Tru Oil the rest of the completed decks and hopefully get the Bulwarks installed and planked on the inner walls.
Back to my Ship build today. going to Tru Oil the rest of the completed decks and hopefully get the Bulwarks installed and planked on the inner walls.
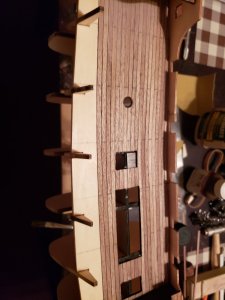
Got some work done today and found a place in the instructions where they forget to mention you need to install blocking for a false cannon port I'll point that out above the Photo
I used the tru oil on the completed decks today 3 hand rubbed coats and they look really good, but hard to see the depth in the wood in the pictures so I wont single photo post those, but you can see them in the pictures of other parts of the build.
I set the Bulwarks up made sure they were in the correct place and marked it with a pencil


once that was done on both sides I removed them and installed the false cannon blocking that I mentioned earlier Make sure you do this or you wont be able to once that bulwark #23 and 24 are installed I painted the inside Black and also painted inside the bulkheads Black so no raw wood shows through the false cannon ports.

Next I rewaxed the bulkhead uprights again to insure they don't stick to the Bulwarks. I installed the Bulwarks on one side and cut off the bulkhead uprights and completed the main deck planking on that side.


Turned to ship around and did the same for the other side. I have 2 more planks on the main deck to lay down then I can tru oil that and move on to the lower bulwark sections that have the rest of the cannon ports in them. I will get to that tomorrow and hopefully start the Hull Planking.


You can see that blacked out port on the rear of the Bulwark While I had the paint out I painted around the grate and skylight openings so no raw wood is visible.
I used the tru oil on the completed decks today 3 hand rubbed coats and they look really good, but hard to see the depth in the wood in the pictures so I wont single photo post those, but you can see them in the pictures of other parts of the build.
I set the Bulwarks up made sure they were in the correct place and marked it with a pencil
once that was done on both sides I removed them and installed the false cannon blocking that I mentioned earlier Make sure you do this or you wont be able to once that bulwark #23 and 24 are installed I painted the inside Black and also painted inside the bulkheads Black so no raw wood shows through the false cannon ports.
Next I rewaxed the bulkhead uprights again to insure they don't stick to the Bulwarks. I installed the Bulwarks on one side and cut off the bulkhead uprights and completed the main deck planking on that side.
Turned to ship around and did the same for the other side. I have 2 more planks on the main deck to lay down then I can tru oil that and move on to the lower bulwark sections that have the rest of the cannon ports in them. I will get to that tomorrow and hopefully start the Hull Planking.
You can see that blacked out port on the rear of the Bulwark While I had the paint out I painted around the grate and skylight openings so no raw wood is visible.
Attachments
Got the Inner Bulwarks Planked and all the cannon supports for the false cannons assembled Put down the first of 3 coats of Tru oil on the main deck and bulwark planking 


Test fit the lower Bulwark section will get both side Installed tomorrow. Everything going smooth as silk so far. I was hoping to be on the hull planking today but I got sidetracked making a Ropewalk and figuring out how I want to make the Server jig.
Test fit the lower Bulwark section will get both side Installed tomorrow. Everything going smooth as silk so far. I was hoping to be on the hull planking today but I got sidetracked making a Ropewalk and figuring out how I want to make the Server jig.
Looking Google Joe. How did those gun supports fit? Soleil uses the same type and I was wondering about them. Nice buck by the way! I didn't think they grew them that big in Maryland.
The supports were a pain to assemble square I should have made a wax jig, but I got them assembled. I fitted the one on the rear most port and it fit well but there is nothing back there for it to bump into. on the ports on the lower Bulwark section I wasn't so lucky those sit inside cut outs in some of the bulkheads, that space in inadequate for them to fit properly so I had to modify some areas which I will show on the next round of Pictures. Up to that point things were working well together. I guess that area wasn't given much thought in the planning of the design.
We have some big bucks here, Not like the ones in some states, but respectable however they are all on Private land, this one isn't as big as some I have seen, but absolutely the biggest on my land that I have seen anyway. one thing to keep in mind is this is a skinny buck so his rack looks bigger then it really is also camera perspective can make things appear larger. this buck will probably green score around 135 145 on the pope and young scale. I'm not into Trophy hunting as I love to eat the Deer and the antlers are inedible. to me a rack is just a bonus. I would have shot a Doe has one came to me first.
We have some big bucks here, Not like the ones in some states, but respectable however they are all on Private land, this one isn't as big as some I have seen, but absolutely the biggest on my land that I have seen anyway. one thing to keep in mind is this is a skinny buck so his rack looks bigger then it really is also camera perspective can make things appear larger. this buck will probably green score around 135 145 on the pope and young scale. I'm not into Trophy hunting as I love to eat the Deer and the antlers are inedible. to me a rack is just a bonus. I would have shot a Doe has one came to me first.
Got my tiny LED's today along with some ultra fine Magnet wire. I wanted to make sure they all worked so I cleaned the wire ends and soldered them to the LED chip I got to tell you These things are super tiny, but are exactly what I wanted to fit in the rear stern lamps un-noticed. They will also be perfect for the cabin because they don't overwhelm a space with light and neither did the lighting back in that period of time we build ships to represent. So IMO these are perfect. soldering was not the easiest I've ever done, but also wasn't the hardest. I managed to get 10 soldered up in just 15 min using a 10X head mount magnifier and a 10X lighted Loop together to boost the Mag power. I included a tiny brass nail used to secure planking as well as a dime so you can see how tiny these thing are. 


Got some more work done today. Its been pouring down rain here all day so not much else to do. I got the last coat of Tru oil on the deck and inner bulwark planking, its looking good. I then turned my attention to the lower sections with the false gun ports. My first Problem with the kit has been found. I dry fitted all the lower sections and noticed that some don't line up with the bulkhead cut outs for the supports to hold the cannons in place. I figured no big deal those rarely ever end up lining up the way they should on any model. It didn't look like a problem to just install the supports and start getting the lower sections glued in. Well so much for best laid plans I glued all the supports on and ran into major problems with some of the bulkhead cut outs not being properly angled for those supports. So I removed all the offending supports some I had to turn others I had to carve into the bulkheads to achieve the proper angle for the support to set into. 


Once I'm sure the last coat of tru oil is dry Ill start sanding and prepping for the first Planking to go down. I absolutely hate having to hack into support structures, but in this case it wasn't much required and its all in a place that cant bee seen once the ship is closed up. because I had to mod some or the supports to fit Ill install the cannons through the port holes after I re drill the holes they sit in to insure they are at correct angles Ill make a jig to also insure they are dead center in the opening and I'll epoxy those cannons in place with 5 min epoxy. The proper thing to have done would have been to eliminate the supports, cut a slot in all the bulkheads and Install a band board the length of the ship. Then drill the mounting holes for the cannons using a jig in the port opening. I am running a bit slow on this build so I opted for the easy fix for the issue. The end result will be the same so I'm not stressed about it.
Once I'm sure the last coat of tru oil is dry Ill start sanding and prepping for the first Planking to go down. I absolutely hate having to hack into support structures, but in this case it wasn't much required and its all in a place that cant bee seen once the ship is closed up. because I had to mod some or the supports to fit Ill install the cannons through the port holes after I re drill the holes they sit in to insure they are at correct angles Ill make a jig to also insure they are dead center in the opening and I'll epoxy those cannons in place with 5 min epoxy. The proper thing to have done would have been to eliminate the supports, cut a slot in all the bulkheads and Install a band board the length of the ship. Then drill the mounting holes for the cannons using a jig in the port opening. I am running a bit slow on this build so I opted for the easy fix for the issue. The end result will be the same so I'm not stressed about it.
