ZHL Royal Caroline Kit, scale 1/30

104.jpg
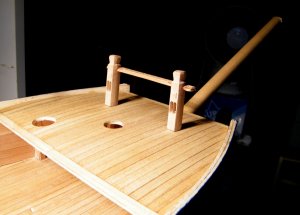
I used the skylight opening for access


105.jpg
This shows the first transom I stuffed up, I ended up cutting the middle of it out, drilled four holes for the leds which you can see lit,


106.jpg
close up of the quarter gallery led


107.jpg
another view


108.jpg
where the gallery will sit


109.jpg
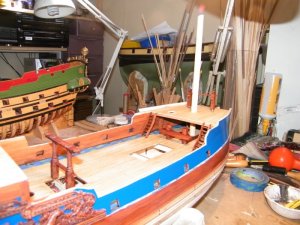
view of the general wiring


110.jpg
According to the instructions and pics you are supposed to go through the transom at the top with the wires from the
lanthorns and come out on the fore side of the transom, after peeling back some of the vertical planks, I decided to ca
some thin brass tubes to the rear of the transom I had stuffed up and the new transom I had made would go over the top
of the tubes after I had cut some grooves in the new transom, this means that when I make the top rail to go across
the transom I will have to make it a bit wider, I hope all this makes sense.


111.jpg
this is just set up to make sure every thing was working,

This has been a very Illuminating experience, I just could not resist.


.
 
Last edited:
114.jpg
The new transom in place with windows attached

115.jpg
wales cut out for quarter gallery


116.jpg
Approx where it will sit

117.jpg
upper carving after waxing


118.jpg
The polish I used for waxing.


119.jpg
after buffing.


120.jpg
transom view with everything attached


.


121.jpg
another view.
 
Last edited:
John

The carvings look superb.

You cannot beat those. This is getting better and better

Cheers
Geoff
 
At this point, is the quality of the carvings actually a problem?
I suspect the carvings should actually be painted - but seeing how good they look waxed, I wouldn't have wanted to paint them either!
 
Those carvings look superb! I am green of envy ;-) I might have left them in their natural colour but it is just me. Anyhow, that wax is something which I have to try.

Janos
 
Thanks guys for all the nice comments and the input,
One of the reasons that I used the Rosewood wax polish is that as I said earlier on in the build, I bought the lower level of pearwood, it is the same quality as the other pearwood it is just that there is a slight colour variation in the pieces whereas the other pearwood has been colour matched if you know what I mean, anyway I used the rosewood wax to try to bring the colour all the same or as near as,
thanks for all your input and advice,
I think I will leave the copper studs in the wales as it might cause too much damage to remove them,

best regards John.
 
This next set of pics shows how I cut out the side gallery windows, I saw a guy on a Russian site, I think it was Russian and he did it this way, so I thought I'd give it a go.

122.jpg
I drilled out the main bulk of the wood, these are solid Pearwood.


123.jpg
Then using a chisel and other sharp implements, including my tongue and sandinding sticks I cleaned up what was left.

124.jpg
Just about finished

126.jpg
Both sides carved out.
 
Last edited:
Just amazing John

Those are excellent carving and those extra bits and timber will make the ship.

Cheers
Geoff
 
John,
How permanent is this beeswax handling? Does it keep its shininess? What about dust sticking to it?
Janos
 
janos said:
John,
How permanent is this beeswax handling? Does it keep its shininess? What about dust sticking to it?
Janos


I'm not really sure Janos, this is the first time I have used it,

best regards John.
 
this is a little bit about the carvings,
127.jpg
This shows the piece of carving as it is in the kit, I have already trimmed the front of it to fit around the Cherub and have to trim the rear to fit to the window.


128.jpg
After cutting and trimming both ends


129.jpg
I'm going to have to cut a sliver of pearwood to fill the slight gap between the window and carving.
 
Last edited:
130.jpg
This is the construction of the fore bitts, there are six pieces
which glue together to make the three main timbers, you can just see the joint on the timber on
the right and also along the timber at the bottom of the screen, the holes I have drilled through the
timbers to take the dowells that will help reinforce them.

131.jpg
The bitts after construction with the supplied belaying pins in place, I might blacken the pins later on.


132.jpg
.another view


133.jpg
temporarily in place on the deck, I also drilled up through the main timbers and added a dowell in each for locating on the deck


134.jpg
Looking forward.


135.jpg
another view with the focsle sitting temporarily in place.


136.jpg
Oh I've forgot what these are called, bitts for the fore mast ???
the set on the left have been glued together, and the set on the right have to be glued together, the narrow timbers are for going under the bitt timbers and go down through the main deck, you could cut some wood the same size as the bitts, but when fixed in place you cannot see them.


137.jpg
the support timbers in place, they have to be cut down level with the deck. This is another area where you have too do a bit of detective work to figure out where things go, but with the help of the photos etc every thing was OK


139.jpg
after cutting down to size I attached them to the bitt timbers with dowells.


139.jpg
close up, these still have to be cleaned up and sanded and varnished yet.
 

Attachments

  • 138.jpg
    138.jpg
    92.6 KB · Views: 152
Last edited:
140.jpg
Even the anchors come as milled pear wood, six pieces to each four anchors, I was quite surprised how strong they were.


141.jpg
Brutal close up.


142.jpg
Next are the ladders, I think these are lovely. I cleaned out the mortices with a small milling bit in my dremel on low speed and the tenons were just a nice tight fit.


143.jpg
the two for the focsle deck.


144.jpg
And one stood up against the ships bulwark.


145.jpg
The Gallows, I drilled through down into them to take a dowell for joining them.


146.jpg
The knee that supports the focsle deck beam


147.jpg
The focsle deck temporarily in place.


148.jpg
This is just about where the ladder will go.


149.jpg
Looking down on the focsle deck.
 
Last edited:
John

I am amazed at the quality of the kit.

I am glad that a true craftsman is putting it together.

Cheers
Geoff
 
Thanks Geoff, you got me a little embarrassed, I'm no where near as good as some of you guys, but thanks for the compliments,

best regards John.
 
160.jpg
I was not sure about the insides of the bulwarks, whether to paint them red or varnish them,
This shows the template for the bulwarks, I have painted it red to see what it looks like, it can be removed as it is only the template,
I then decided to varnish them, thinking that if I did not like the varnish look I could still paint them red, the last six pics shows them varnished, what do you guys think, I'd like to know


162.jpg
So I masked off the bulwark areas.


163.jpg
Another view


164.jpg
These next six pics show the varnished bulwarks and the fittings.
All opinions appreciated.


165.jpg


169.jpg


164.jpg


165.jpg


172.jpg


173.jpg
 

Attachments

  • 170.jpg
    170.jpg
    109.7 KB · Views: 166
Last edited:
Back
Top