You are using an out of date browser. It may not display this or other websites correctly.
You should upgrade or use an alternative browser.
You should upgrade or use an alternative browser.
Nikitin San Bartolome 1584 A.D. (Kit #35)
- Thread starter Pathfinder65
- Start date
- Watchers 68
- Joined
- Aug 30, 2020
- Messages
- 640
- Points
- 308

Wow there is a lot going on in that frame, it looks like a real ship is taking shape, watching this build with interest how it all comes together.The building progress has reached a milestone. We are at the start of Chapter two in the instructions.
View attachment 342438
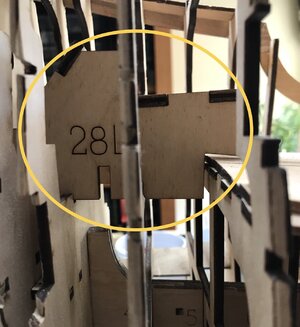
NOTE: The two pieces in the upper left corner marked 80L and 80R, I think should be 77L and 77R.
I had to move the hull to my adjustable workbench, sitting in my Office chair and working at desk level for any length of time proved to be to much. To give you a hint to the size of this build check out the tape measure at the bottom of the jig and the dimensions on the work mat. The width of my worktable is forty inches.
View attachment 342442
View attachment 342449
The start of planking the deck is next. I’m trying to decide wether to pre-stain the planks with locally available paints or wait and order Pavel’s and the follow his paint video.
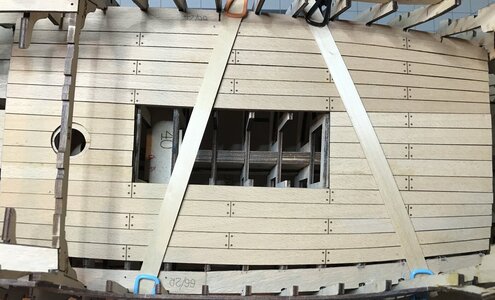
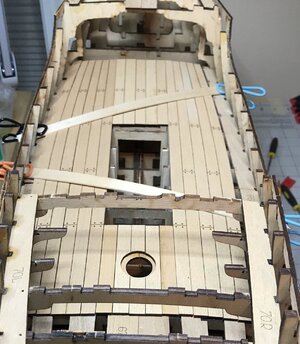
Good morning Jan. Personally….hmmm.A good day in the shipyard, three pieces more and the main deck is finshed. (The build crew shift was over and we all headed to the Sports Bar to watch our favorite NFL football team)View attachment 342842
View attachment 342843
I love the alignment of planks and tree nails. What do you guys think?
 .Nope Jan, they are perfect. Beautiful deck for sure. Can’t wait to see it stained/clou’ed/poly’ed. I hope your NFL team “gave you” a pint or two in celebration. Cheers Grant
I am pleased with the outcome. The last two pieces are a bit tricky. There will be a wee bit of sanding, filling and diddling to get them fit properly around the frames and still keep the tree nail alignment.I think it looks very good, Jan. You can be well pleased with that.
The STAIN, that’s going to be the question. I will be experimenting with that during the week. I have Oak and Walnut in various shades and want to see if I can duplicate Pavel’s method to get his Antique look.Good morning Jan. Personally….hmmm..Nope Jan, they are perfect. Beautiful deck for sure. Can’t wait to see it stained/clou’ed/poly’ed. I hope your NFL team “gave you” a pint or two in celebration. Cheers Grant
- Joined
- Sep 1, 2019
- Messages
- 76
- Points
- 113

I went with a middle of the road brown but it is a little dark for my taste so I will be doing 3 different shades. I found that a light amber color ( minwax #210b - golden oak ) really changes the wood to a golden brown similar to the base color as pavel's . Definitely do some testing, I believe the wood is beech but not positive on that.The STAIN, that’s going to be the question. I will be experimenting with that during the week. I have Oak and Walnut in various shades and want to see if I can duplicate Pavel’s method to get his Antique look.
Post #14 on page 1 of my log is golden oak golden oak stain on hull planks
Last edited:
Wow, a great day to be in the boatyard. The temperature outside is 32F/0C, it’s raining and the rain is leaving coatings of ice on every surface it touches. A good start for our season number four (Winter).
”It’s off to work we go” ( Caffeine high, three cups while catching up on SOS logs)
The Main deck planking has been completed. The final plank edge piece on the Starboard side fit exactly, the Port plank edge needed to have indentation filed at a couple of frames to get an exact fit.
I’m pleased to note that taping together and dry fitting the main deck planks worked out great.
I’m continuing that process with the Fore deck planking.
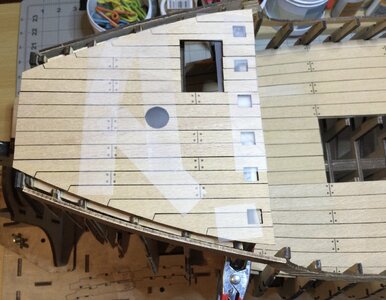
The edges of the planks at the bow need to trimmed, but overall this process allows me to see how things fit.
”It’s off to work we go”
The Main deck planking has been completed. The final plank edge piece on the Starboard side fit exactly, the Port plank edge needed to have indentation filed at a couple of frames to get an exact fit.
I’m pleased to note that taping together and dry fitting the main deck planks worked out great.
I’m continuing that process with the Fore deck planking.

The edges of the planks at the bow need to trimmed, but overall this process allows me to see how things fit.
I have no idea of the type of wood, but the quality is very good. I’ll probably use the same technique of taping together and dry fitting for the Poop deck planking.Good going Jan. I like the color of the deck planking and it looks like really good quality wood.
Yup, I did it. My Fault. I have admit to a slight Re-Do. Somehow I got this assembly backwards and a wee bit higher on the frame than it should be.
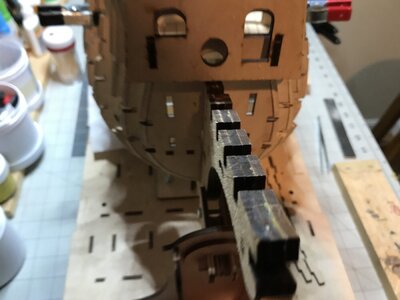
The door opening should be on the left, the bowsprit hole doesn't line up with the hole in the frame. Hot water, a brush and some patience and .....
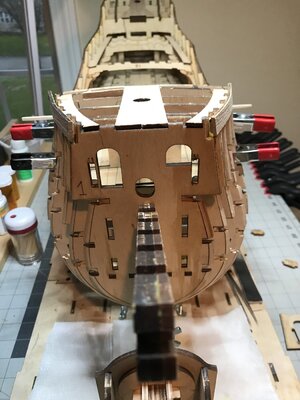
we are ready to correct my mistaken..
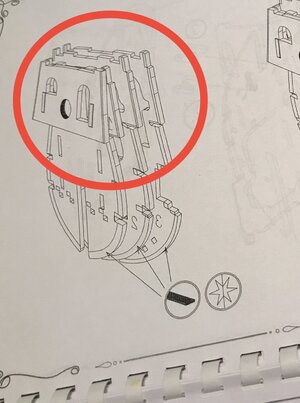
Glue it all back the right way once the parts have dried.
I noticed the problem while doing the prep work for laying the planks on the Fore deck. I was scratching my head as to why the first plank was laying at an angle across the frame tops especially at the bow when I noticed the height difference in the frame assembly. Then I noticed the Bowsprit holes weren't lined up, well the rest is now history. "My Bad"

The door opening should be on the left, the bowsprit hole doesn't line up with the hole in the frame. Hot water, a brush and some patience and .....

we are ready to correct my mistaken..

Glue it all back the right way once the parts have dried.
I noticed the problem while doing the prep work for laying the planks on the Fore deck. I was scratching my head as to why the first plank was laying at an angle across the frame tops especially at the bow when I noticed the height difference in the frame assembly. Then I noticed the Bowsprit holes weren't lined up, well the rest is now history. "My Bad"
The progress continues after the “Re-Do”.
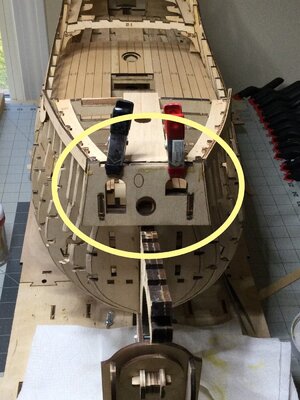
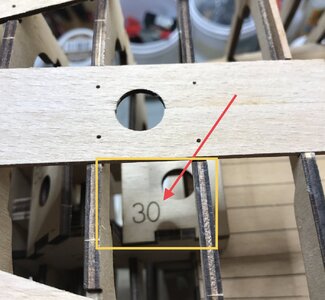
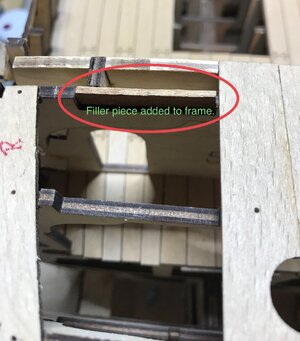
A little prep work was needed before laying the planking. A cross piece needed to be added to fill the gap in this frame.
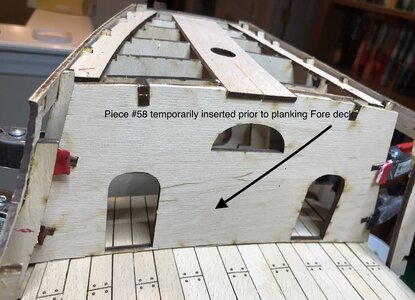
Part 58, the ”wall” needed to be temporarily clamped in place.
The first plank aligned with the mast opening glued and clamped.
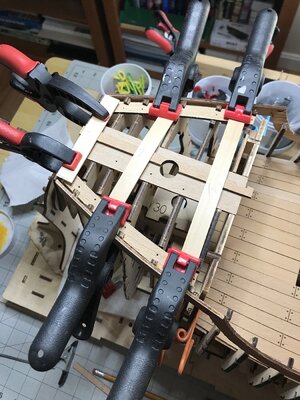
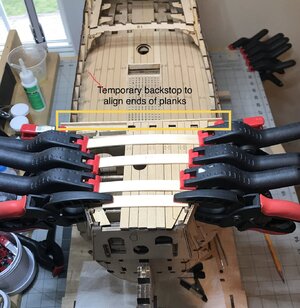
After gluing one more plank on the Port and Starboard side, a temporary backstop was clamped in place to help align the planks.
I think without the information provided by Pavel in his YouTube video, a novice builder like me would have a bit of trouble figuring all this out.
Pavel Nikitin Video #14
A little prep work was needed before laying the planking. A cross piece needed to be added to fill the gap in this frame.

Part 58, the ”wall” needed to be temporarily clamped in place.

The first plank aligned with the mast opening glued and clamped.

After gluing one more plank on the Port and Starboard side, a temporary backstop was clamped in place to help align the planks.

I think without the information provided by Pavel in his YouTube video, a novice builder like me would have a bit of trouble figuring all this out.
Pavel Nikitin Video #14
Looking good my friend!
Thank you Paul. I’m having a good time with this build.Looking good my friend!
- Joined
- Jan 9, 2020
- Messages
- 10,378
- Points
- 938

It certainly looks like you're having a great time - and your progress is great as well!Thank you Paul. I’m having a good time with this build.
Good morning Jan. Redo sorted. This does not look easy. So many supporting and foundational little parts to remember. Must be super fun tho. Looking very goodThe progress continues after the “Re-Do”.
A little prep work was needed before laying the planking. A cross piece needed to be added to fill the gap in this frame.
View attachment 343584
Part 58, the ”wall” needed to be temporarily clamped in place.
View attachment 343586
The first plank aligned with the mast opening glued and clamped.
View attachment 343587
After gluing one more plank on the Port and Starboard side, a temporary backstop was clamped in place to help align the planks.
View attachment 343588
I think without the information provided by Pavel in his YouTube video, a novice builder like me would have a bit of trouble figuring all this out.
Pavel Nikitin Video #14
 Cheers Grant
I think it's the sheer size of what I'm working with that's making this build so great. Pavel's videos of the various stages of the build are excellent. They're show a lot of little bits that Pavel does that aren't on the isometric instruction drawings. I pop up the appropriate video on my iMac and then find the parts that go with that stage of the build. I constantly refer back to the video as I work.It certainly looks like you're having a great time - and your progress is great as well!
Indeed I'm having a great time. Lot's classical oldies playing in the background, genuine high test Duncan Donuts coffee and lot's of odd parts to glue together.Good morning Jan. Redo sorted. This does not look easy. So many supporting and foundational little parts to remember. Must be super fun tho. Looking very goodCheers Grant
- Joined
- Apr 20, 2020
- Messages
- 5,201
- Points
- 738

The progress continues after the “Re-Do”.
A little prep work was needed before laying the planking. A cross piece needed to be added to fill the gap in this frame.
View attachment 343584
Part 58, the ”wall” needed to be temporarily clamped in place.
View attachment 343586
The first plank aligned with the mast opening glued and clamped.
View attachment 343587
After gluing one more plank on the Port and Starboard side, a temporary backstop was clamped in place to help align the planks.
View attachment 343588
I think without the information provided by Pavel in his YouTube video, a novice builder like me would have a bit of trouble figuring all this out.
Pavel Nikitin Video #14
Dear Jan
Wow, you are doing wonderful work there. it looks like a real ship is taking shape, watching this build with interest how it all comes together.


